background image

10

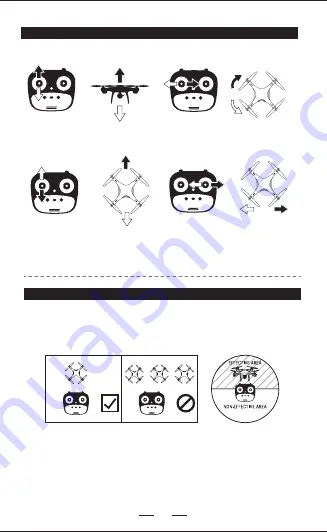
Please put the drone in a forward-facing position. After syncing, but 

before take-off, press the Headless Mode button on the remote control 

and to enter Head-less Mode. Press it once again to exit Headless Mode.   

HEADLESS MODE

OPERATING INSTRUCTIONS

Push the left lever (accelerator) up and

down, The drone will ascends and 

descends accordingly.

Ascend

Descend

Push the left lever (accelerator) leftward 

and rightward,the drone will turn left

and turn right accordingly.

Left turn

Right turn

Push the right lever (swerving rudder),

the drone will go forward and 

backward accordingly.

Fowards

Backwards

Push the right lever (swerving rudder)

leftward and rightward, the drone 

will go leftward and rightward accordingly.

Left 

sideward fly

Right 

sideward fly

Summary of Contents for PRO20-GPS

Page 1: ...Always fly your drone safely and legally Learn the rules and regulations in your airspace and always follow them PRO20 GPS GPS FPV CAMERA DRONE WITH GIMBAL AND PRECISE HOVERING...

Page 2: ...er any spectators and surrounding property 2 Keep it away from any moist environment The inside of the drone is composed of many precision electronic and mechanical parts Therefore please try to avoid...

Page 3: ...is drone under the influence of drugs or alcohol or in the case of fatigue as improper operation can cause serious injury and or property damage 4 KEEP AWAY from rotating parts once the drone is in mo...

Page 4: ...improper use or handling of the product RECHARGEABLE BATTERY Connect the drone battery to the charger Plug the charger into a power outlet and fully charge about 60 mins The remote also includes a re...

Page 5: ...ly 2 Avoid heating or prolonged exposure to the sun 3 Don t put the product in water It will damage electronic parts 4 Please check the plug and other accessories at regular intervals If there is any...

Page 6: ...joystick 3 Press for one button RETURN HOME press again to cancel Return Home 4 ON OFF 5 One button take off with auto hover one button landing Hold 3 secs for Emergency stop 6 USB charging port 7 Spe...

Page 7: ...provided 5 A battery when not in use for a long time will lose its charge automatically Charging or discharging too often may reduce the life of the battery DISCLAIMER You must use the original USB c...

Page 8: ...ront App Drone Status Compass calibration Step 5 GPS Compass Calibration Part 1 Keeping the drone level pick up the drone from the back and rotate your body in one full circle 360 Back lights will tur...

Page 9: ...n is confirmed please DO NOT operate the transmitter any more If it is not safe you can push the throttle lever to raise the flying height and control the steering direction of the Quadcopter so as to...

Page 10: ...of hovering in a secure space with no wind Please follow these instructions in order to trim your drone Hold 8 the trim button for 3 seconds into trim mode 21 indicador flashing 1 If the drone floats...

Page 11: ...celerator up and down The drone will ascends and descends accordingly Ascend Descend Push the left lever accelerator leftward and rightward the drone will turn left and turn right accordingly Left tur...

Page 12: ...PRO GPS APP in the mobile to access into the control interface QR code of RC PRO GPS APP for Apple IOS system Please scan this QR code to install this software QR code of RC PRO GPS APP for Android sy...

Page 13: ...Auto Land Take Photo Recording Take Video Back to Main Menu Controls ON OFF Flight Setting Drone Battery Flip Screen VR Split Screen Remote Battery Flight Record GPS Signal Indicator Media Gallery Sha...

Page 14: ...tely CAMERA CONFIGURATION When you press the power button on the remote control the red light will flash once that means the drone is taking photo When you press the video button the red light turns i...

Page 15: ...OLUTIONS Tripod Wrench X1 The drone shakes uncontrollably Drone does not hover accurately Drone does not achieve Ready to fly No Weak GPS reception 1 Wait a few minutes for GPS reception 2 Stay away f...

Reviews: