4
– English
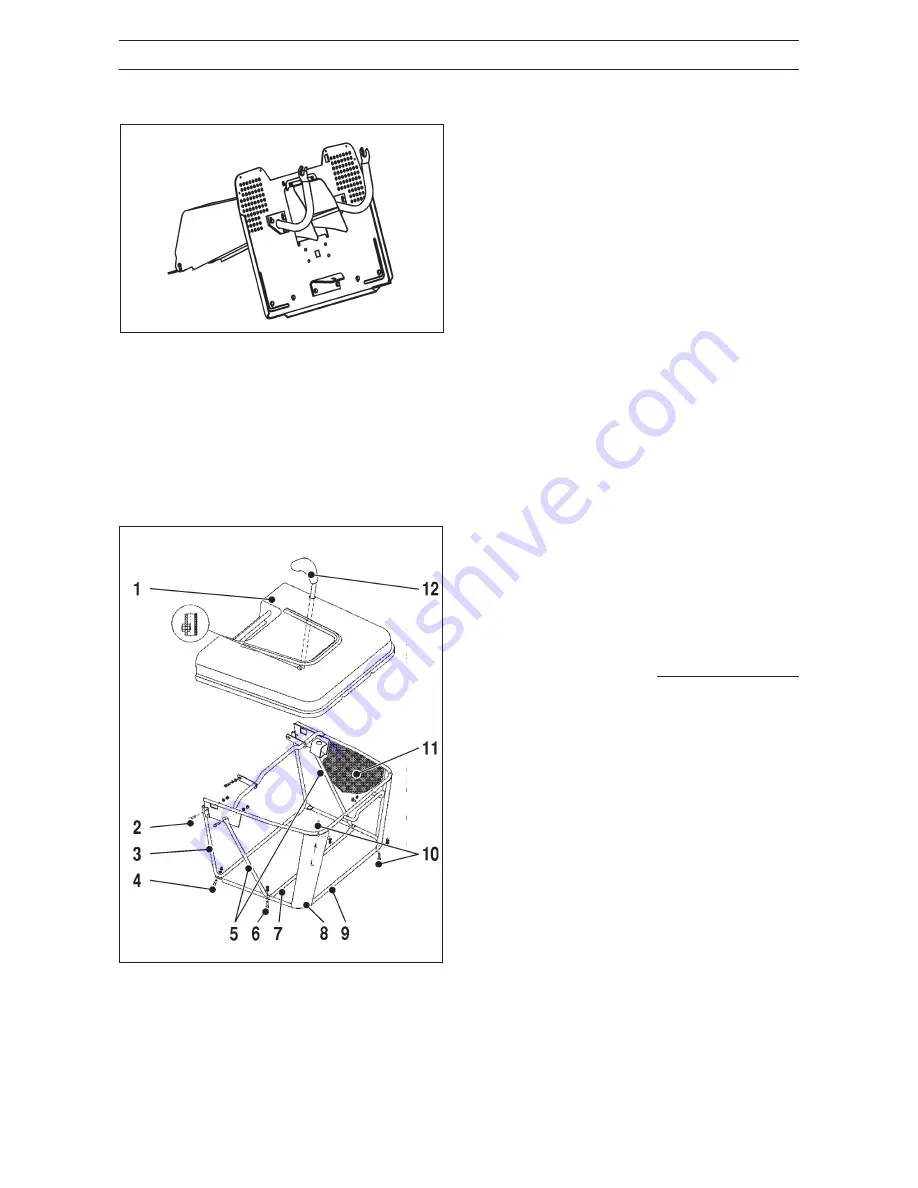
TRAILER HITCH (FIG. 4)
ASSEMBLY
The grass collector has been pre-assembled. However, to
assemble it correctly (to fit the collector cover with tractor
fenders). It is recommended to follow the instructions
below:
1.
Take the pre-assembled basket (item 1) out the box,
tilt the front tube (item 3), insert the upper bolts (item
2) and tighten loosely.
2.
Put the grass container, prepared in such a way, on the
basket supports on the rear part of the tractor and
adjust with the fenders. Tighten the bolts (item 2)
properly.
3.
Stretch the bag (item 3) with your hand and put it on
the rear handle, with the inlet hole of the basket
upwards. Insert the bottom tube (item 9) into the bag,
unscrew the nuts M5 of the bolts (item 10) under the
basket cover and insert the corner supports (item 8)
under the tubes at the top, screw on the nuts M5 on the
bolts (item 10) and (item 4) and tighten, loosely.
4.
Tilt the left and right supports (item 5). Put in place
the lower brace (item 7) from the outside of the grass
collector bag and secure them with screw (item 6)
loosely.
5.
Place the grass collector, hinge it on the tractor
supports and check the fit between the grass collector
cover and fenders. With a regard of the loose screws
you can adjust the fit between the cover and fenders.
6.
If it is not possible, with the help of the method above,
to accomplish the correct fit between the tube frame
and the tractor rear adjust, move the supports on the
tractor by moving them up or down.
7.
Remove the grass collector, tighten all screws securely
and fix the grass collector bag to the tube frame with
plastic clips.
8.
Slip the dumping lever (item 12) through the hole of
the collector cover and tube frame, secure it with
screws M5x 12 and nuts MS (the nuts are located
inside the tube).
NOTE: After assembling check all the screws and nuts for
tightening.
Fig. 5
GRASS COLLECTOR BAG (FIG. 5)
Fig. 4
Proceed to the following steps:
1. Remove two bolts from the grass collector
support plate on the rear side of the tractor.
2. Place trailer hitch in place.
3. Replace bolts, washers and nuts.
Tighten securely.
Summary of Contents for 180
Page 2: ...Svenska 31 ...
Page 28: ...26 English 2 z 1 ...


