background image

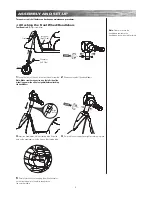
Align 
Holes

4

ASSEMBLY AND SET-UP

Front

Foot pedal

(Right Side)

Connector 

(Left Side)

Arrow

Turn power switch off before conducting any maintenance procedures.

 Attaching the Front Wheel/Handlebars

Tool Required:

 Phillips screwdriver

1

 Facing the front of the unit, insert front wheel assembly.

Note: Make sure the connector is on the left side of the 

wheel (opposite side of the foot pedal) before attaching 

the handlebars.

3

 Insert the handlebars into the steering tube. Align the 

hole on the handlebars with the hole on the steering tube.

Carefully turn unit over and plug the white connector 

on the front wheel into the white connector on 

the control module.


Remove nut and bolt from handlebars.

Re-insert the nut and bolt and tighten securely in place.

Note:

 Failure to secure the 

handlebars can cause the 

handlebars to come out while riding.

Summary of Contents for MINI MOD

Page 1: ...lustrations are for demonstration purposes only Illustrations may not reflect exact appearance of actual product Specifications subject to change without notice Please have your product along with the...

Page 2: ...n and are intended to move and it is therefore possible to get into dangerous situations and or lose control and or fall If such things occur you can be seriously injured or die LIKE ANY OTHER MOVING...

Page 3: ...afe conditions Never risk damaging surfaces such as carpet or flooring by use of the Mini Mod indoors PROPER RIDING ATTIRE Always ensure child is wearing proper protective equipment such as an approve...

Page 4: ...OR MAINTENANCE PROCEDURES Estimated Assembly and Set UpTime Razor recommends assembly by an adult or someone with experience in bicycle mechanics Allow up to 10 minutes for assembly not including ini...

Page 5: ...on the left side of the wheel opposite side of the foot pedal before attaching the handlebars 3 Insert the handlebars into the steering tube Align the hole on the handlebars with the hole on the stee...

Page 6: ...ttery life never store the product in freezing or below freezing temperatures Freezing will permanently damage the battery Run time Up to 40 minutes of continuous ride time Run time may vary depending...

Page 7: ...and 2 of this manual Safety Gear Always wear proper protective gear such as an approved safety helmet Elbow pads and kneepads are recommended Always wear closed toe shoes lace up with rubber soles an...

Page 8: ...een repaired or replaced Use ONLY with the recommended charger Cleaning Wipe with a damp cloth to remove dirt and dust Do not use industrial cleaners or solvents as they may damage the surfaces Do not...

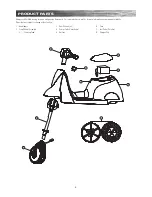
Page 9: ...our web site or e mail us for more information on spare part availability Specifications subject to change without notice 8 PRODUCT PARTS 1 Handlebars 2 Front Wheel Assembly 2 1 Steering Tube 3 Rear W...

Page 10: ...9...
Page 11: ...NCE YOUR INSURANCE POLICIES MAY NOT PROVIDE COVERAGE FOR ACCIDENTS INVOLVING THE USE OF THIS SCOOTER ELECTRIC RIDE ON PRODUCT TO DETERMINE IF COVERAGE IS PROVIDED YOU SHOULD CONTACT YOUR INSURANCE COM...

Page 12: ...or com Please have the product I D code located on the white label of your product available for better assistance Additional Customer Service contact information is listed below US_150507 FCC COMPLIA...

Reviews: