background image

Preliminary

A Raytech T-Base

A.1 T-Base Lite

T-Base Lite is intended for users preferring simplicity over complexity of the Pro version. It is 
limited to the basic functions of USB interface, data import from device, data export to filesystem, 
and automatic firmware updates. Data can be exported in many popular data formats such as 
excel, word, text, .csv, .xml, crystal reports, and .html. Measurements can be saved as archive files
as well and imported into the database of the T-Base Pro version. This software is as download 
available and completely free.

A.2 T-Base Pro

T-Base Pro is a powerful set of tools for data exchange, remote control, visual measurement data 
analysis, test automation and much more. It comes with a fully integrated database management 
system for storing measurement data as well as with a fully customizable reporting system which 
can generate test reports in the most widely used document formats. It uses an advanced add-on 
system which makes it suitable for integration with external systems. To extend according to your 
needs a rich API interface and MS Visual Studio templates are available.

More information on Raytech homepage.

90315-1.2 Instruction Manual CAPO

Page 98 of 117

Summary of Contents for CAPO 2.5

Page 1: ...INSTRUCTION MANUAL ENGLISH RAYTECH AG OBEREBENESTRASSE 11 CH 5620 BREMGARTEN SWITZERLAND CAPO 2 5 CAPO 12 CAPACITANCE AND POWER FACTOR METER ...

Page 2: ...14 3 2 Technical Specifications CAPO 12 15 3 3 Measurement Parameters CAPO 12 16 4 Introduction 18 4 1 General 18 4 2 Advantages Features 20 4 3 System Details 20 5 Quick Start Guide 21 5 1 Connection 21 5 2 Instrument operation 21 6 Power factor tan δ measurements 23 6 1 Definitions 23 6 1 1 Dissipation factor tan δ 24 6 1 2 Power Factor PF cos φ 25 6 2 Background 26 6 2 1 Imperfect dielectric 26...

Page 3: ...57 8 2 7 1 3 Clock 57 8 2 7 1 4 Cursor 57 8 2 7 1 5 Update 58 8 2 7 1 6 Language 58 8 2 7 1 7 Service 59 8 2 7 2 Operator 59 8 2 7 3 Oil Correction Table 60 8 2 7 4 Dissipation factor 61 8 2 7 5 Quality Assistant 61 8 2 7 6 Printer 62 8 2 7 7 Colour 62 8 3 Results and data structure 63 8 3 1 New 63 8 3 1 1 New test object 64 8 3 1 2 Load from Archive 64 8 3 1 3 New Measurement 65 8 3 2 Info 65 8 3...

Page 4: ...ase 95 A 1 T Base Lite 95 A 2 T Base Pro 95 B System Update 96 C Software Development Kit SDK 97 D Command Syntax 98 D 1 Raytech USB Serial Port Driver 98 D 2 Command Syntax 98 D 3 Answer codes 98 D 3 1 Synchronous Answers 98 D 3 2 Asynchronous Answer 99 D 3 3 Serial Interface 99 D 4 USB Interface 99 E USB Printer Info 100 E 1 Printer Requirements 100 E 2 Suggested Printers 100 F Service Mode 101 ...

Page 5: ... 1 Touch Panel does not work 109 H 2 USB Memory Stick does not work 109 I Warranty Conditions 110 I 1 Limitation of Warranty 110 I 2 Arbitration 111 J Contacts 112 K Index 113 90315 1 2 Instruction Manual CAPO Page 5 of 117 Page 5 of 117 ...

Page 6: ...All test personnel should fully familiarize themselves with the correct application and operation of this and all test equipment prior to operation Persons directly and indirectly engaged in the operation of this test equipment should keep clear of all high voltage apparatus while conducting tests and measurements 1 2 Ground the Instrument To minimize shock hazard the Ground Terminal on the instru...

Page 7: ...t specimen or the instrumental side unless the CAPO is in safe mode The CAPO and the object to which it is connected are possible sources of high voltage electrical energy and all persons making or assisting in tests must use all practical safety precautions to prevent contact with energized parts of the test set and related circuits Persons actually engaged in the test must stand clear of all par...

Page 8: ...ollowed 1 4 Measuring cable management and connection The HV Cable and the 2 measurement cables A and B are shielded On the one hand because of the safety and on the other because of the measuring accuracy Take care that no jacket of the cable touches the high voltage parts because of partial discharge or flashover 1 5 Before applying power Read this manual carefully before operating the system Th...

Page 9: ...es or fumes 1 8 Do not substitute parts or modify Instrument Because of the danger of introducing additional hazards do not install substitute parts or perform any unauthorized modification to the instrument Return the instrument to a Raytech service department for service to ensure proper operation and that safety features are maintained Instruments which appear damaged or defective should be mad...

Page 10: ...ment Cables 2 x 10m Cable bag Safety GND Cable 1 x 10m HV GND Cable 1 x 10m Safety Switch 1 2m Instruction Manual USB Stick If any of the above items are missing or damaged contact your local representative or Raytech Switzerland immediately Optional test leads may be ordered other than shown 90315 1 2 Instruction Manual CAPO Page 10 of 117 ...

Page 11: ...mory Storage CAPO 2 5 L 521 mm 20 5 W 432 mm 17 H 216 mm 8 5 22 2 kg 48 9 lbs 85 264 VAC 250 W max 47 63 Hz automatic ranging Li Ion battery pack up to 2500V AC 10Hz 400Hz up to 200mA 500VA Color LCD with back lighting and touch screen Sealed anodized 2 x USB 2 0 1 host 1 device and 9 Pin RS232 serial Stores up to 10000 complete test results Operating Temperature Storage Temperature 10 C to 60 C 2...

Page 12: ... 1x10 4 0 5 Rdg Power Factor cos φ 0 0 1 0 1 1 1x10 5 1x10 4 0 5 Rdg 1x10 4 0 5 Rdg 1x10 4 Capacitance Cmax I max U 2 π f 50Hz 0 00pF 254nF 2 5kV 0 00pF 1 3µF 500V 60Hz 0 00pF 212nF 2 5kV 0 00pF 1 1µF 500V 0 01pF or 5 Digits 0 3 Rdg 0 3pF1 Test Voltage up to 2 500Vrms 45 400Hz f 45Hz 1V 0 5 Rdg 1V Test Current up to 200mArms 0 1µA or 4 Digits 0 3 Rdg 1µA Output Power 0 500VA Output Frequency 10Hz ...

Page 13: ...U I 2 π f 50Hz 40H 100 000H 2 5kV 8H 100 000H 500V 60Hz 33H 70 000H 2 5kV 6 6H 70 000H 500V 0 1mH or 4 Digits 0 3 Rdg 1 For more information see chapter 6 2 4 Conversion capacitances to inductances on page 32 90315 1 2 Instruction Manual CAPO Page 13 of 117 ...

Page 14: ...urement Cables 2 x 10m Cable bag Safety GND Cable 1 x 10m HV GND Cable 1 x 10m Safety Switch 1 2m Instruction Manual USB Stick If any of the above items are missing or damaged contact your local representative or Raytech Switzerland immediately Optional test leads may be ordered other than shown 90315 1 2 Instruction Manual CAPO Page 14 of 117 ...

Page 15: ... Memory Storage CAPO 12 L 627 mm 24 7 W 475 mm 18 7 H 292 mm 11 5 36 9 kg 81 lbs 85 264 VAC 47 63 Hz automatic ranging up to 12000V AC 10Hz 400Hz up to 200mA 0 2 400VA 400W Color 5 7 LCD with back lighting and touch screen Sealed anodized 2 x USB 2 0 1 host 1 device and 9 Pin RS232 serial Stores up to 10000 complete test results Operating Temperature Storage Temperature 10 C to 60 C 20 C to 70 C 1...

Page 16: ...tor cos φ 0 0 1 0 1 1 1x10 5 1x10 4 0 5 Rdg 1x10 4 0 5 Rdg 1x10 4 Capacitance C max I max U 2 π f 50Hz 0 00pF 53nF 12kV 0 00pF 254nF 2 5kV 0 00pF 1 3µF 500V 60Hz 0 00pF 44nF 12kV 0 00pF 212nF 2 5kV 0 00pF 1 1µF 500V 0 01pF or 5 Digits 0 3 Rdg 0 3pF1 Test Voltage up to 12 000Vrms 45 400Hz f 45Hz 1V 2900V 10V 2900V 0 5 Rdg 1V Test Current up to 200mArms 0 1µA or 4 Digits 0 3 Rdg 1µA Output Power 0 2...

Page 17: ... 12kV 40H 100 000H 2 5kV 8H 100 000H 500V 60Hz 159H 70 000H 12kV 33H 70 000H 2 5kV 6 6H 70 000H 500V 0 1mH or 4 Digits 0 3 Rdg 1 500V 2 Max 400W 3 For more information see chapter 6 2 4 Conversion capacitances to inductances on page 32 90315 1 2 Instruction Manual CAPO Page 17 of 117 ...

Page 18: ...on screen which allows quick selection of the voltage frequency and measurement mode Both systems incorporate a touchscreen which allows the user easy access to change or activate a feature Impressive Accuracy The instruments have a high precision fully automatic multi microprocessor based architecture The systems are designed for highly accurate readings on site with laboratory precision Built in...

Page 19: ...ecking sequence If any problems are detected during this initialization period or during operation the operator is immediately notified The system constantly monitors the condition when turned on This is one of the many reasons we can extend our warranty to 2 years 90315 1 2 Instruction Manual CAPO Page 19 of 117 ...

Page 20: ...Interface Color LCD with backlighting and touch screen Panel mounted Emergency Stop Switch Mounted in rugged case for field testing 2 Years standard warranty High voltage excitation current features Multiple frequency measurements Reactance and quality factor reading 4 3 System Details System Check The system is designed to be used with AC Voltage power sources between 85 to 264VAC 47 to 63Hz The ...

Page 21: ...nd the measurement cable to the test object Finally connect the Safety Switch to the Instrument 5 2 Instrument operation 1 Power on the instrument1 2 Select voltage and frequency 1 The battery symbol on the top of the screen is only available in the CAPO 2 5 90315 1 2 Instruction Manual CAPO Page 21 of 117 WARNING WARNING Hazardous voltage may result in severe injury or death ...

Page 22: ...Press the Safety Switch and select Single or Cont Continuous to start 4 Get the results you want by selecting the measurement mode also possible during the measurement 90315 1 2 Instruction Manual CAPO Page 22 of 117 ...

Page 23: ...to the absolute value of the reactive power This corresponds to tan δ The picture below shows the definition of dielectric variables tan δ dissipation factor and cos φ insulation power factor in an equivalent parallel circuit Example Equivalent parallel circuit 1 According to IEEE Std C57 152 2013 90315 1 2 Instruction Manual CAPO Page 23 of 117 ...

Page 24: ...tangent of loss angle δ tan δ P Q tan δ P Q IRX ICX sin δ 1 sin2 δ cosφ 1 cos2 φ tan arcsin cosφ where P Real Power W Q Reactive Power VAR IRX current through resistance A ICX current through capacitance A 90315 1 2 Instruction Manual CAPO Page 24 of 117 ...

Page 25: ...ne of the loss angle δ PF cosφ P S cosφ P S P P 2 Q 2 IRX I sin δ IRX IRX 2 ICX 2 tan δ 1 tan2 δ sin arctan tan δ where P Real Power W S Apparent Power VA I total current A IRX current through resistance A ICX current through capacitance A 90315 1 2 Instruction Manual CAPO Page 25 of 117 ...

Page 26: ...ctric The properties of true dielectric insulations are often simplified and expressed as imperfect dielectrics An imperfect dielectric is a dielectric where the energy necessary to create an electric field is not returned to the electric field when the energy is removed The energy is converted into heat in the dielectric Conversely a perfect dielectric has zero conductivity and there are no absor...

Page 27: ... of the insulation while the capacitor represents the geometric and physical properties such as the dielectric constant The figure below displays the two common methods of representing the imperfect dielectric where Cs serial Capacitance F Cp parallel Capacitance F Rs serial Resistance Ω Rp parallel Resistance Ω Z Impedance complex Ω ω angular frequency s 1 ω 2 π f 90315 1 2 Instruction Manual CAP...

Page 28: ...oth can be used in discussing and defining PF the parallel circuit is the most common In both cases the resistance represents the presence of moisture contaminants lossy partial discharge PD activity and inherent polar materials Have a look in the attachment F 5 Show Series Values on page 106 if you would like to see the series values 90315 1 2 Instruction Manual CAPO Page 28 of 117 INFO INFO The ...

Page 29: ...Xs serial reactance Ω Rp parallel Resistance Ω Xp parallel reactance Ω Z Impedance Ω ω angular frequency s 1 ω 2 π f 90315 1 2 Instruction Manual CAPO Page 29 of 117 Cs Cp 1 tan 2 δ Cp Cs 1 tan2 δ Cs Rp 2 ω 2 Cp 2 1 Rp2 ω2 Cp Cp 1 tan 2 δ Cp Rp Rs Rs Rp2 ω2 Cs 1 tan2 δ Rs Z 2 Rp Rp Xp 2 Rp2 Xp2 Rp Rp2 ω2 Cp2 1 Rp tan 2 δ 1 tan2 δ tanδ ω Cs Rp Z2 Rs Xp 2 Xs Xp Xs 1 ω Cp tanδ Rs 1 tan 2 δ tan 2 δ Rp...

Page 30: ...r frequency s 1 ω 2 π f Cp parallel Capacitance F Xs serial reactance Ω Rs serial Resistance Ω Xp parallel reactance Ω Rp parallel Resistance Ω 90315 1 2 Instruction Manual CAPO Page 30 of 117 Xs Rp2 Xp Rp2 Xp2 Xs Rp2 ω Cp 1 Rp2 ω2 Cp2 Xp Rp2 Rs Rp Rs ...

Page 31: ... following simplifications For tan δ 3 the difference between PF and tan δ is smaller than 0 1 where Cs serial Capacitance F Cp parallel Capacitance F Z Impedance Ω Xs serial reactance Ω Xp parallel reactance Ω Rs serial Resistance Ω Rp parallel Resistance Ω 90315 1 2 Instruction Manual CAPO Page 31 of 117 Z Xs Xp Cs Cp Rs Xs tanδ Rp Xp tan δ Error 1 tan2 δ ...

Page 32: ...Quality factor2 where L Inductances H C Capacitance F R Resistance ω angular frequency s 1 ω 2 π f Q Quality factor tan δC Dissipation factor 1 It is necessary to distinguish between serial and parallel Lp Ls and Cp Cs 2 The quality factor or Q of an inductor is the ratio of its inductive reactance to its resistance at a given frequency 90315 1 2 Instruction Manual CAPO Page 32 of 117 Z 1 jωCs Rs ...

Page 33: ... the Main Switch to switch the CAPO on off 2 Main Switch Press to power the CAPO on off 3 Emergency Stop Press to stop The measurement will stop and immediately switch off the high voltage Turn clockwise to release The device will remain in a safe mode state 90315 1 2 Instruction Manual CAPO Page 33 of 117 ...

Page 34: ...roper earth The FIRST cable you have to connect and lead to earth ground is always the Safety GND This is also the LAST cable to disconnect Any interruption of the grounding connection can create an electric shock hazard 8 Measurement Input B Connect the red measurement cable to this input 9 Measurement Input A Connect the blue measurement cable to this input 10 HV GND This is also a measurement I...

Page 35: ... Safety on page 94 13 Temperature receptacle This receptacle is for an external temperature probe Optional Accessory TP01 14 USB Interface 1 x USB Host 1 x USB Device See chapter 11 1 2 USB on page 93 for details 15 RS Interface RS232 See chapter 11 1 1 RS 323 on page 93 for details 7 2 CAPO 12 90315 1 2 Instruction Manual CAPO Page 35 of 117 ...

Page 36: ...ng Fuse T 10A protects the device Use only the correct fuse type to replace it 3 Safety GND Connect a proper earth The FIRST cable you have to connect and lead to earth ground is always the Safety GND This is also the LAST cable to disconnect Any interruption of the grounding connection can create an electric shock hazard 90315 1 2 Instruction Manual CAPO Page 36 of 117 ...

Page 37: ...Preliminary 4 Thermal Printer 90315 1 2 Instruction Manual CAPO Page 37 of 117 ...

Page 38: ...put 8 Measurement Input A Connect the bluered measurement cable to this input 9 HV GND This is also a measurement Input Connect the green yellow cable to this input 10 Guard V Everything connected to this potential is not taken into account for the measurement It is the same potential as the shield of the measurement cables 11 HV Output1 This is the receptacle for the high voltage Connect the oran...

Page 39: ...he measurement will stop and immediately switch off the high voltage Turn clockwise to release The device will remain in a safe mode state 14 USB Interface 1 x USB Host 1 x USB Device See chapter 11 1 2 USB on page 93 for details 15 RS Interface RS232 See chapter 11 1 1 RS 323 on page 93 for details 90315 1 2 Instruction Manual CAPO Page 39 of 117 ...

Page 40: ... few key strokes and selections on the test screen measurements can be started See chapter Fehler Verweis nicht gefunden Fehler Verweis nicht gefunden on page Fehler Verweis nicht gefunden 8 1 Menu Structure CAPO 12 menu is structured as shown in the figure below 90315 1 2 Instruction Manual CAPO Page 40 of 117 ...

Page 41: ...he measurement result 100 Hz Select the measurement test frequency 2000 V Select the measurement voltage Cxp Shows the measurement result You can tap on it to change from capacitance Farad to Inductance Henry PF tanδ 1 Shows the measurement result You can tap on it to change from PF Power Factor tan δ2 to Rp Serial Resistance If you have selected inductance in the upper field you will see here Q Q...

Page 42: ...ll change to P10k Then it shows the Power W 10kV This is the calculated power you would have when you have 10kV over this test object ϑm If you connect a temperature probe TP01 you will see the measured temperature If the receptacle Temp is open you can click on ϑm and enter the temperature manually Single Multi1 Single Starts a single measurement Multi Starts measurements with multiple parameters...

Page 43: ...t the results or the actual transformer template Archive Opens the menu with the stored results and transformer templates on the instrument and the USB key if you have one connected Setup Opens the Setup menu 90315 1 2 Instruction Manual CAPO Page 43 of 117 ...

Page 44: ...afety Switch Safety Switch is open Safety Switch is pressed 8 2 1 2 Earth connection Below the symbol for the Safety Switch there is the symbol for the earth connection If the symbol is crossed the earth connection is open Earth connection is OK 90315 1 2 Instruction Manual CAPO Page 44 of 117 ...

Page 45: ...lect the tab Name Plate Info in the bottom of the screen The Name Plate with Information 8 2 1 4 Time The actual Time is visible in the main screen to the upper right corner The time and the date is adjustable in the Setup under Clock Have a look on chapter 8 2 7 1 3 Clock on page 59 90315 1 2 Instruction Manual CAPO Page 45 of 117 ...

Page 46: ...y symbol indicates the level of the battery and if the mains are connected or not It is only available in the CAPO 2 5 Mains operation and charging A plug symbol is in the Battery Battery operation 90315 1 2 Instruction Manual CAPO Page 46 of 117 ...

Page 47: ...easurement Mode is visible on the main screen If you need to change it tap on it and a new window will open For more information about the measurement modes see chapter 9 Measurement Modes on page 72 90315 1 2 Instruction Manual CAPO Page 47 of 117 ...

Page 48: ...ual text of the caption is visible on the main screen If you need to change it tap on it and a new window will open Select a text from the list and press the button Or click on the text field to change the actual text or enter a new one 90315 1 2 Instruction Manual CAPO Page 48 of 117 ...

Page 49: ...a new window will open This is also possible during a measurement Select the frequency you want The four buttons on the right can be set by the user just select the ü User Set and you can change them by pressing the button On the second tab User you can increase or decrease the actual frequency 90315 1 2 Instruction Manual CAPO Page 49 of 117 ...

Page 50: ...urement However CAPO will calculate the result based on the selected frequency Please note that continuous measurement is not possible in this method Under the Tab Sweep it would be possible to store different lists of frequencies The CAPO will start with the first frequency of the selected list After a proper measurement result it will automatically change to the next frequency and perform the me...

Page 51: ...e1 The actual selected measurement voltage is visible on the button If you would like to change it tap on it and a new window will open This is also possible during a measurement 1 Maximum voltage of CAPO 2 5 is 2 500V CAPO 12 has a maximum voltage of 12 000V 90315 1 2 Instruction Manual CAPO Page 51 of 117 ...

Page 52: ... buttons on the right can be set by the user just select the ü User Set and press on the button you want to change On the second tab User there is the option to increase or decrease the actual voltage 90315 1 2 Instruction Manual CAPO Page 52 of 117 ...

Page 53: ...dd or Remove a voltage of the list use the button or 8 2 6 Start a measurement Before performing any test with this instrument read this user manual and observe all safety precautions indicated There are different measurement modes Single Continuous Multi 90315 1 2 Instruction Manual CAPO Page 53 of 117 WARNING WARNING Hazardous voltage may result in severe injury or death NOTE NOTE The FIRST cabl...

Page 54: ...esult or directly Print it on paper 8 2 6 2 Multi measurement Instead of Single the button can be labeled with Multi This are multiple Single measurements Mulit is visible if frequency or voltage Sweep is selected or the measurement Mode Xfrmr or Multi There is more information in the following chapter 8 2 4 Measurement frequency on page 49 8 2 5 Measurement voltage on page 51 9 5 Xfrmr on page 81...

Page 55: ...ment you can change the measurement channel e g from UST A to GSTg B You also don t have to stop the measurement if you want to change the frequency or the voltage During all measurement there is a bar on the right side of the screen It indicates the total current which is actually flowing The black line means 150mA 90315 1 2 Instruction Manual CAPO Page 55 of 117 ...

Page 56: ...ve the same numbers Inductive loads If the test object is inductive the instrument shows automatically Lxp instead of Cxp and instead of the dissipation factor tan δ PF it shows the quality factor Q The quality factor Q of an inductor is the ratio of its inductive reactance to its resistance at a given frequency 1 Depending on your default setting in the Setup 90315 1 2 Instruction Manual CAPO Pag...

Page 57: ...ed with the symbol taps on top of the screen The content of this five parts is described in the following chapters 1 With the Service Code 1200 it is possible to add a sixth part Have a look in the attachment F 6 Oil Correction Table on page 107 Symbol Taps Menu Conent G e n e r a l O p e r a t o r D i s s i p a t i o n F a c t o r P r i n t e r C o l o u r s 90315 1 2 Instruction Manual CAPO Page...

Page 58: ...se number If your license state changes you may be asked to enter a new license This menu displays the actual license state By touching the Enter new License Key button you can do so To modify or extend the license enter a new license code 90315 1 2 Instruction Manual CAPO Page 58 of 117 NOTE NOTE The license code is generated by Raytech AG ...

Page 59: ...nt will contain a time stamp 8 2 7 1 4 Cursor Lower versions than 0 8 8 of the Firmware had an option to activate a cursor of a USB mouse This option is no longer needed in newer firmware It will automatically recognize it if you connect a USB Mouse or a Track ball and a mouse cursor will be visible during the motion of the mouse The instrument can then be fully controlled by the mouse 90315 1 2 I...

Page 60: ...p it Connect the USB key to the instrument and press Install The system will detect and automatically install the new firmware and restart the system 8 2 7 1 6 Language The CAPO firmware supports different languages Use this menu to choose your favourite language from a list of available languages Restart the instrument to activate the desired language selected 90315 1 2 Instruction Manual CAPO Pa...

Page 61: ... 8 2 7 2 Operator Every measurement can be stored with the name of the actual operator In this menu new operators can enter their first and last name Existing entries can be changed Touch an operators name and then touch OK to make your choice Note the ü Ask for Operator at Power up when checked you will be asked if the chosen operators name is yours during the start up of the instrument This may ...

Page 62: ...of the temperature Normally this feature is disabled But if you need it read chapter F 6 Oil Correction Table in the appendix on page 107 To enter a Service Code check chapter F in the appendix Service Mode on page 104 1 This is only available if you entered the Service Code 1200 90315 1 2 Instruction Manual CAPO Page 62 of 117 NOTE NOTE To access this feature you must enter the service code 1200 ...

Page 63: ...r cos ᵠ The one you selected will be on the print out and on the measurement display 8 2 7 5 Quality Assistant If the Quality Assistant is enabled a light in the main screen indicates the quality of the test result If the light is green the measured result is stable 90315 1 2 Instruction Manual CAPO Page 63 of 117 ...

Page 64: ...ake sure everything works properly For more Information see Appendix E USB Printer Info on page 103 Auto Print Results If you select it the CAPO will automatically print the result after a finished Single measurement 8 2 7 7 Colour Two recommended colour schemes are available Indoor and in moderate sunlight you may prefer the coloured scheme In bright sunlight black and white provides maximal cont...

Page 65: ... to external USB keys or direct to a computer Create a test object for an easy organization of all measurement results Under a test object it is possible to store multiple measurements To work with the test object and organize the results there are three buttons on the main screen 8 3 1 New A new window will open after pressing the button New 90315 1 2 Instruction Manual CAPO Page 65 of 117 ...

Page 66: ...open with a keyboard1 8 3 1 2 Load from Archive If the test object was created and stored to memory from an earlier measurement select Load from Archive Now you can load an existing test object from the memory on the instrument or from a USB key if a USB key is connected 1 It s also possible to connect an external USB Keyboard or Mouse to control the CAPO 90315 1 2 Instruction Manual CAPO Page 66 ...

Page 67: ...ults and you see an overview about the measurements in this test object Use the buttons on the bottom of the display to work with the measurements For more information have a look in the next chapter 8 3 3 1 Info on page 68 8 3 3 Archive Here you see all the test objects in the internal memory and on the connected USB key The actual test object is blue If you select a different one it is highlight...

Page 68: ... its measurements In the Results tab you get an overview of your measurements If you would like to see the actual measurement results press the Result button on the bottom of the display Select Details to show the results in the selected measurements 90315 1 2 Instruction Manual CAPO Page 68 of 117 ...

Page 69: ...Preliminary Select one to e g delete or print it Press Esc to go back to the previous view 90315 1 2 Instruction Manual CAPO Page 69 of 117 ...

Page 70: ...ade with a sweep function it is possible to show the results in a diagram Select Diagram to show it Change with the Tab between values of the PF or Cx With the Print function you can print out or save the diagram 90315 1 2 Instruction Manual CAPO Page 70 of 117 ...

Page 71: ...s also possible that all the measurements can be exported onto a USB key in a pdf or csv file The csv file can be opened for example with Microsoft Excel or LibreOffice Calc The file is named with CAPO the serial number of the instrument the test object and the date and time You can locate the file in the directory Raytech EXPORT on the USB Key To select the CSV Separator see chapter F 3 CSV Separ...

Page 72: ...ential which is the low voltage point reference of the high voltage supply All currents that flow directly to this point will not be measured 1 According to ANSI IEEE Standard 62 IEEE Std C57 152 2013 90315 1 2 Instruction Manual CAPO Page 72 of 117 Measurement Inputs Mode A B HVGND UST A measured guarded guarded UST B guarded measured guarded UST A B measured measured guarded GST A B measured mea...

Page 73: ...d tightened on bushing surface near the tank not touching and connected to guard leakage current of bushing guarded will not measure The shields of the measurement cables are also connected to this V potential Do not use unshielded measurement cables By selecting the different test modes all combinations of measurements according the ANSI IEEE Standard 62 can be measured without any rewiring 1 The...

Page 74: ...n example for transformers a lot of different objects such as CTs PTs switch gear insulators capacitors bushings motors or generators can be measured In the example below you measure the capacitance and dissipation factor between high voltage winding HV and low voltage winding LV C CHL Measurement of capacitance between high voltage winding HV and low voltage winding LV insulated from ground In th...

Page 75: ...UST A Ungrounded specimen test channel A capacitance measured CA CB and CG guarded 9 2 2 UST B Ungrounded specimen test channel B capacitance measured CB CA and CG guarded 90315 1 2 Instruction Manual CAPO Page 75 of 117 ...

Page 76: ...Preliminary 9 2 3 UST A B Ungrounded specimen test channel A B capacitance measured CA CB CG guarded 90315 1 2 Instruction Manual CAPO Page 76 of 117 ...

Page 77: ...ration is illustrated bellow In the example above you measure the Capacitance and dissipation factor between HV and LV CHL HV and tertiary TV CHT and HV and tank CHG The total measured capacitance represents the sum of the three capacitances 9 3 1 GST A B Grounded specimen test channel A B capacitance measured CA CB CG 90315 1 2 Instruction Manual CAPO Page 77 of 117 GST A B ...

Page 78: ... enables smaller sections of insulation to be tested individually Only the ground currents are measured using a GST Guard configuration Current flowing to terminals with the guard connection is not measured This configuration is illustrated bellow 90315 1 2 Instruction Manual CAPO Page 78 of 117 GSTg A B ...

Page 79: ... A Grounded specimen test with guarded A connected to V capacitance measured CB CG 9 4 2 GSTg B Grounded specimen test with guarded B connected to V capacitance measured CA CG 90315 1 2 Instruction Manual CAPO Page 79 of 117 ...

Page 80: ...Preliminary 9 4 3 GSTg A B Grounded specimen test with guarded A and B connected to V capacitance measured CG 90315 1 2 Instruction Manual CAPO Page 80 of 117 ...

Page 81: ...ent Input A to the shorten low voltage terminals of the transformer If you start the measurement it will do the following 3 measurements GSTg B CH CHL GSTg A B CH UST A CHL 9 5 2 HL LV Connect the high voltage from the CAPO to the shorten low voltage terminals of the transformer Connect the measurement Input A to the shorten high voltage terminals of the transformer If you start the measurement it...

Page 82: ...rement it will do the following 3 measurements GSTg B CH CHL GSTg A B CH UST A CHL 9 5 4 HLT LV Connect the high voltage from the CAPO to the shorten low voltage terminals of the transformer Connect the measurement Input A to the shorten high voltage terminals of the transformer Connect the measurement Input B to the shorten tertiary voltage terminals of the transformer If you start the measuremen...

Page 83: ...nnect the measurement Input A to the shorten high voltage terminals of the transformer Connect the measurement Input B to the shorten low voltage terminals of the transformer If you start the measurement it will do the following 3 measurements GSTg B CT CHT GSTg A B CT UST A CHT 90315 1 2 Instruction Manual CAPO Page 83 of 117 ...

Page 84: ...ti This Test Mode is useful to generate lists with measurement modes The CAPO will do all the measurement according to the selected list Use or to change the selected list 90315 1 2 Instruction Manual CAPO Page 84 of 117 ...

Page 85: ...of excitation current test results is based largely on pattern recognition Both current magnitude and loss depend on the transformer design and are unique for each unit The results can also be used in comparison with previous data from tests performed at the same test voltage For the great majority of three phase transformers the pattern is two similar high readings on the outer phases and one low...

Page 86: ...c circuit of a transformer Although some residual magnetism is almost always present in the core in most cases it has no significant effect on test results If residual magnetism exists then it is recommended that the core be demagnetized before performing the test Often residual magnetism is introduced as a result of a dc winding resistance test It is recommended to perform excitation current test...

Page 87: ...y wound with interleaved lined paper layers Resin bonded Resin impregnated paper insulation with interspersed conducting condenser layers Non condenser type Solid core or alternate layers of solid and liquid insulation Solid mass of homogeneous insulating material e g solid porcelain Gas filled Condenser type bushing includes a series of concentric capacitors from centre conductor to ground Some t...

Page 88: ...lange including C2 Hot collar test to measure insulation losses of a small section of the bushing If the bushing under test is installed on a transformer in order to reduce the influence of winding s inductance on measurements all terminals of each voltage level of the transformer should be shorted together and those transformer sides which not energized should also be grounded for the safety In o...

Page 89: ...all insulations between centre conductor and ground would be included in measurement values This method can be used for all various type of bushings including condenser types with or without tap electrode and also non condenser types For this test the GSTg A B mode should be selected 90315 1 2 Instruction Manual CAPO Page 89 of 117 NOTE NOTE The bushing overall test is useful if the bushing under ...

Page 90: ...or main insulation test of a bushing In this method the insulation between centre conductor and tap electrode which includes C1 can be measured This method can be used only for bushings with tap electrode For this test the UST A mode should be selected 90315 1 2 Instruction Manual CAPO Page 90 of 117 ...

Page 91: ...pes bushings with tap electrode For this test the GSTg A B mode should be selected Please note that the test voltage must not exceeds the permissible level which defined by bushing manufacturer If the permissible maximum test voltage is not clear do not adjust the output voltage more than 500 V 90315 1 2 Instruction Manual CAPO Page 91 of 117 WARNING WARNING In bushing tap insulation test the test...

Page 92: ...s For the test setup at first a conductive hot collar band must be fit tightly to the surface of bushing mainly near the top then test cables must be connected according to the following picture For this test the UST A mode should be selected If the current or watts loss is appreciably higher than normal move the collar one petticoat down and do another test Repeat this procedure and move the coll...

Page 93: ...Pin Pin 2 TxD CAPO Host Pin 3 RxD Host CAPO Pin 7 GND Interface Parameters fixed unchangeable Port RS232 Baudrate 38400 Baud Databit 8Bit Stopbits 1Bit Parity No 11 1 2 USB USB Master Standard 2 0 USB Slave Standard 2 0 90315 1 2 Instruction Manual CAPO Page 93 of 117 ...

Page 94: ...here is an internal Relay whose contact is connected to the plug Safety An external power source and a Warning Light or Beeper may be connected to pins 3 and 4 to indicate a dangerous condition See Example for connecting an external warning device below Use the working contact between Pin 3 and Pin 4 maximum Load 240VAC 2A The contact is open when the system is Safe The contact is closed when the ...

Page 95: ...ndard delivery The optional part can be ordered at your local Raytech representative Technical Specification of the External temperature probe TP 01 Order number 30074 TP 01 Cable length 10m Temperature range 20 110 C Accuracy 0 70 C 0 2K Sensor B57863S103F40 B25 100 3988K R25 10kΩ Plug cable Lemo FFA 1E 302 CLAC65 Socket instrument Lemo ERA 1E 302 CLL Set of 2 probes TP 02 Set of 3 probes TP 03 9...

Page 96: ...Appendix Page 96 of 117 CAPO 2 5 CAPO 12 90315 1 2 Instruction Manual CAPO CAPACITANCE AND POWER FACTOR METER ...

Page 97: ...er Info 100 E 1 Printer Requirements 100 E 2 Suggested Printers 100 F Service Mode 101 F 1 Calibrate Touchscreen 101 F 2 Show Ground Warning 102 F 3 CSV Separator 102 F 4 Raytech USB Driver 103 F 5 Show Series Values 103 F 6 Oil Correction Table 104 G Error Messages 106 H Trouble Shooting 108 H 1 Touch Panel does not work 109 H 2 USB Memory Stick does not work 109 I Warranty Conditions 110 I 1 Lim...

Page 98: ...ware is as download available and completely free A 2 T Base Pro T Base Pro is a powerful set of tools for data exchange remote control visual measurement data analysis test automation and much more It comes with a fully integrated database management system for storing measurement data as well as with a fully customizable reporting system which can generate test reports in the most widely used do...

Page 99: ...an USB Stick to upgrade the CAPO Download the new Firmware zip file onto your USB key on the root directory Not in a sub directory and do not Unzip it The CAPO 12 will automatically ask for an update when the USB Stick is plugged to your Instrument For further details please contact our support group Check also chapter 8 2 7 1 5 Update on page 60 90315 1 2 Instruction Manual CAPO Page 99 of 117 ...

Page 100: ...lication and Raytech instruments The SDK with native Raytech USB Driver for Windows provides the OS with full device functionality appearing to OS as a Raytech USB device This software can also be used without native Raytech USB drivers to control the device over the standard RS 232 serial port It is a powerful tool to write easily customized Software to control the Raytech Instruments 90315 1 2 I...

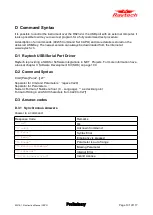
Page 101: ...rations in NET Projects For more information have a look at chapter C Software Development Kit SDK on page 100 D 2 Command Syntax Cmd Para Para2 LF Separator for Cmd and Parameters space 0x20 Separator for Parameters Numeric Format of Numbers float C Language as decimal point Format of Strings all ASCII Characters from 0x20 to 0x7f D 3 Answer codes D 3 1 Synchronous Answers Answer to a command Res...

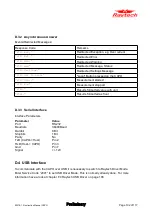
Page 102: ...Results formatted value with unit R1 Results formatted as float D 3 3 Serial Interface Interface Parameters Parameter Port Baudrate Databit Stopbits Parity TxD CAPO Host RxD Host CAPO Gnd Signal Value RS232 38400Baud 8 Bit 1 Bit No Pin 2 Pin 3 Pin 7 12V D 4 USB Interface To communicate with the CAPO over USB it is necessary to switch to Raytech Driver Mode Enter Service Code 2001 to set USB Driver...

Page 103: ...R Canon BJ 300 dpi Canon BJ 360 dpi Epson LX 9 pin E 2 Suggested Printers Table Suggested Printers Ink Jet Laser Canon iP90 Brother HL 5240 Tested Epson Stylus S20 Brother HL 2140 HP Deskjet 6940 Brother HL 5240L HP Deskjet H470B HP Laserjet P1505N HP Deskjet H470WBT HP Laserjet P2055DN Epson Stylus Office B40W HP Color Laserjet CP2025N PocketJet 200 PocketJet II The information in this document i...

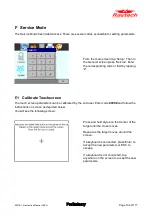
Page 104: ...rameters can be calibrated by the end user Enter code 0000 and follow the instructions on screen as depicted below You will see the following screen Press and hold stylus on the Center of the target until the cross moves Repeat as the target moves around the screen If a keyboard is connected press Enter to accept the new parameters or ESC to escape If a keyboard is not connected tap anywhere on th...

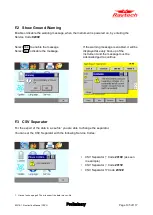
Page 105: ...splayed at every boot up of the instrument and the message must be acknowledged to continue F 3 CSV Separator For the export of the data in a csv file1 you are able to change the separator You can set the CSV Separator with the following Service Codes CSV Separator Code 2010 as seen in example CSV Separator Code 2011 CSV Separator t Code 2012 1 Have a look on page 67 how to export the data in a cs...

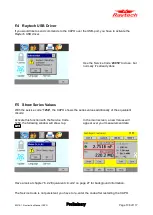
Page 106: ... the CAPO shows the series values additionally of the equivalent circuits Activate this function with the Service Code 125 the following window will show tap Yes In the main screen a new Values will appear over your measurement data Have a look at chapter 6 2 2 Equivalent circuits on page 27 for background information The Service Code is not persistent you have to re enter the code after restartin...

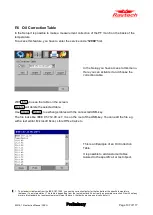
Page 107: ...e IEEE C57 12 90 oct1 It is on the root of the USB key You can edit the file e g with a text editor Microsoft Excel Libre Office Calc etc This is an Example of an Oil Correction Table It is possible to add customer tables tailored to the specific oil or test object 1 The standartd table was from the IEEE C57 1290 you see the correction factor for the tan delta at the specific temperature between i...

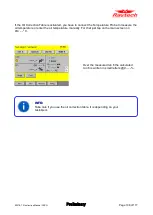
Page 108: ...il temperature or enter the oil temperature manually For that just tap on the main screen on ϑm C Over the measured tan δ the calculated tan δ is written in small letters ϑ 90315 1 2 Instruction Manual CAPO Page 108 of 117 INFO INFO Take care if you use the oil correction table It is depending on your testobject ...

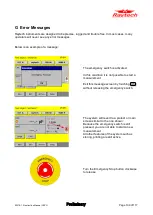
Page 109: ...ot possible to start a measurement Exit this message screen by touching OK without releasing the emergency switch The system will revert to a pretest or main screen similar to the one shown Because the emergency switch is still pressed you are not able to start a new measurement All other features of the system such as storing printing are still active Turn the Emergency Stop button clockwise to r...

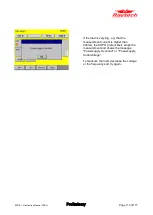
Page 110: ...rrent is higher than 200mA the CAPO protect itself stops the measurement and shows the message Powersupply Overload or Powersupply Undervoltage To measure the load decrease the voltage or the frequency and try again 90315 1 2 Instruction Manual CAPO Page 110 of 117 ...

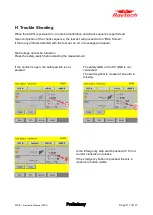
Page 111: ...message will appear Test Voltage cannot be turned on Press the safety switch before starting the measurement If the contact is open the safety switch is not pressed The safety GND or the HV GND is not connected The earth symbol is crossed if an earth is missing Is the Emergency stop switch pushed in Turn it counter clockwise to release If the emergency button is pressed there is a mushroom button ...

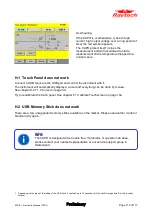
Page 112: ...n be done by mouse See chapter 8 2 7 1 4 Cursor on page 59 Try to recalibrate the touch panel See chapter F 1 Calibrate Touchscreen on page 104 H 2 USB Memory Stick does not work There are a few unsupported memory sticks available on the market Please use another model or brand and try again 1 1 Depending on the type of formatting of the USB stick it can take up to 15 seconds until the stick is re...

Page 113: ...Preliminary I Warranty Conditions 90315 1 2 Instruction Manual CAPO Page 113 of 117 ...

Page 114: ...legal basis Warranty claim rights on replacement parts as well as repair of defective parts shall expire after 12 months Warranty limitation period shall be extendable according to the price list The purchaser has the right to extend the warranty period by purchasing additional warranty years I 1 Limitation of Warranty The foregoing warranty shall not apply to defects resulting from Improper and u...

Page 115: ...ourt and shall be referred to arbitration for final decision Any disputes between the purchaser and Raytech AG Switzerland shall be settled according to the rules of settlement and arbitration of the chamber of commerce in Zurich by one or more arbitrators appointed also according to the rules of arbitration of the chamber of commerce in Zurich Switzerland 90315 1 2 Instruction Manual CAPO Page 11...

Page 116: ...0 10 14 90315 1 2 Instruction Manual CAPO Raytech AG Oberenbenestrasse 11 5620 Bremgarten Phone 41 56 648 6010 Fax 41 56 648 6011 Mail welcome raytech ch Web www raytech ch Raytech AG Oberenbenestrasse 11 5620 Bremgarten Phone 41 56 648 6010 Fax 41 56 648 6011 Mail welcome raytech ch Web www raytech ch ...

Page 117: ...Preliminary K Index Page 117 of 117 90315 1 2 Instruction Manual CAPO ...

Reviews: