14
2. Installation
The followings are instructions for setting up the Wireless Subscriber Gateway. Refer to the illustration
and follow the simple steps below to quickly install your Wireless Subscriber Gateway.
2-1 Wall-Mounting
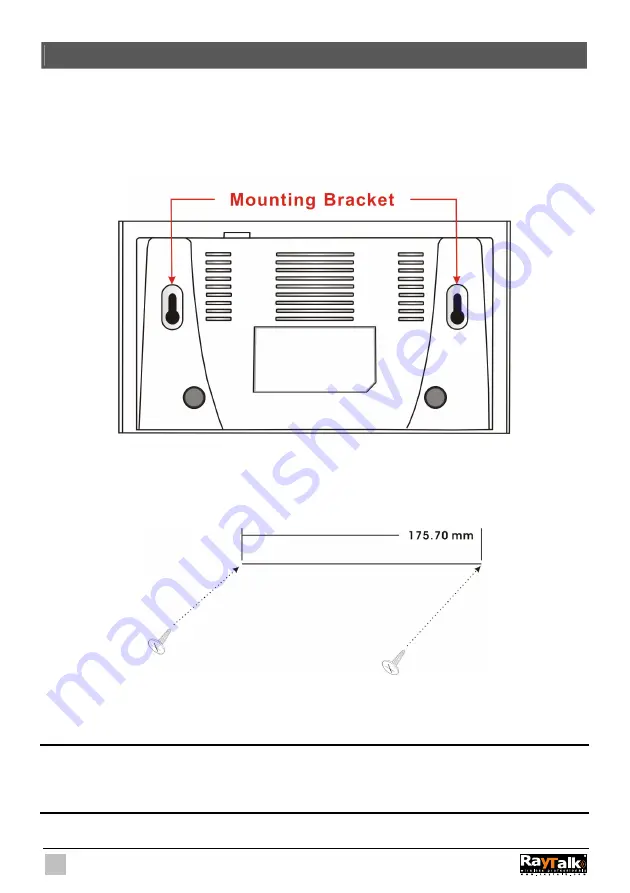
The Wireless Subscriber Gateway can be wall-mounted on a wall by applying the two mounting
brackets on screws.
Figure 2-1 Wall-Mounting Bracket - Bottom of RA-490 Wireless Subscriber Gateway
Please refer to the following instructions for mounting a Wireless Subscriber Gateway on a wall or other
surface.
1.
Install two screws on a wall according to the relative positions shown below.
Figure 2-2
2. Hang Wireless Subscriber Gateway on the wall by sliding the two screws in the mounting brackets.
Note
: If the screws are not properly anchored, the strain of the cables connected to the Wireless
Subscriber Gateway rear panel connectors could pull out the Wireless Subscriber Gateway from
the wall.
Summary of Contents for RA-490
Page 1: ......
Page 2: ...2 RA 490...
Page 37: ...37 Figure 3 20 Example Account Printout...
Page 42: ...42 Figure 3 27 Example Post paid Printout...
Page 59: ...59 3 2 5 RADIUS Authentication Figure 3 45 Authentication Setting Screen...
Page 72: ...72 Figure 3 60 PC connected Printer Printout Time to Finish...
Page 73: ...73 Figure 3 61 Web based Account Generator Printout Accumulation...
Page 77: ...77 Below is an example of the account printout Figure 3 67 Account Printout...
Page 79: ...79 Below is an example of the account printout Figure 3 69 Account Printout...
Page 88: ...88 3 2 9 Keypad Figure 3 79 Keypad Setting Screen...
Page 95: ...95 Network Report Printout Figure 3 91 Network Report Printout Press ABCAB...
Page 102: ...102 Figure 3 102 Logo Setting Screen Figure 3 103 Login Page...
Page 111: ...111 Figure 3 120 Billing Setting Screen...
Page 113: ...113 Figure 3 122 Service Selection Page Setting Screen iValidate net...
Page 114: ...114 Figure 3 123 Service Selection Page Setting Screen Secure Pay...
Page 115: ...115 Figure 3 124 Service Selection Page Authorize net...
Page 116: ...116 Figure 3 125 Service Selection Page iValidate net...
Page 117: ...117 Figure 3 126 Service Selection Page SecurePay...
Page 118: ...118 Successful Page Figure 3 127 Successful Page Setting Screen...
Page 145: ...145 3 2 22 Wireless Figure 3 154 Wireless Setting Screen...
Page 151: ...151 Figure 3 158 System Status Screen...
Page 167: ...167 3 5 2 Glossary of Terms Figure 3 189 Glossaries of Terms...


