background image

 Installation Guidelines

                             171


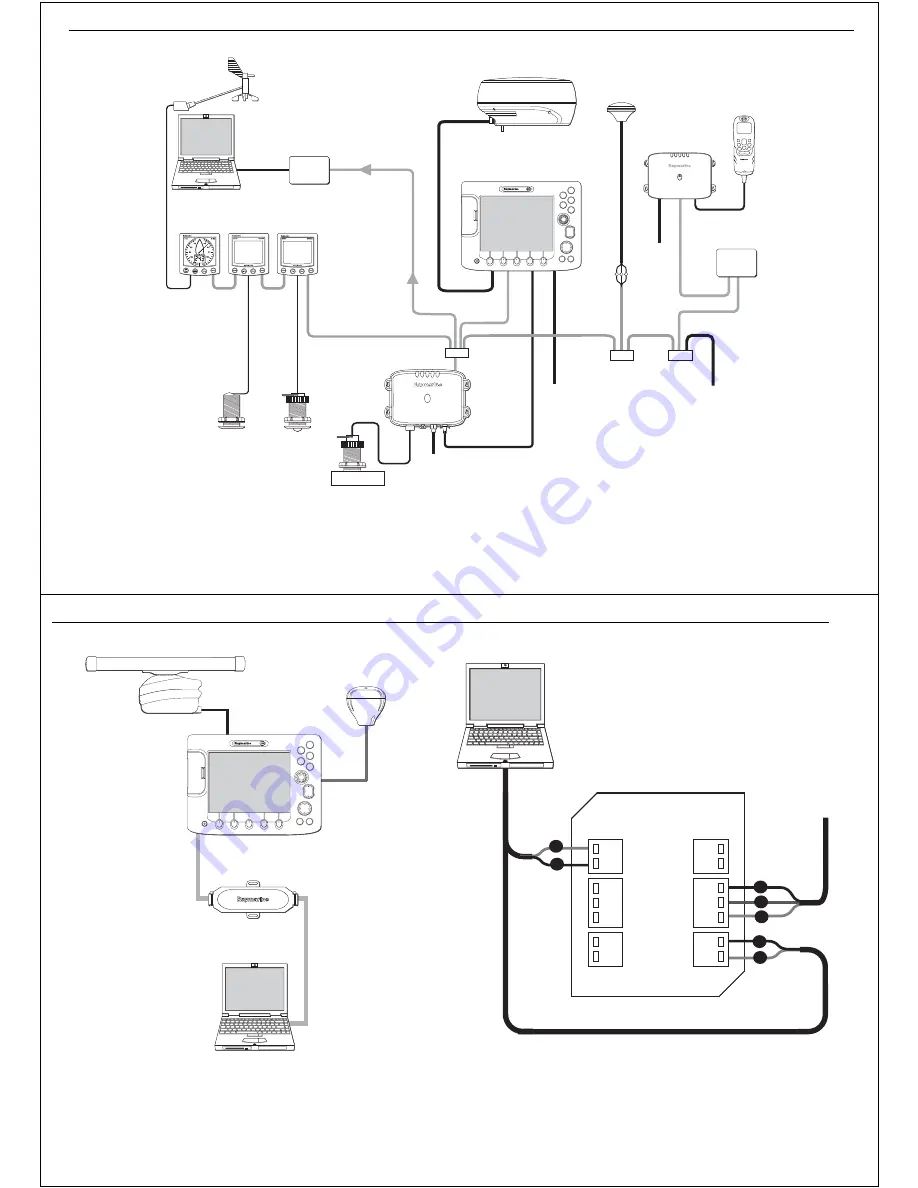
Raymarine SeaTalk system

E86001

9-pin cable

MENU

CH

OK

16/9

HI/LO

SCAN

WATCH

SQ

RAY

240

WX

Power
IN

Power
IN

Wind Transducer

Radar scanner

Wind

display

Speed

display

Depth

display

DSM 250

Depth 

Transducer

Speed

Transducer

Transducer

Power
IN

Power
IN

GPS

VHF/DSC

Radio

E85004

 RayTech SeaTalk 

Interface 

E85001

SeaTalk 

Interface 

2 5 0

ES M

SeaTalk

SeaTalk

SeaTalk

SeaTalk

CANCEL

OK

RANGE

IN

OUT

PAGE

ACTIVE

WPTS
MOB

MENU

DATA

D8410_1

Pathfinder or C-Series display

hsb

2

D244

D244

D244

172

           RayTech RNS V6.0 - Users Guide


Figure D-1: SeaTalk

hs 

crossover coupler


Figure D-2: RayTech SeaTalk/PC/NMEA interface box

SeaTalk devices

“Raymarine SeaTalk system” on page 171 shows how to connect an
instrument system using the Raymarine SeaTalk data format.

CANCEL

OK

RANGE

IN

OUT

PAGE

ACTIVE

WPTS
MOB

MENU

DATA

Radar scanner

GPS

E-Series display

SeaTalk  

crossover coupler

hs

PC running

RNS

D8800_1

RayTech RNS

RayTech SeaTalk/PC/NMEA Interface 

Part No.E85001

 Cable to 

SeaTalk System

9 - pin cable
Part No. E86001

D8411_1

+

_

+

_

RS-232             SeaTalk            NMEA

+

_

+

_

 NMEA             SeaTalk          RS-232

1

2

3

4

5

6

7

Summary of Contents for Pathfinder

Page 1: ......

Page 2: ...ystar ST40 ST60 Seaclutter Smart Route Tridata and Waypoint Navigation are trade marks of Raymarine Limited Windows and NT are registered trademarks of Microsoft Inc Pentium is a registered trademark...

Page 3: ...MapNT PC charts from CD ROM 26 Maptech cartography 26 2 RayTech RNS V6 0 Users Handbook Navionics cartography 26 RayTech chart installer 27 The User Interface and controls 29 Introduction 29 The scree...

Page 4: ...h RNS V6 0 Users Handbook MARPA 84 Safety Notices 84 What is MARPA 84 Target and vector history 85 Target history 86 MARPA targets 86 Working with sonar 89 Introduction 89 The sonar screen 89 Displayi...

Page 5: ...and cable runs 166 Proper cable shielding 166 Preventing interference and crosstalk 167 Interfacing RayTech 167 Connecting RayTech to your instruments 167 Connecting directly to an NMEA GPS 167 Connec...

Page 6: ...for the limited warranty regarding the magnetic media contained in the license agreement accompanying the product this product is provided AS IS without warranty of any kind either express or implied...

Page 7: ...the license agreement System integration RayTechV6 0hasbeendesignedtoworktransparentlywithRaymarineSeaTalk data communications package or any other device that outputs data in National Marine Electron...

Page 8: ...e your boat virtually anywhere in the world RayTech easily interfaces with your boats onboard navigational systems offering you the flexibility to allow RayTech to autopilot your boat to any destinati...

Page 9: ...o quickly and easily tailor its powerful resources to suit your needs Navionics Platinum chart card Compatibility with Navionics Platinum chart card provides you with enhanced 2D cartography features...

Page 10: ...system Serial port for connecting to NMEA or SeaTalk Ethernet port for connecting to an E Series display using SeaTalkhs PCMCIA port for connecting to a Pathfinder system using a PCMCIA to hsb2 adapt...

Page 11: ...that you have the latest versions of Microsoft DirectX and your Display adapter driver installed Note It will be necessary to have the PC connected to the internet for these checks and updates to be...

Page 12: ...nt your internet browser to http www microsoft com windows directx downloads default asp and check the current version of DirectX If the version installed is not current download and install the lates...

Page 13: ...ine com RayTech software 2 Click RayTechupgrade Download and install the application here 3 Click Download RNS 6 0 Registration required The registration screen appears 4 Complete the registration for...

Page 14: ...ox on page 17 You now have a choice of which mode RayTech opens in Planning Instrument connection is not required see Click the soft key for the mode you want RayTech to open on page 19 Onboard enable...

Page 15: ...screen keyboard that appears Make sure the license key type is set to the correct version number To display the license keyboard 1 Select File Setup The Setup dialog box is displayed 2 Double click th...

Page 16: ...d instruments However you may at a later date want to change the way in which instruments are configured to RayTech You can choose which way you configure instruments to RayTech This can be either Usi...

Page 17: ...o show connectivity 4 Click Cancel to close the detected COM ports dialog box If you want to see what instruments are connected i Double click the SeaTalk or NMEA icon and the connection dialog box is...

Page 18: ...Failure to do so will prevent your RayTech software from being able to find installed C Map charts To install C Map charts from a CD ROM it is necessary to install the C Map NT PC Chart Selector softw...

Page 19: ...ed in the Navionics USB CF Chart Card Reader are read in real time as long as the card is actually inserted in the card reader Navionics charts cannot be downloaded to your PC for off line viewing Ray...

Page 20: ...red to suit your working practices 4 3 Interface controls The interface can be controlled using the PC mouse touchscreen standard or Raymarine waterproof USB Navigation Keyboard This section will deta...

Page 21: ...he function bar is open zooms the page to show a larger OUT or smaller IN area changes radar range D6925_1 D 6 9 1 5 _ 1 32 RayTech RNS V6 0 Users Guide Action box Action boxes are contained in a sele...

Page 22: ...lication you want to open The appli cation will open in a full page format 5 Right click on the page status bar and select Split Horizontally Split Vertically 6 Click the split style you require D6927...

Page 23: ...apter 4 The User Interface and controls 35 Default chart screen Status bar Depth contour Navigational object Page tab Boat icon Cursor Cartographic information available 36 RayTech RNS V6 0 Users Guid...

Page 24: ...38 RayTech RNS V6 0 Users Guide 5 4 Moving around the chart You can move around the chart using Chart panning RayTech includes chart panning Whenever you move the cursor near the edge of a chart page...

Page 25: ...c charts Down arrow Transparency slider 20 level 40 level D8753_1 40 RayTech RNS V6 0 Users Guide Raster or Navionics aerial photography charts Radar overlay Orbimage Satellite Sea Temperature Orbimag...

Page 26: ...Chapter 5 Using charts 41 42 RayTech RNS V6 0 Users Guide Navionics Platinum cartography D8754_1...

Page 27: ...ree dimensions giving you an accurate easy to view image of the area around your boat that can help you plan Fishing spots What fishing pattern to use Safe routes If you are in a new area or visibilit...

Page 28: ...is displayed 4 Click Show Pilot Book The pilot book opens in a new page Use the scroll bar at the right to scroll through the available information 6 3 2D chart enhancements The enhancements to 2D cha...

Page 29: ...played 4 Enter the name of the port you want to locate 5 Click OK The on screen keyboard closes and the result s are displayed in the information dialog box Wrecks data Wrecks data provides details of...

Page 30: ...3D indication of True North in relation to the chart view cannot be turned off Boat symbol can be shown as a power or sail boat to indicate your position n the chart Depth scale shows the approximate...

Page 31: ...ables you to view additional features Chart offset The 3D chart center can be offset in a similar way to a 2D chart You can offset the position of the on screen boat by 1 3 or 2 3 from the center of v...

Page 32: ...what is around you With your RayTech page set up to view the two applications together a comprehensive view of the surrounding area is show As with all multiple page sets the active window is indicat...

Page 33: ...oint Place Waypoint at Vessel 2 A new waypoint will be placed at the boat s current position at a known position There are two ways that you can place a waypoint at a known position using the Enter Wa...

Page 34: ...menu is displayed 7 Highlight the symbol you want to represent the waypoint 8 Click OK The waypoint symbol is changed to your selection 9 Click OK Repeat Steps 4 through 8 until you have changed all t...

Page 35: ...dialog box closes 8 Repeat steps 1 through 7 above until you have added all the required waypoints to the new folder To rename a folder 1 Select Waypoints Manage Waypoints The Folders dialog box is di...

Page 36: ...file Raymarine Waypoint file C E Series file format e mail enables the transfer of data using your e mail client To transfer route and waypoint data 1 Click Import Export Routes and Waypoints The imp...

Page 37: ...aypoints not marked for transfer The right pane displays waypoints which will be exported If a waypoint is a member of a route or folder already marked for trans fer it will not be displayed 9 Click F...

Page 38: ...fferent course If you have RayTech connected to your GPS and autopilot the route you chart on the screen can be run automatically 8 3 Creating a route You create a route by placing a series of waypoin...

Page 39: ...n menu is displayed 5 Highlight Delete 6 Click OK The waypoint is deleted and the dialog box closes Choosing a route With a chart page open To choose a route 1 Click Route Choose Route The Choose Rout...

Page 40: ...Range to target waypoint displayed in nautical miles nm Course Over Ground COG displayed in degrees magnetic Bearing to target waypoint displayed in degrees magnetic Cross Track Error XTE displayed in...

Page 41: ...Chapter 8 Working with routes 71 72 RayTech RNS V6 0 Users Guide Tides and Currents screens Tides Currents D8772_1...

Page 42: ...ents to set the correct region 74 RayTech RNS V6 0 Users Guide 9 2 Tides Tide height data see page 62 is a prediction for maximum and minimum tide heights over a 24 hour period for a selected station...

Page 43: ...earest Currents The current information for the current station nearest your selected position will be displayed in a new page To display current flow information for stations other than the nearest 1...

Page 44: ...size Nearby objects may appear to be the same size as distant larger objects With experience the approximate size of different objects can be determined by the relative size and brightness of the echo...

Page 45: ...the gain slightly to reduce the speckle and improve target definition Do not set the gain too low or you may miss small or weak targets The gain mode and its associated settings are retained each time...

Page 46: ...obtaining distance informa tion from the radar picture Range rings can be turned on or off as required To turn range rings on off use the right mouse menu select Range Rings and click A check mark wil...

Page 47: ...outer enables you to set the distance of the outer edge of the zone from your boat Set width enables you to set the width of a sector zone each side of the SHM Set bearing enables you to set the beari...

Page 48: ...acquired Target is safe Target is dangerous Target is lost 86 RayTech RNS V6 0 Users Guide the direction in which the target and your own boat are moving over the ground The result is the boat s true...

Page 49: ...rget ID Bearing Range Course Speed To view the MARPA database list 1 Click the Target Tracking soft key 2 Click the Marpa List soft key The MARPA database list is now displayed 3 Click OK to remove th...

Page 50: ...ntation soft keys you can change the background color scrolling speed and whether or not the depth of fish echoes is displayed on the screen Background color The background color you select for the pr...

Page 51: ...ets you select the maximum depth displayed on the scrolling bottom and A scope images You can also set the shift value to move the image up or down within the current range When auto range is selected...

Page 52: ...shade Setting a low value produces a small band for the strongest color but a wide signal band for the other colors Setting a high value gives a wide band for the strongest color but a small signal ba...

Page 53: ...ed 2 Click to select the way in which bottom lock is displayed 11 7 Getting a live image from below the boat The normal scrolling bottom display shows a historical record of sonar echoes The A Scope s...

Page 54: ...Chapter 11 Working with sonar 97 White line D8781_1 98 RayTech RNS V6 0 Users Guide Sonar mark D7004_1...

Page 55: ...ve it as a waypoint and return to the same spot A sm is displayed on the sonar image as a solid vertical line with the label sm displayed at intervals along the line The sm scrolls across the screen w...

Page 56: ...with the sonar in split frequency or zoom modes it will appear in both panes To use the VRM 1 Click Presentation 2 Click VRM EBL to ON The crosshair will appear on screen as dashed lines 3 Click Edit...

Page 57: ...t being processed or saved To record sonar data With a sonar page open and data being processed 1 Click Tools Sonar Data recording The data recording dialog box is displayed 2 Click the Recording file...

Page 58: ...Chapter 11 Working with sonar 105 106 RayTech RNS V6 0 Users Guide RayTech video capture D8784_1...

Page 59: ...ave connected cameras to RayTech the input type is stored for the device so if you are using a web cam it will stay assigned as originally specified You can change the input labels and set the video i...

Page 60: ...Chapter 12 Using video 109 110 RayTech RNS V6 0 Users Guide RayTech Weather screen Temperature Ocean current Wind direction strength D8786_1...

Page 61: ...wnloaded a weather file it can be overlaid on your chart in several layers You can choose what information is displayed and the format it is shown in For example ocean currents can be shown as barbs a...

Page 62: ...ormation box is displayed 11 Click OK The weather information is displayed on the chart Viewing a weather file To view a downloaded weather file 1 Select View Weather Toolbar The weather toolbar will...

Page 63: ...15 9 Click Play b to start the animation The animation will now start to play You can pause fast forward or rewind it using the buttons at the right of the toolbar 116 RayTech RNS V6 0 Users Guide Rul...

Page 64: ...e customized to show information that you want to see in the order that you want to see it This can be achieved by either modifying an existing databox or creating a new one in addition databoxes can...

Page 65: ...eate a new databox 1 Click Add A new databox is displayed on screen 2 Populate the databox as required by following procedures for adding channels as detailed in To show an additional channel on page...

Page 66: ...collected You can modify the default values shown or load an existing polar parameters file To modify the values shown refer to Step 3 D7027 1 122 RayTech RNS V6 0 Users Guide To load an existing pol...

Page 67: ...in knots Heading Heading of boat in degrees Heel Amount of heel in degrees 124 RayTech RNS V6 0 Users Guide Note For full definitions of the terms used in the above table refer to Appendix L Glossary...

Page 68: ...example above and the accompanying definitions The bottom axis 1 shows boat speed range in knots The maximum minimum speed and speed interval are determined on the scale plotted The top axis 2 describ...

Page 69: ...your true heading Calibration of this kind is usually achieved by piloting the boat along a known line of transit For best results you should have your compass swung by a professional Apparent wind an...

Page 70: ...e and boat speed Target compare Comparesyourperformancewithyourcurrenttargets Target create Used to identify good target points when sailing upwind or downwind Targetsp Displays Corrected True Wind Sp...

Page 71: ...Chapter 13 RayTech advanced features 131 DataTrak D7036_1 132 RayTech RNS V6 0 Users Guide Pre start display D7038_1 P S...

Page 72: ...indicating that your datum longitude is incorrect press the Yes button close the Pre start page and re open it The datum is corrected 13 8 Route optimization You can use route optimization to determi...

Page 73: ...tal time distance and bearing to mark Tacking angle Other tack heading Mark true wind angle Mark Mark range Mark bearing Cross track error Leg range Whole route length distance to go time to destinati...

Page 74: ...w information on targets tracked with laser rangefinders Gives information on other boats data range bearing speed direction Vmc Used in large course yachting Shows relative velocity made good on cour...

Page 75: ...on of the arrow on the trackpad Press two sections together to move the cursor diagonally The longer you press the trackpad the faster the cursor will move in the selected direction CANCEL Press to ca...

Page 76: ...plugging it into an unused USB port on the computer that you are using to run RayTech 14 4 Setting up RayTech for use with the RNS keyboard To set up RayTech for use with the keyboard 1 Open RayTech...

Page 77: ...ator within the instrument settings dialog E85001 stuck in NMEA mode Use SeaLevel No 2105 serial to USB adapter If Auto Set up does not find SeaTalk or NMEA is there other software e g Iridium or Noki...

Page 78: ...shes Windows continues to work Possible cause Solution Faulty USB serial adapter driver software Refer to adapter recommendations given in Raytech system requirements on www raymarine com or try updat...

Page 79: ...g vector charts Turn off the Raster chart layer or make it transparent with the raster icon in the Charting Toolbar 148 RayTech RNS V6 0 Users Guide These problems possible causes and solutions are by...

Page 80: ...21 Manchester Street Merrimack NH 03054 4801 1 800 539 5539 Opening hours Monday through Friday 0815 1700 Eastern Standard or Eastern Daylight Savings Time Europe Technical Support Services Accessori...

Page 81: ...iginal paper chart from which it was scanned Maptech NOAA BSB and PCX charts are examples of raster charts 152 RayTech RNS V6 0 Users Guide Aerial imagery A high resolution geo referenced rasterized p...

Page 82: ...r antenna height target height in nautical miles in metres in metres Rmax radar horizon of antenna a1 radar horizon of target a2 D7005_1 154 RayTech RNS V6 0 Users Guide The following table shows typi...

Page 83: ...now either around the boat or in the distance In addition some echoes may be indirect reTurns to the radar scanner providing false echoes or multiple echoes The effects of many false echoes can be min...

Page 84: ...y appears as multiple echoes on the display at short range scales and the echoes are not repetitive or consistent in position With high winds and extreme conditions echoes from sea clutter may cause d...

Page 85: ...waves are making two complete trips hitting the bottom bouncing off the boat the reflecting off the bottom again This can happen if the water is shallow the bottom is hard or gain is set high C 4 Disp...

Page 86: ...13 250 50 50 10 80 20 14 300 100 60 20 100 20 15 400 100 80 20 150 50 162 RayTech RNE V6 0 Users Guide 16 600 200 100 20 200 50 17 800 200 150 50 300 100 18 1000 200 200 50 400 100 19 1500 500 250 50...

Page 87: ...S V6 0 Users Guide D 2 System integration This section provides an overview of system integration and the protocols that interface with RayTech You may find that your system does not use all the proto...

Page 88: ...ground circuit directly between the two RS 232 linked devices To wire one RS 232 device to another 1 Connect device A s Tx lead to device B s Rx lead 2 Connect device A s Rx lead to device B s Tx lead...

Page 89: ...also be labelled Tx Tx Data out or NMEA OUT Black SGnd Not used Green Tx Not used Black SGnd NMEA output may also be labelled TX Data out NMEA out or Ground 168 RayTech RNS V6 0 Users Guide Connecting...

Page 90: ...ill need a second ethernet interface on the PC IMPORTANT When you attempt to connect to a SeaTalkhs network if a dynamic IP configuration server DHCP is detected by RayTech the soft ware will load but...

Page 91: ...U DATA D8410_1 Pathfinder or C Series display hsb2 D244 D244 D244 172 RayTech RNS V6 0 Users Guide Figure D 1 SeaTalkhs crossover coupler Figure D 2 RayTech SeaTalk PC NMEA interface box SeaTalk devic...

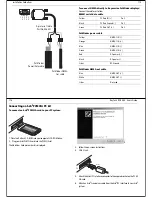
Page 92: ...surface 3 Alternatively the interface box may be attached using the two self tapping screws provided 4 Remove the top of the interface box by gently squeezing the lid at each end and pulling it away f...

Page 93: ...IN Green NMEA 2 IN Red DC power Black DC power Silver RF Ground Blue NMEA OUT White NMEA OUT Silver Not used 176 RayTech RNS V6 0 Users Guide Connecting an hsb2 PCMCIA PC kit To connect an hsb2 PCMCIA...

Page 94: ...2 Set the Output Baud Rate setting cross track error calculation value 2 to 6 4 bps Refer to the relevant Manufacturers handbook for instructions 3 Connect the cables as follows Cable color Performan...

Page 95: ...of your Raymarine hsb2 or multifunction displays and ensure that there is a FIX 2 Select the chart screen on RayTech and click Find Vessel Make sure that the vessel symbol is centered on the screen i...

Page 96: ...fast heading to PC using E86001 cable to Serial Port 2 SeaTalk GPS Typical SeaTalk System Scanner SeaTalk SeaTalk SeaTalk Course Computer G series Distribution Panel E86001 9 pin cable E85004 SeaTalk...

Page 97: ...n Move destination to vessel Moves the destination waypoint to your boat s current position Place Waypoint at cursor Places a new waypoint at the cursor s current position Manage waypoints Displays Wa...

Page 98: ...NS V6 0 Users Guide View menu Sonar Displays the sonar dialog box Data Trak Graphs live instrument data Set New Ruler Sets the cursor to draw a new ruler Applications Enables you to open Polars Engine...

Page 99: ...h to Raymarine Online Technical Support RayTech Home page Links RayTech to Raymarine RayTech web pages Online purchase Enables online purchase of RayTech license keys 188 RayTech RNS V6 0 Users Guide...

Page 100: ...on Command Action Raster charts Turns on off raster chart layer Topo charts Turns on off topographical chart layer Navionics Chart Turns on off Navionics chart layer Radar Overlay Turns on off chart o...

Page 101: ...Action Move Forward Pans the chart forward of your boat View Forward Eye point is above and behind the boat looking forward Move Aft Pans the chart aft of your boat View Aft Eye point above and in fro...

Page 102: ...les you to set racecourse top mark via laser Americas Cup course Displays Americas Cup course dialog box 194 RayTech RNS V6 0 Users Guide Pre start toolbar Weather toolbar Command Action Command Actio...

Page 103: ...ox list dialog box Dock Enables you to dock floated databoxes Modify channel Displays Databox list dialog box Delete Removes a databox Channel Up Displaysthenextlevelofchannelselectedin the Databox se...

Page 104: ...oard nm nautical miles NMEA National Marine Electronics Association NOAA National Oceanographic and Atmospheric Administration PC Personal Computer RAM Random Access Memory ROM Read Only Memory RX Rec...

Page 105: ...und Your direction of movement relative to a ground position CTS Course to steer The heading you need to maintain in order to reach your destination Tab Rudder tab An adjustable section of the rudder...

Page 106: ...0 business services find nearest 46 information 46 search port by name 47 card reader C Map installation 179 coastal roads 48 current position 38 finding your boat 38 formats 38 151 inland waterways 4...

Page 107: ...ing 119 delete channels 119 dock 118 float 117 font selector 120 modify 118 119 DataTrak 128 add a graph 129 add wands 130 custom page 129 delete graph 130 graph definitions 128 open 129 Declutter 52...

Page 108: ...117 Monitoring course 68 cross track error 69 engines 137 Multiple echoes 156 N Navigating to waypoints 58 Navigation numbers 136 what if page 136 Navionics Platinum 3D controls 50 operating modes 50...

Page 109: ...nu 81 what is it 153 working with 77 Rain clutter 157 Range rings 81 RayTech 3D cartography screen 49 advanced features 111 CDI screen 70 chart screen 35 configuration network 17 23 installing 15 cust...

Page 110: ...cing 99 object depth and distance 101 operating frequency 92 160 picture quality 160 range and shift values 160 screen 89 background color 89 change the view 89 scrolling speed 90 change 90 pause 91 t...

Page 111: ...er 59 add waypoint 59 create 59 rename 60 inserting 55 at a known position 55 at boat s position 55 at cursor 55 enter waypoint button 55 man overboard marker cancel 57 place 57 manage 56 move destina...

Reviews: