background image

ii. the autopilot will then adjust the locked

heading as required to maintain the new wind

angle.

Note:

Because turning the vessel affects the

relationship between the true and apparent wind

angles, you should only use this method to make

minor adjustments to the wind angle. For major

changes, return to

STANDBY

mode, steer onto

the new heading, then re-select

Wind Vane

mode.

Leaving wind vane mode

To leave wind vane mode:
1. Press

AUTO

to return to Auto mode (autopilot

control), or.

2. Press

STANDBY

to return to Standby mode

(manual steering).

Wind Shift Alarm

Evolution autopilot

If the autopilot detects a wind shift of more than 30°

for 60 seconds it will trigger the Wind Shift Alarm.

SPX and SmartPilot

If the autopilot detects a wind shift of more than 15°

it will trigger the Wind Shift Alarm.

Enabling and disabling the Wind Shift alarm

The Wind Shift alarm is turned on by default, you can

enable and disable the Wind Shift alarm at anytime.
In Wind Vane Mode:
1. Select

Sail Boat Settings

from the

Autopilot

Calibration

menu: (

Menu > Set-up > Autopilot

Calibration > Sail Boat Settings

).

2. Select

Wind Shift Alarm

.

3. Select iOff to disable the alarm or On to enable

the alarm.

Responding to the wind shift warning

1. To cancel the warning, and retain the existing

wind angle and heading, press

Cancel

.

2. Alternatively, to cancel the warning and return to

the previous heading:
i. adjust the locked wind angle using the

-1

,

+1

,

-10

and

+10

buttons or the

Rotary

controller.

ii. press

Standby

to return to manual steering,

steer onto the required heading, and press

Cancel

to return to Wind Vane mode with the

new wind angle.

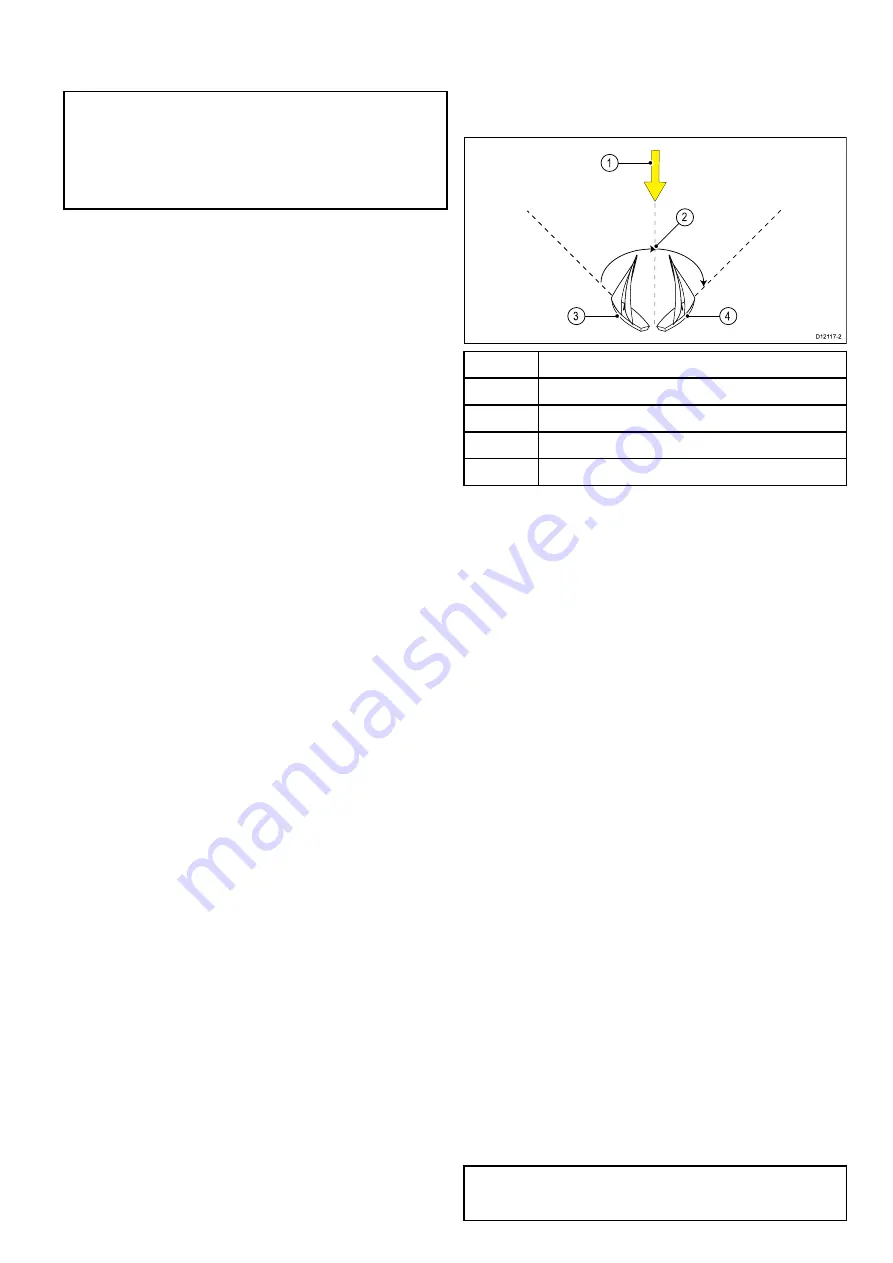
Using AutoTack in wind vane mode

The autopilot has a built in automatic tack facility

(AutoTack) that turns your vessel "relative" to the

wind angle you're currently on, and it tacks the

vessel to put you on the opposite relative wind angle.

D12117-2

3

1

4

2

Item

Description

1

Starting position

2

Tack

3

Wind direction

4

Final position

AutoTack is always relative to wind angle and is not

adjustable.
In Wind Vane mode:
1. Using a

p70

/

p70s

:

i. Press the

-1

and

-10

buttons at the same time

to Tack to port.

ii. Press the

+1

and

+10

buttons at the same

time to Tack to starboard.

2. Using a

p70R

or a

p70Rs

:

i. Select

Tack Port

from the main menu to Tack

to port.

ii. Select

Tack Starboard

from the main menu

to Tack to Starboard.

3.
When you AutoTack in wind vane mode, the boat

turns through the AutoTack angle. The autopilot will

then trim the heading to mirror the locked wind angle

from the previous tack.

Operating hints for wind vane mode

• Always trim your sails carefully to minimize the

amount of standing helm.

• Reef the headsail and mainsail a little early rather

than too late.

• In Wind Vane mode the autopilot will react to

long-term wind shifts, but will not correct for

short-term changes such as gusts.

• In gusty and unsteady inshore conditions, it is best

to sail a few degrees further off the wind so that

changes in wind direction can be tolerated.

• Avoid using Auto Tack in conditions where the

wind may shift suddenly.

Caution: Allow time

Allow time for course changes

Pilot modes

65

Summary of Contents for P70

Page 1: ...INSTALLATION OPERATION INSTRUCTIONS p70 p70R Pilot Controller 2016 Raymarine UK Limited 81355 2 Document number 05 2016 Date English EN ...

Page 2: ......

Page 3: ...design patents patents pending or design patents pending Fair Use Statement You may print no more than three copies of this manual for your own use You may not make any further copies or distribute or use the manual in any other way including without limitation exploiting the manual commercially or giving or selling copies to third parties Software updates Important Check the Raymarine website for...

Page 4: ......

Page 5: ... Autopilot commissioning main differences between Evolution and SPX systems 40 7 3 Autopilot response levels 41 7 4 Initial setup and commissioning 41 7 5 Powering the Pilot controller on 42 7 6 Using the Set up Wizard 43 7 7 Using the Dockside wizard 43 7 8 Adjusting the hard over time SmartPilot and SPX 45 7 9 Compass linearization Evolution autopilots 45 7 10 Compass lock 47 Chapter 8 Commissio...

Page 6: ...Miscellaneous troubleshooting 103 14 5 Performing a Factory Reset 104 Chapter 15 Technical specification 105 15 1 Technical specification 106 Chapter 16 Technical support 107 16 1 Raymarine product support and servicing 108 16 2 Learning resources 109 Chapter 17 Spares and accessories 111 17 1 Spares and accessories 112 17 2 SeaTalkng cables and accessories 112 17 3 SeaTalkng cable kits 114 17 4 S...

Page 7: ...t Warning Potential ignition source This product is NOT approved for use in hazardous flammable atmospheres Do NOT install in a hazardous flammable atmosphere such as in an engine room or near fuel tanks Warning Product grounding Before applying power to this product ensure it has been correctly grounded in accordance with the instructions provided Warning Positive ground systems Do not connect th...

Page 8: ...A radar beam can normally be assumed to spread 20 degrees above and below the radiating element The product is supplied from a separate battery from that used for engine start This is important to prevent erratic behavior and data loss which can occur if the engine start does not have a separate battery Raymarine specified cables are used Cables are not cut or extended unless doing so is detailed ...

Page 9: ...ats and workboats NOT covered by International Maritime Organization IMO and Safety of Life at Sea SOLAS Carriage Regulations Technical accuracy To the best of our knowledge the information in this document was correct at the time it was produced However Raymarine cannot accept liability for any inaccuracies or omissions it may contain In addition our policy of continuous product improvement may c...

Page 10: ...10 p70 p70R ...

Page 11: ...Chapter 2 Document and product information Chapter contents 2 1 Document information on page 12 2 2 Product overview on page 13 Document and product information 11 ...

Page 12: ...add new features and improve existing functionality This document covers Pilot controller software LightHouse Version 3 xx which should be used in conjunction with EV and ACU software version 2 xx Please refer to the Software Releases section for details on software releases Check the Raymarine website to ensure you have the latest software and user manuals www raymarine com software www raymarine...

Page 13: ... STBY STBY D13016 1 1 2 1 p70 8 button pilot control head 2 p70R Rotary pilot control head The unit has the following features 2 x SeaTalkng connections Compatible with NMEA 2000 and SeaTalk standards 12 V dc operation Waterproof to IPX 6 Document and product information 13 ...

Page 14: ...14 p70 p70R ...

Page 15: ... Pack contents on page 16 3 3 Compatible autopilot systems on page 17 3 4 Software updates on page 17 3 5 Tools on page 18 3 6 System protocols on page 18 3 7 Warnings and cautions on page 19 3 8 General location requirements on page 19 3 9 Unit dimensions on page 20 Planning the installation 15 ...

Page 16: ...ion It is also useful for any future additions or maintenance of the system The diagram should include Location of all components Connectors cable types routes and lengths 3 2 Pack contents All models contain the following items 1 2 3 4 5 6 7 8 D12098 1 Number Description 1 p70 p70R Pilot controller p70 8 button controller is shown in diagram above 2 Bezel 3 Gasket 4 Suncover 5 4 x fixing screws 6...

Page 17: ...software update process is carried out at your own risk Before initiating the update process ensure you have backed up any important files Ensure that the unit has a reliable power supply and that the update process is not interrupted Damage caused by incomplete updates are not covered by Raymarine warranty By downloading the software update package you agree to these terms Evolution software upda...

Page 18: ...at have a low draw can be powered from the network although high current equipment will need to have a separate power connection SeaTalkng is a proprietary extension to NMEA 2000 and the proven CAN bus technology Compatible NMEA 2000 and SeaTalk SeaTalk2 devices can also be connected using the appropriate interfaces or adaptor cables as required NMEA 2000 NMEA 2000 offers significant improvements ...

Page 19: ...oles in places which may damage the structure of the vessel Cable entry Ensure the unit is mounted in a location which allows proper routing and connection of cables Minimum bend radius of 100 mm 3 94 in unless otherwise stated Use cable supports to prevent stress on connectors Water ingress The display is suitable for mounting both above and below decks It is waterproof to IPX6 standard Although ...

Page 20: ...iewing angle considerations As display contrast color and night mode performance are all affected by the viewing angle Raymarine recommends you temporarily power up the display when planning the installation to enable you to best judge which location gives the optimum viewing angle 3 9 Unit dimensions p70 and p70r dimensions A B H p70 p70r C F D G C F D G E E D12103 1 Item Description A 110 mm 4 3...

Page 21: ... 1 General cabling guidance on page 22 4 2 Connections overview on page 22 4 3 SeaTalkng power supply on page 23 4 4 SeaTalkng connection on page 25 4 5 SeaTalk connection on page 26 4 6 NMEA 2000 network connection on page 27 Cables and connections 21 ...

Page 22: ...cords or ropes attached to cable connectors to pull cables through restricted apertures e g as in bulkheads as this could cause damage to cables Strain relief Ensure adequate strain relief is provided Protect connectors from strain and ensure they will not pull out under extreme sea conditions Cable shielding Ensure that all data cables are properly shielded that the cable shielding is intact e g ...

Page 23: ...e fuse rating Thermal breaker rating 5 A 3 A if only connecting one device Note The suitable fuse rating for the thermal breaker is dependent on the number of devices you are connecting If in doubt consult an authorized Raymarine dealer SeaTalkng system loading The maximum loading LEN for a SeaTalkng system depends on the length of the backbone Loading type Backbone length Total LEN Unbalanced 20 ...

Page 24: ...eaker use individual in line fuses for each power circuit to provide the necessary protection In all cases observe the recommended breaker fuse ratings provided in the product s documentation If you need to extend the length of the power cable ensure you use suitably rated cable and that sufficient power 12 V dc is available at the SeaTalkng backbone s power connection Important Be aware that the ...

Page 25: ...eed transducer Note In the above example if an ACU 100 was used the SeaTalkng network would require a dedicated 12 V dc power supply because the ACU 100 does not supply power to the SeaTalkng network Example SeaTalkng SPX system with transducer pods SMARTPILOT 12 V dc SeaTalkng SeaTalkng D12099 2 2 7 8 1 3 4 6 6 6 5 9 10 11 Item Description 1 SPX supplying 12V to SeaTalkng network 2 2 x Instrument...

Page 26: ...ent 5 Wind transducer 6 SeaTalkng to SeaTalk Adaptor cable 7 Depth transducer 8 Speed transducer 9 Course computer supplying 12V to SeaTalk network For SeaTalk cables and extensions use Raymarine SeaTalk cable accessories SeaTalk power protection The power supply must be protected by a 5 A fuse or a circuit breaker providing equivalent protection Raymarine recommends that the power is connected to...

Page 27: ...eaTalkng device can be connected to a DeviceNet NMEA 2000 network D12060 3 4 2 NMEA 2000 3 SeaTalkng device 1 1 SeaTalkng device 2 SeaTalkng to DeviceNet adaptor cable A06045 3 DeviceNet T piece 4 NMEA 2000 backbone Cables and connections 27 ...

Page 28: ...28 p70 p70R ...

Page 29: ...Chapter 5 Installation Chapter contents 5 1 Mounting on page 30 Installation 29 ...

Page 30: ...le around the cut edge until smooth 6 Drill four holes as indicated on the template to accept the securing screws 7 Peel the backing off of the gasket and place the adhesive side of the gasket onto the display unit and press firmly onto the flange 8 Connect cables to the unit 9 Slide the unit into place and secure using screws provided Note Drill tap size and tightening torque is dependent on the ...

Page 31: ...e 32 6 2 Before using your product on page 33 6 3 Powering the Pilot controller on on page 33 6 4 Completing the startup wizard on page 34 6 5 Pilot functions on page 34 6 6 Display settings on page 35 6 7 Multiple data sources MDS overview on page 36 Getting started 31 ...

Page 32: ...1 3 5 7 Item Description 1 LEFT SOFT BUTTON Cancel Back mode selection 2 STANDBY BUTTON Disengage pilot Manual control Power Brightness 3 ROTARY CLOCKWISE Down navigation in list Adjust Up Increase angle locked heading adjust numerical values power steer 4 ROTARY ANTI CLOCKWISE Up navigation in list Adjust Down Decrease angle locked heading adjust numerical values power steer 5 RIGHT SOFT BUTTON M...

Page 33: ... unit is being switched on for the first time or after a factory reset the set up wizard will be launched Note The logo is not displayed if the unit is in sleep mode In Sleep mode the unit may appear off but still has power 2 To turn the Pilot controller off press and hold the STANDBY button After 1 second a pop up count down is displayed 3 Continue to hold the STANDBY button for a further 3 secon...

Page 34: ...te The Startup Wizard may not be displayed if these settings have already been set on the system that the unit is connected to 6 5 Pilot functions The SmartPilot has various modes Standby Manual steering activated by STANDBY button Auto Autopilot engaged steering to a heading activated by AUTO button Wind vane Autopilot engaged steering to maintain a selected apparent or true wind angle activated ...

Page 35: ...ction see list of compatible units above the Share brightness setting set to On for all units in the brightness group units to be assigned to Network Groups all the displays in that group to be synchronized Assigning A Network Group To enable the Shared Brightness and Color unit s must be assigned to the same network group Compatible Instrument Displays and Pilot Controllers will also share their ...

Page 36: ...following data types GPS Position GPS Datum Time Date Heading Depth Speed Wind This exercise would usually be completed as part of the initial installation or when new equipment is added For MDS to be available all products in the system that use the data sources listed above must be MDS compliant The system will report any products that are NOT MDS compliant It may be possible to upgrade the soft...

Page 37: ...3 Select your preferred data source or 4 Select Auto to allow the system to decide ACTIVE is displayed next to the data source that is the current source for the data type Getting started 37 ...

Page 38: ...38 p70 p70R ...

Page 39: ... 3 Autopilot response levels on page 41 7 4 Initial setup and commissioning on page 41 7 5 Powering the Pilot controller on on page 42 7 6 Using the Set up Wizard on page 43 7 7 Using the Dockside wizard on page 43 7 8 Adjusting the hard over time SmartPilot and SPX on page 45 7 9 Compass linearization Evolution autopilots on page 45 7 10 Compass lock on page 47 Commissioning Evolution autopilot s...

Page 40: ... Evolution system provides a number of features to improve upon the commissioning process required by existing SPX and some other autopilot systems Built in heading and attitude sensor no additional fluxgate compass required Automatic set up the rudder gain counter rudder manual compass calibration and autolearn settings required for existing SPX systems are no longer required This results in a gr...

Page 41: ...ng Vessel type Vessel steering system information What the autopilot will be used for System layout components and connections you should have a schematic of the vessel s autopilot system Initial set up Initial set up involves the following steps Important Before proceeding with the initial set up or commissioning of an Evolution autopilot system with a p70 p70s p70R or p70Rs Pilot Controller ensu...

Page 42: ...NDBY button for one second until the logo appears If the unit is being switched on for the first time or after a factory reset the set up wizard will be launched Note The logo is not displayed if the unit is in sleep mode In Sleep mode the unit may appear off but still has power 2 To turn the Pilot controller off press and hold the STANDBY button After 1 second a pop up count down is displayed 3 C...

Page 43: ... selecting a different vessel type When choosing a suitable vessel type the emphasis should be on safe and dependable steering response 7 7 Using the Dockside wizard The dockside calibration process must be completed before the Evolution autopilot system can be used for the first time The Dockside wizard guides you through the steps required for dockside calibration The Dockside wizard contains di...

Page 44: ... the hard over time SmartPilot and SPX in this document for information on how to calculate and adjust the hard over time Checking the rudder drive As part of the dockside calibration process the system will check the drive connection Once it has completed the check successfully a message will appear asking if it is safe for the system to take the helm During this procedure the autopilot will move...

Page 45: ... fitted you MUST ensure that adequate provision is made to prevent the steering mechanism from impacting the end stops 7 9 Compass linearization Evolution autopilots The EV unit s internal compass needs to compensate for local and the Earth s magnetic fields This is achieved using an automatic process known as linearization Initial linearization When the EV unit is first installed and powered up o...

Page 46: ... and alignment is complete System monitoring and adaptation To ensure optimum performance after the initial linearization process is complete the EV continues to monitor and adapt the compass linearization to suit current conditions If the conditions for linearization are less than ideal the automatic linearization process temporarily pauses until conditions improve again The following conditions ...

Page 47: ...agnetic interference may build a heading error over time Note The compass lock may be released at any time to allow the compass continuous linearization to restart This is particularly useful if planning a long voyage The earth s magnetic field will change significantly from one geographical location to another and the compass can continuously compensate for the changes ensuring you maintain accur...

Page 48: ...48 p70 p70R ...

Page 49: ...p and commissioning on page 51 8 4 Powering the Pilot controller on on page 51 8 5 Using the Set up Wizard on page 52 8 6 Dockside calibration on page 53 8 7 Dealer settings on page 54 8 8 Adjusting the hard over time SmartPilot and SPX on page 55 8 9 Sea trial calibration on page 55 8 10 Checking autopilot operation on page 57 Commissioning SPX and SmartPilot systems 49 ...

Page 50: ...changes to the pilot response at any time by accessing the Pilot response menu from Main menu Pilot Response 1 From the Main menu highlight Pilot response and press SELECT 2 Use the UP and DOWN buttons to change the response value to the required setting 3 Press SAVE to save the response value Setting Options Levels 1 to 3 Minimize the amount of pilot activity This conserves power but may compromi...

Page 51: ... of the vessel s autopilot system Commissioning process Check you have adhered to commissioning pre requisites Initial power on and set up Dockside calibration Dealer Settings on SeaTalk systems Set hard over time non rudder reference systems only Sea trial calibration System checks 8 4 Powering the Pilot controller on 1 Press and hold the STANDBY button for one second until the logo appears If th...

Page 52: ...tions at any time with the pilot in Standby by selecting MENU Set up Autopilot Calibration Vessel Settings Vessel Hull Type As a general guide select the option that most closely matches your vessel type and steering characteristics The options are Race Sail Sail Cruiser Catamaran Workboat RIB Outboard Speedboat Inboard Speedboat Power Cruiser 1 12 kts Power Cruiser 2 30 kts Power Cruiser 3 30 kts...

Page 53: ...d turn the rudder hard to port and select OK 3 When prompted turn the rudder hard to starboard and select OK 4 When prompted turn the rudder back to the center and select OK Note You can cancel Dockside calibration at any time by selecting STANDBY Rudder Limit setting As part of the Dockside calibration process the system will set up the rudder limits For vessels with a rudder reference transducer...

Page 54: ...kng system for SeaTalk systems the Dealer settings should be set before going out on the sea The dealer settings menu can be accessed from Main menu Set up Auto pilot calibration Dealer settings Once entered the dealer settings menu will cycle through all available options Options and limits are dependent on the course computer installed 54 p70 p70R ...

Page 55: ... room to manoeuvre The Sea Trial wizard guides you through the steps required for Sea trial calibration The Sea trial wizard includes the following steps Swing compass Align compass to GPS Align compass manually Auto Learn You can access the Sea trial wizard at any time from the Commissioning menu Menu Set up Autopilot calibration Commissioning Note Sailing vessels should perform the sea trial und...

Page 56: ... and 500m ahead D12106 1 Caution Autolearn Please ensure sufficient free space ahead Minimum 100x500m long significantly more for a high speed vessel Performing Auto learn Auto learn is available from the Sea trial wizard or from the Commissioning menu Maintain a normal cruising speed at least 3 kts throughout the auto learn process 1 Ensure there is sufficient free water in front of the vessel an...

Page 57: ...k the counter rudder setting 1 Ensure you have set the autopilot response to level 5 2 Drive your vessel at a typical cruising speed in clear water 3 Press AUTO and if necessary engage the autopilot 4 Make a 90 course change When rudder gain and counter rudder are both set correctly the vessel performs a smooth continuous turn with minimal overshoot If the counter rudder is too low the vessel will...

Page 58: ...58 p70 p70R ...

Page 59: ... on page 60 9 2 Mode menu on page 61 9 3 Patterns on page 61 9 4 Track mode on page 62 9 5 Wind vane mode Sailing boats only on page 64 9 6 Power steer on page 66 9 7 Jog steer tiller pilots only on page 67 9 8 Shortcut key on page 67 Pilot modes 59 ...

Page 60: ...sing 1 button will increment the course to port by 1º and 10 will increment by 10º Turning the rotary controller 1 click anticlockwise will increment the course to port by 1º 2 Use the 1 and 10 buttons or turn the rotary controller clockwise to change the vessel s course to starboard Pressing 1 button will increment the course to starboard by 1º and 10 will increment by 10º Turning the rotary cont...

Page 61: ...rence Fishing patterns require GPS data to be available on your system Pattern Adjustment Icon Direction Circle Radius Direction Angle Zig Zag Length Direction Cloverleaf Radius Direction Radius Spiral Increment Direction Radius Circle against Distance Direction Figure 8 Radius Direction Width Height Width increment Pattern search Height increment Direction 180 turn Radius Direction Width Box sear...

Page 62: ...to a suitable multifunction display with autopilot control enabled D12111 2 1 2 2 3 Item Description 1 Current goto waypoint 2 Subsequent waypoints in a route 3 Final waypoint in route Using track mode Start with your connected chartplotter following a route From the menu 1 Select Mode 2 Select Track The display will show the bearing to the next planned waypoint and the direction in which the vess...

Page 63: ... and the navigator accepts the next waypoint you activate the Man Overboard MOB function When the warning sounds the autopilot continues on its current heading but displays the bearing to the next waypoint the direction the boat will turn to take up that bearing Arriving at a waypoint As you approach each waypoint an alarm sounds and a warning is displayed When the waypoint arrival warning is disp...

Page 64: ...e it uses the wind angle as the primary heading reference As changes in the true or apparent wind angle occur it adjusts the locked heading to maintain the original wind angle D12116 2 1 3 5 2 4 Item Description 1 Wind direction 2 Wind shift 3 New wind direction 4 Relative wind angle 5 Vessel turns to maintain same relative wind angle You can only select Wind Vane mode if your autopilot is receivi...

Page 65: ...ry controller ii press Standby to return to manual steering steer onto the required heading and press Cancel to return to Wind Vane mode with the new wind angle Using AutoTack in wind vane mode The autopilot has a built in automatic tack facility AutoTack that turns your vessel relative to the wind angle you re currently on and it tacks the vessel to put you on the opposite relative wind angle D12...

Page 66: ...oat Settings menu Menu Set up Autopilot Calibration Sail Boat Settings Gybe Inhibit 9 6 Power steer Power steer mode enables you to use the rotary controller of the p70Rs or a connected joystick to directly steer the vessel on manual heading Power steer has 2 options Proportional The rudder will behave in proportion to the movement of the rotary control or joystick Bang Bang Joystick only The rudd...

Page 67: ...ns or turn the rotary controller anticlockwise to retract the ram 3 Use the 1 and 10 buttons or turn the rotary controller clockwise to extend the ram 9 8 Shortcut key When in pilot view you can assign pilot modes to the LEFT SOFT button as a shortcut depending on which vessel type has been set up The following pilot modes can be assigned as shortcuts Track default All vessels Pattern Power and fi...

Page 68: ...68 p70 p70R ...

Page 69: ...pilot views on page 70 10 2 Graphical view on page 70 10 3 Large view on page 71 10 4 Standard view on page 71 10 5 Multiple view on page 72 10 6 2D View on page 72 10 7 Setting the pilot view on page 73 10 8 Setting up data boxes on page 73 Pilot views 69 ...

Page 70: ... Steer 4 Partial compass 5 Wind direction indicator 6 Current heading Standby and Power Steer Locked heading Auto Wind Vane and Pattern 7 Heading Magnetic True The type of heading is determined by the language selection during the start up wizard 8 Shortcut key Left Soft button Track default Pattern Wind Vane Initiating Track when the Pilot View is set to Graphical will display the rolling road vi...

Page 71: ...t button Track default Pattern Wind Vane 10 4 Standard view The Standard view provides large sized heading data combined with data boxes which provide further information 335o Track 15 69 23 30 20 10 10 20 30 Mag TWS Kts Depth ft SOG Kts Pattern D13027 1 2 4 6 3 5 1 7 1 Rudder position 2 Pilot Mode 3 Current Heading Auto Destination waypoint name Track Locked wind angle Wind Vane Pattern symbol Pa...

Page 72: ...ult Pattern Wind Vane 10 6 2D View The 2D view includes a full compass dial and data boxes for displaying information Track 30 20 10 10 20 30 Track Waypoint 17 TWS Kts Depth ft SOG Kts N E W S 050o M 18 73 22 D13021 1 9 3 4 5 1 2 8 6 7 10 11 1 Pilot Mode 2 Current Heading Auto Destination waypoint name Track Locked wind angle Wind Vane Pattern symbol Pattern Power Steer symbol Power Steer 3 Rudder...

Page 73: ... your chosen Pilot view displayed 1 Select Menu 2 Select Pilot View 3 Select Data Boxes 4 Select the Data box that you want to change the data for A list of available data is displayed 5 Select the relevant data type from the list Data boxes The following data types are available which can be displayed in the data boxes Depth XTE Cross track error DTW Distance to waypoint BTW Bearing to waypoint A...

Page 74: ...74 p70 p70R ...

Page 75: ...Chapter 11 Pilot controller alarms Chapter contents 11 1 Alarms on page 76 Pilot controller alarms 75 ...

Page 76: ...cted Initial Linearization complete further linearization will be performed in the background None Calibration required Indicates a pilot that has not been fully calibrated Initiated in Standby mode for a few seconds after initial power up Dockside and Seatrial calibration needs to be undertaken Change pilot mode Self cancelling Alarm name Alarm type Description Action Off Course Indicates Vessel ...

Page 77: ... and ACU has been lost or cannot be es tablished Check LED diag nostics in dicators Check output from EV and ACU units Check physical connec tions and cable con dition re place if necessary Alarm name Alarm type Description Action SeaTalk fail Safety Alarm Total SeaTalk data transmission problem Check connec tions for short or open cir cuit Check system for device fault Pilot drops to standby and ...

Page 78: ...d due to compass or drive error Restart Au toLearn AutoLearn fail 5 Safety Alarm AutoLearn has failed due to motor going into current limit Restart Au toLearn Alarm name Alarm type Description Action AutoLearn fail 6 Safety Alarm AutoLearn has failed as boat went into spin i e motor did not drive the rudder back to opposite side Restart Au toLearn Turn rate too high Safety Alarm Indicates an exces...

Page 79: ...data Alarm Speed data has stopped Check Seatalk connec tions for short or open cir cuit Check system for Seatalk device fault SeaTalk 1 fail Alarm SeaTalk channel 1 has a com munication problem Change pilot mode SeaTalk 2 fail Alarm SeaTalk channel 2 has a com munication problem Change pilot mode Drive short Warning Indicates a short circuit in the drive unit Pilot will power down User to fix shor...

Page 80: ...80 p70 p70R ...

Page 81: ...options Chapter contents 12 1 Set up menu on page 82 12 2 Autopilot calibration menu on page 82 12 3 User preferences menu on page 90 12 4 System set up menu on page 92 12 5 Diagnostics menu on page 93 Set up menu options 81 ...

Page 82: ... any data from any other external unit On Off Factory Reset Delete user settings and Restore unit to factory default settings Yes No Diagnostics Information About the display and system and key beep on off setting Yes No Set up Wizard Launch the initial set up wizard Language Vessel hull type Welcome page 12 2 Autopilot calibration menu The Autopilot Calibration menu options are determined by the ...

Page 83: ... Response 1 Wind Shift Alarm 2 Commissioning Dockside Wizard Sea Trial Wizard 1 Motor Phasing 1 Swing Compass 1 Auto Learn 1 Align Compass GPS Align Compass 1 Restart Compass 2 Compass Lock 2 Pilot Factory Reset Debug Level 2 ACU Debug Level 2 Set up menu options 83 ...

Page 84: ... cruiser 1 Vessel speeds up to 12 knots Power cruiser 2 Vessel speeds up to 30 knots Power cruiser 3 Vessels speeds greater than 30 knots Sport fishing Pro fishing Drive type List of compatible drive types The list is dependant upon connected autopilot system Note The drive type option is not available in systems comprising of an EV 2 and an ACU 300 Type 1 Linear ACU 200 and ACU 400 Type 2 Linear ...

Page 85: ...ing must be manually aligned to the vessels known heading 10 to 10 179 to 180 Latitude Compass Damping If no valid latitude data is available the autopilot system will use this setting which provides the necessary adaptation for higher latitudes N A On Off default Auto release Auto release allows you to override the pilot by taking hold of the wheel or tiller When you release the wheel or tiller t...

Page 86: ...nce has been fitted you MUST ensure that adequate provision is made to prevent the steering mechanism from impacting the end stops 10º 40º 30º default Rudder offset This specifies the offset from amidships zero adjustment 9 to 9 Reverse rudder ref This reverses the phase of the rudder reference display Note This option is not available unless you have a rudder reference transducer fitted Note This...

Page 87: ... Off course alarm This screen determines the angle used by the OFF COURSE alarm The OFF COURSE alarm operates if the pilot strays off course by more than the specified angle for more than 20 seconds 15 to 40 20º default Turn rate limit This limits your vessel s rate of turn under autopilot system control It is only effective if your speed is greater than 12 knots 1 to 30 7º default Power steer Thi...

Page 88: ...from the wind With gybe inhibit set to prevent you can only tack through into the wind Gybe inhibit does not effect Auto Turn Allow Gybe Prevent Gybe Allow Gybe Prevent Gybe Wind Type This option determines whether the vessel steers to apparent or true wind in Wind Vane mode True Apparent True Apparent Wind Trim Response Wind Trim Response controls how quickly the autopilot responds to changes in ...

Page 89: ...he compass from performing further automatic linearization On Off N A Debug Level 1 Sets the debug value for troubleshooting purposes The recommended Debug setting is 7 Note The Debug level should only be set temporarily usually when requested by Technical Support as part of a troubleshooting sea trial 0 63 N A ACU Debug Level 1 Sets the debug value for troubleshooting purposes The recommended Deb...

Page 90: ...bles you to specify the units used for the following key measurements Speed Distance Depth Wind speed Temperature Flow rate Heading Pressure Volume Barometric Speed kts knots mph miles per hour km h Kilometers per hour Distance nm Nautical miles sm Statute miles km Kilometers Depth ft Feet m Metres fa Fathoms Wind speed kts knots m s metres per second Temperature ºC degrees centigrade ºF degrees f...

Page 91: ...ch German Greek Italian Japanese Korean Norwegian Polish Portuguese Brazilian Russian Spanish Swedish Turkish Variation Enables you to turn on and off magnetic variation specify slave source or adjust manually Variation mode Variation range Variation mode On Off default Slave Variation range 30º 30º Key Beep Enable and disable the audible beep when pressing buttons On default Off Set up menu optio...

Page 92: ... Group 5 Brightness color group Enables synchronization of the displays brightness and color to be the same as the other units in the same group Sync brightness color This display This group Data sources Allows you to view and select preferred data sources Select data source Data source found Data source details Select data source GPS position GPS Datum Time Date Heading Depth Speed Wind Data sour...

Page 93: ...on about the autopilot you are using Note The About Pilot menu is only available on Pilot controllers NMEA Code Product ID Serial number Description Software version PCB Number CAN Volts Unit Volts Operating hours Deviation About system Allows you to search the SeaTalkng network and display information about the products found Model number Serial number Software version Hardware version Volts Self...

Page 94: ...94 p70 p70R ...

Page 95: ...pter contents 13 1 Routine equipment checks on page 96 13 2 Product cleaning on page 96 13 3 Cleaning the display screen on page 97 13 4 Cleaning the display case on page 97 13 5 Cleaning the sun cover on page 98 Maintenance 95 ...

Page 96: ...on a regular basis Examine all cables for signs of damage or wear and tear Check that all cables are securely connected 13 2 Product cleaning Best cleaning practices When cleaning products If your product includes a display screen do NOT wipe the screen with a dry cloth as this could scratch the screen coating Do NOT use abrasive or acid or ammonia based products Do NOT use a jet wash 96 p70 p70R ...

Page 97: ...ing cloth available from an opticians 13 4 Cleaning the display case The display unit is a sealed unit and does not require regular cleaning If it is necessary to clean the unit follow this basic procedure 1 Switch off the power to the display 2 Wipe the display with a clean soft cloth a microfibre cloth is ideal 3 If necessary use a mild detergent to remove grease marks Note Do NOT use solvents o...

Page 98: ...taminants may stick to this surface To avoid damaging the monitor display clean the sun cover regularly following this procedure 1 Carefully remove the sun cover from the display 2 Rinse the sun cover with fresh water to remove all dirt particles and salt deposits 3 Allow the sun cover to dry naturally 98 p70 p70R ...

Page 99: ...ontents 14 1 Troubleshooting on page 100 14 2 Power up troubleshooting on page 101 14 3 System data troubleshooting on page 102 14 4 Miscellaneous troubleshooting on page 103 14 5 Performing a Factory Reset on page 104 System checks and troubleshooting 99 ...

Page 100: ...r to packing and shipping subjected to comprehensive test and quality assurance programs However if you experience problems with the operation of your product this section will help you to diagnose and correct problems in order to restore normal operation If after referring to this section you are still having problems with your unit please contact Raymarine Technical Support for further advice 10...

Page 101: ... are secure clean and free from corrosion replace if necessary 5 With the product under load using a multi meter check for high voltage drop across all connectors fuses etc replace if necessary Incorrect power connection The power supply may be wired incorrectly ensure the installation instructions have been followed Power source insufficient With the product under load using a multi meter check t...

Page 102: ... display or engine interface is not operating Refer to the manufacturer s handbook for the equipment in question Instrument engine or other system data is unavailable at all displays Software mismatch between equipment may prevent communication Contact Raymarine technical support Check that all required equipment is connected to the network Check the status of the Raymarine network Switch Network ...

Page 103: ...k that the power source is of the correct voltage and sufficient current Software mismatch on system upgrade required Go to www raymarine com and click on support for the latest software downloads Display behaves erratically Frequent unexpected resets System crashes or other erratic behavior Corrupt data other unknown issue Perform a factory reset Important This will result in the loss of any sett...

Page 104: ...ault settings follow the steps below Note Performing a factory reset will erase all saved data and customized settings 1 Press the Menu button 2 Select Set Up 3 Select Factory Reset 4 Select Yes Your unit will now reset itself to factory default settings 104 p70 p70R ...

Page 105: ...Chapter 15 Technical specification Chapter contents 15 1 Technical specification on page 106 Technical specification 105 ...

Page 106: ...rating temperature 25 C to 55 C 13 F to 131 F Storage temperature range 30 C to 70 C 22 F to 158 F Relative humidity max 93 Water proof to IPX6 Display screen TFT LCD display 16bit color 64k colors Resolution 320x240 Brightness 700 cd m2 Data connections 2 x SeaTalkng ports fulling compliant with NMEA2000 SeaTalk specifications Conformance Europe 2004 108 EC Australia and New Zealand C Tick compli...

Page 107: ...Chapter 16 Technical support Chapter contents 16 1 Raymarine product support and servicing on page 108 16 2 Learning resources on page 109 Technical support 107 ...

Page 108: ...pdates http www rayma rine com software Telephone and e mail support Region Tele phone E mail United Kingdom UK EMEA and Asia Pacific 44 0 1329 246 777 support uk raymarine com United States US 1 603 324 7900 Toll free 800 539 5539 support raymarine com Region Tele phone E mail Australia and New Zealand 61 2 8977 0300 aus support raymarine com Raymarine subsidiary France 33 0 1 46 49 72 30 support...

Page 109: ... in depth training courses to help you make the most of your products Visit the Training section of the Raymarine website for more information http www raymarine co uk view id 2372 FAQs and Knowledge Base Raymarine has produced an extensive set of FAQs and a Knowledge Base to help you find more information and troubleshoot any issues http www raymarine co uk knowledgebase Technical support forum Y...

Page 110: ...110 p70 p70R ...

Page 111: ...d accessories Chapter contents 17 1 Spares and accessories on page 112 17 2 SeaTalkng cables and accessories on page 112 17 3 SeaTalkng cable kits on page 114 17 4 SeaTalk accessories on page 117 Spares and accessories 111 ...

Page 112: ...62 Includes 2 x 5 m 16 4 ft Backbone cable A06036 1 x 20 m 65 6 ft Backbone cable A06037 4 x T piece A06028 2 x Backbone terminator A06031 1 x Power cable A06049 SeaTalkng 0 4 m 1 3 ft spur A06038 SeaTalkng 1 m 3 3 ft spur A06039 SeaTalkng 3 m 9 8 ft spur A06040 SeaTalkng 5 m 16 4 ft spur A06041 SeaTalkng 0 4 m 1 3 ft elbow spur A06042 SeaTalkng 0 4 m 1 3 ft backbone A06033 SeaTalkng 1 m 3 3 ft ba...

Page 113: ...ACU SPX SeaTalkng spur cable 0 3 m 1 0 ft R12112 Connects an SPX course computer or an ACU to a SeaTalkng backbone SeaTalk 3 pin to SeaTalkng adaptor cable 0 4 m 1 3 ft A06047 SeaTalk to SeaTalkng spur 1 m 3 3 ft spur A22164 SeaTalk2 5 pin to SeaTalkng adaptor cable 0 4 m 1 3 ft A06048 DeviceNet adaptor cable Female A06045 Allows the connection of NMEA 2000 devices to a SeaTalkng system DeviceNet ...

Page 114: ...ctor A06064 Each connector block allows the connection of up to 3 compatible devices When correctly terminated a connector block forms a complete backbone Multiple connector blocks can be daisy chained together 1 N A N A N A SeaTalkng Backbone kit A25062 Parts included Quan tity Connector A Cable Connector B Length Backbone cable A06036 2 5 m 16 4 ft Backbone cable A06037 1 20 m 65 6 ft Power cabl...

Page 115: ...06036 2 5 m 16 4 ft Power cable A06049 1 1 m 3 3 ft Spur cable A06040 1 1 m 3 3 ft ACU SPX power cable R12112 for powering the SeaTalkng backbone from the autopilot system 1 0 3 m 1 0 ft 5 way connector A06064 Each connector block allows the connection of up to 3 compatible devices When correctly terminated a connector block forms a complete backbone Multiple connector blocks can be daisy chained ...

Page 116: ... E22158 Parts included Quan tity Connector A Cable Connector B Length Power cable A06049 1 1 m 3 3 ft Backbone terminator A06031 2 N A N A N A Blanking plug A06032 N A N A N A SeaTalk 3 pin adapter cable A06047 1 0 4 m 1 3 ft SeaTalk to SeaTalkng con verter E22158 Enables the con nection of SeaTalk devices to a SeaTalkng sys tem 1 N A N A N A 116 p70 p70R ...

Page 117: ...otes 3 way SeaTalk junction box D244 1 m 3 28 ft SeaTalk extension cable D284 3 m 9 8 ft SeaTalk extension cable D285 5 m 16 4 ft SeaTalk extension cable D286 9 m 29 5 ft SeaTalk extension cable D287 12 m 39 4 ft SeaTalk extension cable E25051 20 m 65 6 ft SeaTalk extension cable D288 Spares and accessories 117 ...

Page 118: ...118 p70 p70R ...

Page 119: ... product software to introduce improvements additional hardware support and user interface features The table below details some of the important enhancements and which software revision they were introduced with Software version Applica ble prod uct man ual Pilot con troller compati bility Changes V3 05 81365 2 88057 2 82285 6 p70s p70Rs p70 p70R Track acquisition Track Keeping enhancements Vane ...

Page 120: ...d uct man ual Pilot con troller compati bility Changes V1 08 81355 1 p70 p70R Corrected unit reset when unit is set to Swedish Improved compatibility on multiple control head systems V1 06 81331 1 p70 p70R Initial Release 120 p70 p70R ...

Page 121: ......

Page 122: ...www raymarine com Raymarine UK Limited Marine House Cartwright Drive Fareham PO15 5RJ United Kingdom Tel 44 0 1329 246 700 ...

Reviews: