background image

13.2 Power up troubleshooting

Product does not turn on or keeps turning off

Possible causes

Possible solutions

Blown fuse / tripped
breaker.

1.

Check condition of relevant fuses and breakers and connections,
replace if necessary. (Refer to the

Technical Specification

section of

your product’s installation instructions for fuse ratings.)

2. If fuse keeps blowing check for cable damage, broken connector pins

or incorrect wiring.

Poor / damaged /
insecure power supply
cable / connections

1.

Check that the power cable connector is correctly orientated and fully
inserted into the display connector and locked in position.

2. Check the power supply cable and connectors for signs of damage or

corrosion, and replace if necessary.

3.

With the display turned on, try flexing the power cable near to the
display connector to see if this causes the unit to restart or lose
power. Replace if necessary.

4.

Check the vessel’s battery voltage and the condition of the battery
terminals and power supply cables, ensuring connections are secure,
clean and free from corrosion. Replace if necessary.

5. With the product under load, using a multi-meter, check for high

voltage drop across all connectors / fuses etc, and replace if
necessary.

Incorrect power
connection

The power supply may be wired incorrectly, ensure the installation
instructions have been followed.

Product will not start up (restart loop)

Possible causes

Possible solutions

Power supply and
connection

See possible solutions from the table above, entitled ‘Product does not
turn on or keeps turning off’.

Software corruption

1.

In the unlikely event that the product’s software has become
corrupted, try downloading and installing the latest software from the
Raymarine website.

2. On display products, as a last resort, attempt to perform a ‘Power

on Reset’. Be aware that this will delete all settings / presets and
user data (such as waypoints and tracks), and revert the unit back
to factory defaults.

Troubleshooting

73

Summary of Contents for CYCLONE

Page 1: ...2021 Raymarine UK Limited 87402 1 Document number 05 2021 Date English en US Installation instructions CYCLONE CYCLONE PRO...

Page 2: ......

Page 3: ...more than three copies of this manual for your own use You may not make any further copies or distribute or use the manual in any other way including without limitation exploiting the manual commerci...

Page 4: ......

Page 5: ...IMO and SOLAS 13 Warranty registration 14 Product disposal 14 Technical accuracy 14 Operation instructions 14 Multifunction display software version 14 Chapter 2 Document information 15 2 1 Document i...

Page 6: ...6 7 VCM100 location requirements 35 Chapter 7 Cables and connections 37 7 1 General cabling guidance 38 Cable types and length 38 Cable routing 38 Strain relief 38 Circuit isolation 38 Cable shieldin...

Page 7: ...Troubleshooting 72 13 2 Power up troubleshooting 73 13 3 Radar troubleshooting 74 13 4 Radar target acquisition data source requirements 75 13 5 Doppler data source requirements 75 13 6 VCM100 LED in...

Page 8: ...8...

Page 9: ...om or near fuel tanks Warning Positive ground systems Do not connect this unit to a system which has positive grounding Warning Power supply voltage Connecting this product to a voltage supply greater...

Page 10: ...stroboscopic visual effect known as wagon wheeling or aliasing Wagon wheeling refers to an optical illusion similar to that seen in some movies where wagon wheels appear to occasionally rotate backwar...

Page 11: ...cy Electromagnetic Fields 3 kHz to 300 GHz ICNIRP Guidelines When properly installed and operated the use of this Radar conforms to ICNIRP Guidelines 1998 International Commission on Non Ionising Radi...

Page 12: ...ent items of electrical equipment to provide the best conditions for EMC performance throughout the installation Suppression ferrites Raymarine cables may be pre fitted or supplied with suppression fe...

Page 13: ...the EMC Directive 2014 30 EU The original Declaration of Conformity certificate may be viewed on the relevant product page at www raymarine com manuals Radar licensing Installation and operation of t...

Page 14: ...nt at a recycling center or other collection point For more information about suitable collection points for waste electrical and electronic equipment in your region refer to the Raymarine website www...

Page 15: ...Chapter 2 Document information Chapter contents 2 1 Document information on page 16 Document information 15...

Page 16: ...stem of connected marine electronics troubleshoot problems and obtain technical support if required This and other Raymarine product documents are available to download in PDF format from www raymarin...

Page 17: ...0628 Cyclone Power Cable 15 m A80653 Radar data Cable 15 m A80659 VCM100 E70648 Cyclone 4ft Array 15 m Cables T70492 Cyclone Pedestal E70620 Cyclone 4ft Antenna E70629 Cyclone Power Cable 15 m A80653...

Page 18: ...E70630 Cyclone Power Cable 15 m A80653 Radar data Cable 15 m A80659 VCM100 E70648 Document illustrations Your product and if applicable its user interface may differ slightly from that shown in the i...

Page 19: ...for your product refer to the documentation that accompanies your display All product documentation is available to download from the Raymarine website www raymarine com manuals 81370 LightHouse 3 MF...

Page 20: ...20...

Page 21: ...yclone Open Array Radar on page 22 3 2 VCM100 Voltage Converter Module on page 23 3 3 Compatible multifunction displays on page 23 3 4 Lighthouse MFD software requirements on page 24 3 5 Required addi...

Page 22: ...dance Scanner rotation up to 60 RPM Data connection via RayNet cable 12 V or 24 V operation with VCM100 power converter Waterproof to IPX 6 Multiple radar scanners You can use a maximum of two radar s...

Page 23: ...of Doppler information the process of matching on screen radar returns with real world objects becomes a much simpler task 3 2 VCM100 Voltage Converter Module The VCM100 Voltage Converter Module conve...

Page 24: ...ces to be available on your system e g connected to your multifunction display via SeaTalkng or NMEA 0183 Data type Example data source COG Course Over Ground GPS or GNSS receiver MFD internal receive...

Page 25: ...Chapter 4 Parts supplied Chapter contents 4 1 Parts supplied pedestal on page 26 4 2 Parts supplied antenna on page 27 4 3 Parts supplied VCM100 on page 27 Parts supplied 25...

Page 26: ...box 1 Radar Pedestal 2 M10 Stud x4 3 M10 Nut x8 4 M10 Spring Washer x4 5 M10 Plain Washer x4 6 Mounting Gasket 7 Mounting Template 8 Radar Data Cable 9 Power Cable Note Power and Data cables are only...

Page 27: ...na box 1 Radar Antenna 2 M8 Hex Bolt x4 3 M8 Plain Washer x4 4 M8 Spring Washer x4 5 O Ring x4 4 3 Parts supplied VCM100 Parts illustrated are supplied in the VCM100 box 1 VCM100 2 Cable Clamp 3 VCM10...

Page 28: ...28...

Page 29: ...Chapter 5 Product dimensions Chapter contents 5 1 Cyclone series on page 30 5 2 VCM100 Voltage Convertor Module on page 30 Product dimensions 29...

Page 30: ...eries A Antenna size is determined by model E70628 36 in array 1031 mm 40 5 in E70629 48 in array 1336 mm 52 5 in E70630 72 in array 1945 mm 76 5 in 5 2 VCM100 Voltage Convertor Module A Minimum cable...

Page 31: ...position overview on page 32 6 3 Radar scanner general location requirements on page 32 6 4 Compass safe distance on page 34 6 5 Radar scanner mounting angle on page 34 6 6 Multiple Radar scanners lo...

Page 32: ...s near as possible to the vessel s centerline On a rigid and stable platform capable of securely supporting the scanner under seagoing conditions For GPS ensure unobstructed view of the sky Avoid larg...

Page 33: ...ar display indicate possible shadowed areas This information should be posted near the display unit and operators must be alert for targets in these blind areas Access The radar scanner should be easi...

Page 34: ...s In this situation when choosing the installation location for your product ensure that the compass is not affected by the product when it is in a powered state 6 5 Radar scanner mounting angle Ensur...

Page 35: ...tion holes are not obstructed Allow adequate separation of equipment Mounting surface Ensure equipment is adequately supported on a secure surface Do not mount units or cut holes in places which may d...

Page 36: ...Power supply Select a location that is as close as possible to the vessel s DC power source This will help to keep cable runs to a minimum 36...

Page 37: ...Chapter 7 Cables and connections Chapter contents 7 1 General cabling guidance on page 38 7 2 Cyclone connections overview on page 39 7 3 Cable routing options on page 39 Cables and connections 37...

Page 38: ...cables in place using cable clips or cable ties Coil any excess cable and tie it out of the way Where a cable passes through an exposed bulkhead or deckhead use a suitable watertight feed through Do...

Page 39: ...ayNet connector Connects to a RayNet Radar data cable 7 3 Cable routing options You can route the power cable and data cable away from the radar in different ways The routing options allow for the cab...

Page 40: ...Rear exit 1 Mounting surface 2 Power and RayNet connectors 3 Power and RayNet cables 40...

Page 41: ...RayNet connectors 3 Power and RayNet cables 4 Cable seal Note The power and data cables should pass through the cable seal using the slits The cable seal should then be fitted to the underside of the...

Page 42: ...42...

Page 43: ...Chapter 8 Installation Chapter contents 8 1 Warnings and cautions on page 44 8 2 Schematic diagram on page 44 8 3 Tools required on page 44 8 4 Mounting on page 45 Installation 43...

Page 44: ...ning any installation It is also useful for any future additions or maintenance of the system The diagram should include Location of all components Connectors cable types routes and lengths 8 3 Tools...

Page 45: ...in the event that the pedestal falls before it is secured to the mounting surface Do NOT attach the antenna to the pedestal prior to lifting 1 Check the selected location A clear flat platform is req...

Page 46: ...tal base and hand tighten If the supplied studs are not long enough for the mounting surface thickness use M10 stainless steel grade A4 70 studding of a suitable length Important Ensure the vents on t...

Page 47: ...pedestal back into position Important For more information refer to p 37 Cables and connections Important Ensure the cables are NOT powered during the installation procedure 11 Grease the 4 metal stu...

Page 48: ...e nut Cut off any excess stud Attaching the antenna Before attaching the antenna to the pedestal unit ensure that The pedestal base is securely fixed to the platform Power and data cables are connecte...

Page 49: ...e cover 2 Referring to the following illustration lower the antenna onto the pedestal placing the front on first and clipping it in place 3 Using the 4 hex bolts and associated washers and O rings sec...

Page 50: ...lanyard supplied with the mast bracket MUST be secured properly to the mast and to the Radar scanner unit according to the instructions provided with the bracket If a safety lanyard is not supplied wi...

Page 51: ...driver screw the self tapping mounting screws through the mounting lug holes into the drilled holes 8 Connect the cables according to the instructions provided in this handbook 9 Hold the cable clamp...

Page 52: ...52...

Page 53: ...Chapter 9 System connections Chapter contents 9 1 Typical system examples on page 54 System connections 53...

Page 54: ...owing illustrations show the various products that can be connected in a typical system These systems are shown as an example only and may differ from your planned installation For information on how...

Page 55: ...tant Fuses not supplied are required for circuit protection for the Cyclone Radar 12 V dc 15 A thermal fuse at breaker x1 20 A inline fuse on RED power cable x1 24 V dc 8 A thermal fuse at breaker x1...

Page 56: ...nt Fuses not supplied are required for circuit protection for the Cyclone Radar 12 V dc 15 A thermal fuse at breaker x1 20 A inline fuse on RED power cable x1 24 V dc 8 A thermal fuse at breaker x1 10...

Page 57: ...6 MFD power cable 7 12 V dc 24 V dc Power supply Distribution Panel or Battery 8 VCM100 power cable System connections 57...

Page 58: ...58...

Page 59: ...Chapter 10 Power connections Chapter contents 10 1 Radar power connections on page 60 Power connections 59...

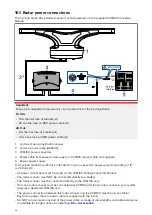
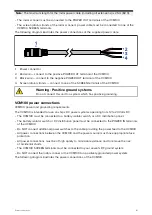
Page 60: ...pply The Cyclone Open Array Radar is intended for use on vessel DC power systems operating at 12 or 24 Volts DC All power connections must be made via the VCM100 Voltage Converter Module The radar sca...

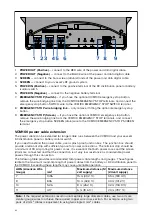
Page 61: ...ower connections VCM100 power and grounding requirements The VCM100 is intended for use on ships DC power systems operating from 12 to 24 Volts DC The VCM100 must be connected to a battery isolator sw...

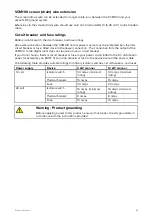
Page 62: ...power cable can be extended for longer cable runs between the VCM100 and your vessel s DC distribution panel or battery isolator switch If you need to extend the power cable use a splash proof juncti...

Page 63: ...or circuit breaker If you do not have a thermal circuit breaker or fuse in your power circuit fitted to the DC distribution panel for example you MUST fit an in line breaker or fuse to the positive wi...

Page 64: ...64...

Page 65: ...Chapter 11 System checks Chapter contents 11 1 Radar scanner initial power on test on page 66 11 2 Radar check on page 66 System checks 65...

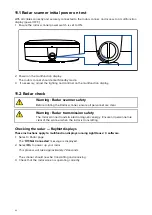
Page 66: ...safety Before rotating the Radar scanner ensure all personnel are clear Warning Radar transmission safety The radar scanner transmits electromagnetic energy Ensure all personnel are clear of the scan...

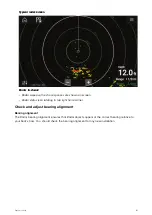
Page 67: ...o responses are shown on screen Radar status icon rotating in top right hand corner Check and adjust bearing alignment Bearing alignment The Radar bearing alignment ensures that Radar objects appear a...

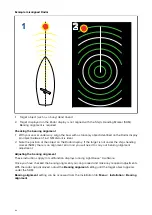
Page 68: ...t on the Radar display If the target is not under the ships heading marker SHM there is an alignment error and you will need to carry out bearing alignment adjustment Adjusting the bearing alignment T...

Page 69: ...Chapter 12 Operation Chapter contents 12 1 Operation instructions on page 70 Operation 69...

Page 70: ...instructions for your product refer to the documentation that accompanies your display All product documentation is available to download from the Raymarine website www raymarine com manuals 81370 Li...

Page 71: ...on page 72 13 2 Power up troubleshooting on page 73 13 3 Radar troubleshooting on page 74 13 4 Radar target acquisition data source requirements on page 75 13 5 Doppler data source requirements on pa...

Page 72: ...oducts are subjected to comprehensive testing and quality assurance programs If you do experience problems with your product this section will help you to diagnose and correct problems in order to res...

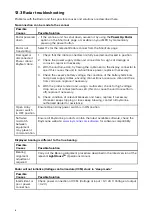
Page 73: ...necessary 4 Check the vessel s battery voltage and the condition of the battery terminals and power supply cables ensuring connections are secure clean and free from corrosion Replace if necessary 5 W...

Page 74: ...clean and free from corrosion replace if necessary 5 With the product under load using a multi meter check for high voltage drop across all connectors fuses etc this can cause the unit to reset turn...

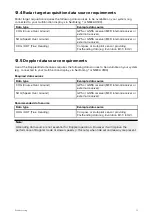
Page 75: ...s Use of the Doppler Radar features requires the following data sources to be available on your system e g connected to your multifunction display via SeaTalkng or NMEA 0183 Required data sources Data...

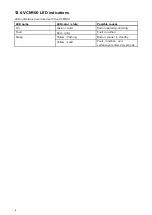
Page 76: ...iated with the VCM100 LED name LED color state Possible causes On Green solid Radar operating normally Fault Red solid Fault condition Yellow flashing Radar scanner in standby Sleep Yellow solid Fault...

Page 77: ...Chapter 14 Technical support Chapter contents 14 1 Raymarine product support and servicing on page 78 Technical support 77...

Page 78: ...ific E Mail emea service raymarine com Tel 44 0 1329 246 932 United States US E Mail rm usrepair flir com Tel 1 603 324 7900 Web support Please visit the Support area of the Raymarine website for Manu...

Page 79: ...el 46 0 317 633 670 Finland Raymarine subsidiary E Mail support fi raymarine com Tel 358 0 207 619 937 Norway Raymarine subsidiary E Mail support no raymarine com Tel 47 692 64 600 Denmark Raymarine s...

Page 80: ...80...

Page 81: ...Chapter 15 Technical specification Chapter contents 15 1 Technical specification on page 82 Technical specification 81...

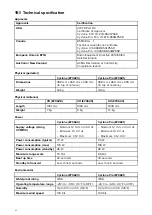
Page 82: ...Kg Physical Antenna 3ft E70628 4ft E70629 6ft E70630 Length 1031 mm 1336 mm 1945 mm Weight 7 Kg 9 Kg 12 Kg Power Cyclone E70620 Cyclone Pro E70621 Supply voltage Using VCM100 Nominal 12 V dc or 24 V d...

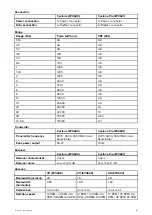
Page 83: ...2 72 96 79000 0 7 Transmitter Cyclone E70620 Cyclone Pro E70621 Transmitter frequency 9370 9400 9430 MHz User Selectable 9370 9400 9430 MHz User Selectable Peak power output 55 W 110 W Receiver Cyclon...

Page 84: ...84...

Page 85: ...Chapter 16 Spares and accessories Chapter contents 16 1 Accessories on page 86 16 2 Network hardware on page 86 16 3 RayNet to RayNet cables and connectors on page 87 Spares and accessories 85...

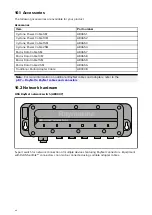
Page 86: ...e 10M A80658 Radar Data Cable 15M A80659 Radar Data Cable 25M A80656 Traditional Radar Adapter Cable A80308 Note For more information on additional RayNet cables and adapters refer to the p 87 RayNet...

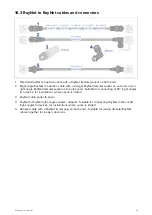
Page 87: ...n the other end Suitable for connecting at 90 right angle to a device for installations where space is limited 3 RayNet cable puller 5 pack 4 RayNet to RayNet right angle coupler adapter Suitable for...

Page 88: ......

Page 89: ...14 18 Doppler Data source requirements 24 75 Overview 22 E Electromagnetic Compatibility 12 EMC See Electromagnetic Compatibility I Installation Mounting 45 Schematic diagram 44 Tools required 44 Int...

Page 90: ...System connections 53 System examples 54 T Technical specification 81 82 Technical support 78 Troubleshooting 72 V VCM100 55 Applicable products 16 Dimensions 30 mounting 51 Parts supplied 27 Power c...

Page 91: ......
Page 92: ...Raymarine Marine House Cartwright Drive Fareham Hampshire PO15 5RJ United Kingdom Tel 44 0 1329 246 700 www raymarine com a brand by...

Reviews: