background image

10

A65 Installation Manual

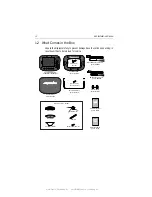
1.2 What Comes in the Box

Unpack the display carefully, to prevent damage. Save the carton and packing, in 
case the unit has to be returned for service.


Mount Screws, M4 (x2)

Bracket Screws, 
No.10 x 3/4 (x3)

D7733-1

Owner's Handbook, 

part no. 81248

A65

Owner's 
Handbook

GPS Antenna

 Bracket Knobs,

part no. R38107

Pole Mount Bracket

 Mounting Bracket,

part no. R38110

A65 GPS Chartplotter, 

E33020 (US), E33022 (CE)

A65 Sun Cover,

part no. R38108

Power/Data Cable, 3 pin, 1.5m 

part no. R08003

NMEA Cable, 5 pin, 1.5m 

part no. R08004

A65 Mount Frame,

part no. R38109

GPS Gasket

Frame Screws, 

M3 (x4)

Installation Manual, 

part no. 87055

A65

Installation 
Manual

Studs (x2)

Thumb nuts (x2)

RS12 GPS, part no. E33021

www.Busse-Yachtshop.de      email: [email protected]

Summary of Contents for A65

Page 1: ...A65 and RS12 Chartplotter GPS Installation Manual Document number 87055 2 Date March 2006 www Busse Yachtshop de email info busse yachtshop de...

Page 2: ...ark of Raymarine plc Navionics is a registered trademark of Navionics Company Italy All other product names are trademarks or registered trademarks of their respective owners Contents of this handbook...

Page 3: ...na 19 3 1 Selecting the Mounting Location 19 Receiver Location 19 Cabling Route 20 3 2 Mounting the Receiver 20 Pole Mounting 20 Surface Mounting 21 Making the Cable Connections 22 Chapter 4 Maintenan...

Page 4: ...Installation Manual Appendix Specifications 23 A65 LCD Color Display 33 General 33 Chartplotter Features 34 Interfacing 34 RS12 GPS Sensor 35 Index 37 www Busse Yachtshop de email info busse yachtsho...

Page 5: ...rudence and navigational judgement This device should not be relied upon as a substitute for such prudence and judgement WARNING Product Installation This equipment must be installed in accordance wit...

Page 6: ...omeetalloftheseconditionsinall situations ToensurethebestpossibleconditionsforEMCperformancewithinthe constraints imposed by any location always ensure the maximum separation possible between differen...

Page 7: ...upplied by Raymarine the suppression ferrite if supplied MUST always be attached to the cable nearest the Raymarine unit TFT LCD Displays The colors of the display may seem to vary when viewed against...

Page 8: ...been attached at the factory on the SONAR AUX and NMEAconnectorsontherearoftheA65 Ifyouarenotusingoneormoreofthese ports please keep the cover attached to the connector to protect it from the elements...

Page 9: ...to allow cable con nections to the rear panel connectors avoiding tight bends in the cable Interference Theselectedlocationshouldbefarenoughawayfromdevices that may cause interference such as motors g...

Page 10: ...s Handbook GPS Antenna Bracket Knobs part no R38107 Pole Mount Bracket Mounting Bracket part no R38110 A65 GPS Chartplotter E33020 US E33022 CE A65 Sun Cover part no R38108 Power Data Cable 3 pin 1 5...

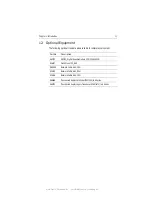
Page 11: ...E63070 DSM25 Digital Sounder Module 200 50KHz 500W E36017 Flush Mount Kit A65 R69086 Network Cable A65 3 5m E36015 Network Cable A65 8 5m E36016 Network Cable A65 15m E66066 Transducer Adapter Pathfin...

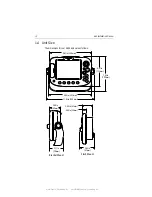
Page 12: ...e as follows D7718 1 Bracket Mount Flush Mount RANGE PAGE ACTIVE DATA MENU WPTS MOB CANCEL PWR 9 61in 244mm 6 81in 173mm 7 83in 199mm 9 88in 251mm 11 02in 280mm 2 56in 65mm 2 40in 61mm 866in 22mm 3 11...

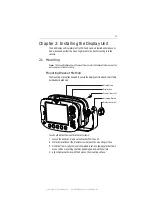
Page 13: ...curethedisplayunittoadash charttable bulkhead or deckhead You should install the mount bracket as follows 1 Loosen the knobs and remove the bracket from the unit 2 Mark the locations of the bracket sc...

Page 14: ...g surface 6 Attach the display unit to the bracket 7 Adjust the unit angle for clear vision and tighten the knobs Flush Mounting Flush mounting your display on the console requires the optional E36017...

Page 15: ...in the area that has been cut out 6 Drill four 3 16 in 4 5 mm holes as indicated on the template to accept the retaining bolts 7 Place the gasket onto the display unit 8 Connect the cables to the disp...

Page 16: ...r supply DC power is connected at the 3 pin POWER connector on the unit s connector panel The connector viewed from the outside and pin functions are shown in the following diagram and table D7722 2 1...

Page 17: ...splay flickering due to power fluctuations provide the display unit with its own dedicated connection to boat s power TheREDwiremustbeconnectedtothefeedfromthepositive batteryterminal and the BLACK wi...

Page 18: ...N Correct Polarity If the power connections are accidentally reversed the system will not work Use a multimeter to ensure that the input power leads are connected for correct polarity NMEA Cable R0800...

Page 19: ...es that could block line of sight reception of signals Aslowaspossible theheightofthe receiverisnotasimportantasithavinga clear view horizon to horizon for optimum signal reception In fact the lower t...

Page 20: ...cent lights engines and radio transmitting equipment as these may cause interference 3 2 Mounting the Receiver When you have selected a suitable location follow the installation instructions for Pole...

Page 21: ...u do not remove these tabs before using the cable channel you could damage the cable 3 Screw the two mounting studs 2 into the underside of the receiver 4 Stick the supplied gasket 3 to the mounting s...

Page 22: ...nnections ConnectthecabletotheconnectorLabeledGPSonthebackofthedisplayunitas shown below D8690 1 1 2 3 4 2 3 4 Top view Underside view A B RS12 A65 Display GPS D8506 1 GPS SONAR AUX NMEA POWER www Bus...

Page 23: ...ent pieces of electrical equipment to interact with one another with a consequent adverse effect on operation In order to minimize these effects and enable you to get the best possible performance fro...

Page 24: ...g table which are reset to the factory default each time Settings Reset The factory reset will set all values back to their original factory settings The Waypoint and Route List databases are not rese...

Page 25: ...up menu 3 Select Settings and Data Reset A confirmation message appears 4 Press ENTER to accept the reset or CANCEL to quit without resetting 4 3 Troubleshooting All Raymarine products are prior to pa...

Page 26: ...w NO DATA SOURCE mes sage Make sure the boat s power system is capable of deliver ing at least 10 8 VDC at 4 amps Check for Inadequate wire gauge or excessive wire length Too many other electronics de...

Page 27: ...wered OFF insert the CF card into the A65 chart card reader 3 Power the A65 on The following screen appears The Upgrade Package Available field displays the contents of the card Local Unit Details dis...

Page 28: ...e progress bar replaces the two soft keys You are prompted to confirm the upgrade 6 Press Continue to confirm When complete the following message appears Upgrade Completed Press ANY KEY to Continue 7...

Page 29: ...in Adobe Acrobat format Downloading RayTech software updates Accessing the Raymarine solution database Clicking the Find Answers link routes you to our solution database Search questions and answers...

Page 30: ...d Raymarine dealer for assistance The dealer is best equipped to handle your service requirements and can offer timesaving help in getting your equipment back into normal operation If repairs cannot b...

Page 31: ...can obtain Technical Support service and accessories from your authorized Raymarine dealer or by contacting Raymarine plc Anchorage Park Portsmouth PO3 5TD England Tel 44 0 23 9271 4713 Fax 44 0 23 92...

Page 32: ...32 A65 Installation Manual www Busse Yachtshop de email info busse yachtshop de...

Page 33: ...imit Waterproof to IPX7 suitable for external mounting 14 F to 122 F 10 C to 50 C up to 95 at 35 C non condensing Controls 9 defined keys 5 soft keys trackpad and rotary control Display type Color TFT...

Page 34: ...rds Chart of the world built in Chart scaling 1 64nm if cartographic detail is available to 4000nm Presentation Modes Head up Course up or North up selectable True or Magnetic Relative or True Motion...

Page 35: ...F to 158 F 10 C to 70 C water protection waterproof to CFR46 Storage conditions temperature range 14 F to 158 F 10 C to 70 C Frequency 1575 42 MHz 1 MHz C A code L1 Sensitivity Tracking 152 dBm Acqui...

Page 36: ...36 A65 Installation Manual www Busse Yachtshop de email info busse yachtshop de...

Page 37: ...h mounting A65 14 Fuse 17 I Installation A65 13 RS12 19 M Mounting A65 13 14 RS12 20 21 N NMEA Cable 18 O Optional equipment 11 P Phone numbers 30 Pole mounting RS12 20 Power Connections A65 16 Supply...

Page 38: ...38 A65 Installation Manual www Busse Yachtshop de email info busse yachtshop de...

Reviews: