background image


Pagina 13/20 

I april 2017 I 2.0 

SmartGrid 

Press confirm to save the settings.  

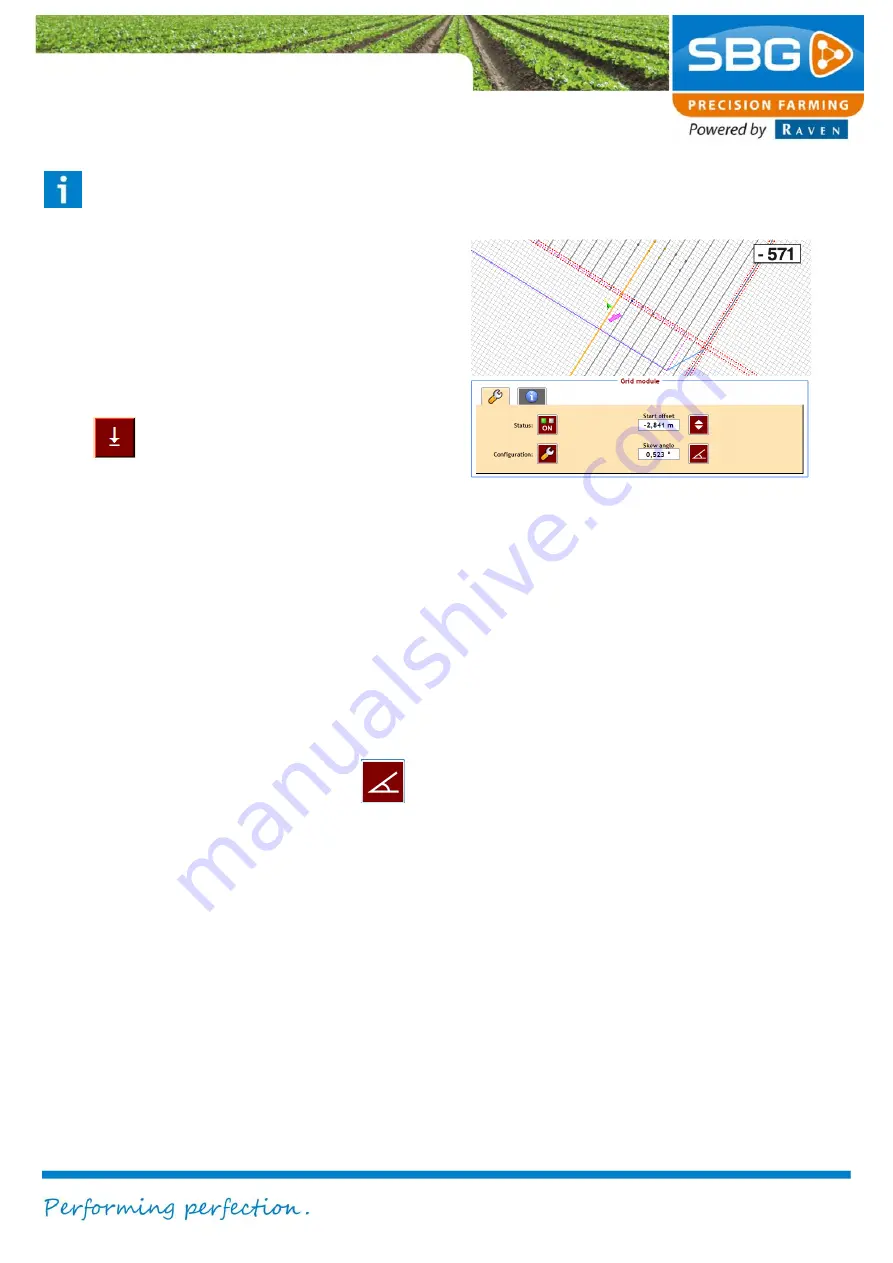
Start offset 

This offset determines the staring postiion of the 
grid points in the driving direction. The displayed 
value is the distance in the driving direction to the 
A-point of hte AB Line. The start offset is manually 
adjustable by pressing the number value or 
automatically by placing the start offset under the 
current reference point of the tractor/machine. 

Press 

 to set the offset automatically. Now 

the first grid point is defined, this is marked with 
the two red dotted lines which are right angle to 
work line 1. On work line 1 are also two red dotted 
lines which mark the axes of the grid (

Figure 10

). 

Skew angle 

This offset determines the angle between the axes 
of the grid (which are marked with the double 
dotted lines). An angle offset 0 means that the 
axes are right angles to each other. The angle can 
be set manually by pressing the number value or 
can be placed parallel to the nearby field sides or 

headland lines (if excisting) by pressing 

 . 

Press repeatedly to switch between multiple field 
sides or headland lines. In 

Figure 10

, the first grid 

point is placed on the headland line by using the 
angle offset button.  

PLEASE NOTE!:


If the automatic 

SKEW OFFSET


is used, 

the 

START OFFSET


will also be moved to 

the field side or headland where the grid is 
placed parallel to.  


Figure 10 Start offset en Skew angle


Summary of Contents for SBG SmartGrid

Page 1: ...USER MANUAL ENGLISH SBGuidance 4 0 SmartGrid module 016 8000 008 Rev A ...

Page 2: ...st be available for people who operate service and repair this product Name of device Type designation Serial no of manifold Serial no of terminal Serial no of sensor box Serial no of dynamIQ Year of manufacture Options Installed software module 1 2 3 4 5 Your dealer ...

Page 3: ...SBG Precision Farming accepts no liability for any errors or incomplete information contained in this document Remarks or queries can be submitted to info sbg nl Neither SBG Precision Farming nor any of its suppliers may be held liable for any injury or damage to property that may arise from the use of the system SBGuidance System The installed SBG systems produces less than 70 dBA In this manual ...

Page 4: ...system Warning The system contains moving parts Make sure the immediate environment is clear of people before operating the system Warning Always wear personal protective equipment when operating adjusting repairing the system outside of the tractor cabin Warning In case of system failure or breakdown switch of the tractor and disconnect the electrical power source to avoid further damage Contact ...

Page 5: ...Preface Pagina 5 20 I april 2017 I 2 0 terminal and GPS antenna unattended in the tractor on the field ...

Page 6: ...0 Table of contents Preface 3 Disclaimer 4 1 Introduction 7 2 Main menu 8 3 SmartGrid 9 3 1 Creating loading Field Operation 9 3 2 SmartGrid menu 9 3 2 1 Settings 9 3 2 2 Grid information 14 4 RCU module 16 4 1 RCU Grid 16 4 2 RCU Start Stop 18 ...

Page 7: ...inked to an AB based operation Three different patterns are possible Square rectangle connetion Triangular connection Plot seeding Please note This manual only deals with the operation of the SmartGrid software module Additonal operations may be required to allow the grid module to work Therefore please contact your installer for questions about the installed options ...

Page 8: ...p For detailed information about the main menu refer to the general SBGuidance user manual An overview of the available buttons soft keys in the main menu is shown below Shut down software Hold the button for 3 seconds Software closes and the Loader will be visible gain Zoom in Go to field menu Zoom out Go to registration menu Go to settings Go to info menu Go to smart grid menu Steering activate ...

Page 9: ...n a A AB or Contour field Curve or contour operations are not supported In addition the operation may not contain deviating spray paths 3 2 SmartGrid menu Press on the SMART GRID button to continue The grid module menu will open Figure 3 3 2 1 Settings Activate grid Click on STATUS to activate the grid module Status OFF grid not active Status ON grid active When the grid module is active grid poin...

Page 10: ...on to give a grid signal instead of giving a failure D Distance between plants in the row D1 Distance 1 at plot seeding D2 Distance 2 at plot seeding D3 Distance 3 at plot seeding PATTERN With the set distances D1 D2 and D3 a repeatable pattern can be set In the desired order press D1 D2 and D3 buttons to create a pattern Press the button to erase the pattern PLEASE NOTE Small margins at high driv...

Page 11: ...here is a possiblity to set up an offset The offset moves the grid point in front of or behind the antenna relative to the driving direction PLEASE NOTE Filling in an positive value will move the grid point to the front a negative value will move the grid point to the rear SIGNAL 1 Choose the signal type that should be given at a grid point Possibilities Beep Light Drive Side Shift L R SIGNAL 2 In...

Page 12: ...forward ONLY INSIDE FIELD BOUNDARY Grid signal is only given if the vehicle is inside the field boundary LINK TO HEADLAND DETECTION Additional grid signal is generated on each headland line if excisting 2ND HEADLAND SIGNAL OFFSET Second extra grid signal is generated on an adjustable distance from the headland line LINK TO REGISTRATION When crop registration is used position registration can be li...

Page 13: ...e 1 On work line 1 are also two red dotted lines which mark the axes of the grid Figure 10 Skew angle This offset determines the angle between the axes of the grid which are marked with the double dotted lines An angle offset 0 means that the axes are right angles to each other The angle can be set manually by pressing the number value or can be placed parallel to the nearby field sides or headlan...

Page 14: ...plant between the red dotted lines right angle on the driving direction the value between the brackets next to the plant number is the distance from the closest plantnumber to the A point of the AB line FAILURES Number of failures since the start of the count FAILURES Percentage missed grid points relative to the total number of grid points DISTANCE TO TRC Distance to the next grid point TRC Targe...

Page 15: ...on the grid points With the button the FAILURES FAILURES ERROR en MEAN ERROR values can be reset The red square at the top right of the diagnostic menu indicates when a grid point is detected The square turns green once a grid point is detected At this point a grid signal is given ...

Page 16: ... high low output signal becomes high when a grid point is detected and low when the next grid point is detected To invert the high low signal press INVERT HIGH LOW Figure 12 The lamp in the button lights up when the signal output is high At the pulse output signal a pulse is generated with the lenght as set in the configuration wizard By pressing the PULSE RTK FIXED button a pulse can be generated...

Page 17: ...ted and the headland signal is activated no output signal is generated by the RCU Grid module when the reference point is on the headland Only the headland status will be high The headland signal can be inverted by pressing the INVERT HEADLAND button Figure 12 The lamb in the button lights up when the headland status is high The RCU Grid module will not generate a output signal when the reference ...

Page 18: ...l output high and startsignal low By pressing button 1 start the driving can be resumed The stop signal output becomes low and the start signal is high at that moment In MAN manual mode the module only responds by pressing the buttons 1 start or 0 stop manually The white lamb between 1 start and 0 stop lights up when startsignal output is high In AUTO mode startsignal output can only be high when ...

Page 19: ...hen turning on the headland without activated automatic steering it is necessary to switch the rotary knob to MAN manual mode Then the driving can be resumed by pressing button 1 start In AUTO mode the vehicle will be stopped when the GPS receiver is not in RTK fixed mode The stopsignal output becomes high and the startsignal output becomes low The beeper output becomes high for 1 second Wait till...

Page 20: ...SBG precision farming Hoornseweg 22 1775 RB Middenmeer Email info sbg nl Web www sbg nl Tel 31 0 227 54 93 00 ...

Reviews: