background image

RAVEN MTI CUBASE/NUENDO USER MANUAL      67


2. 

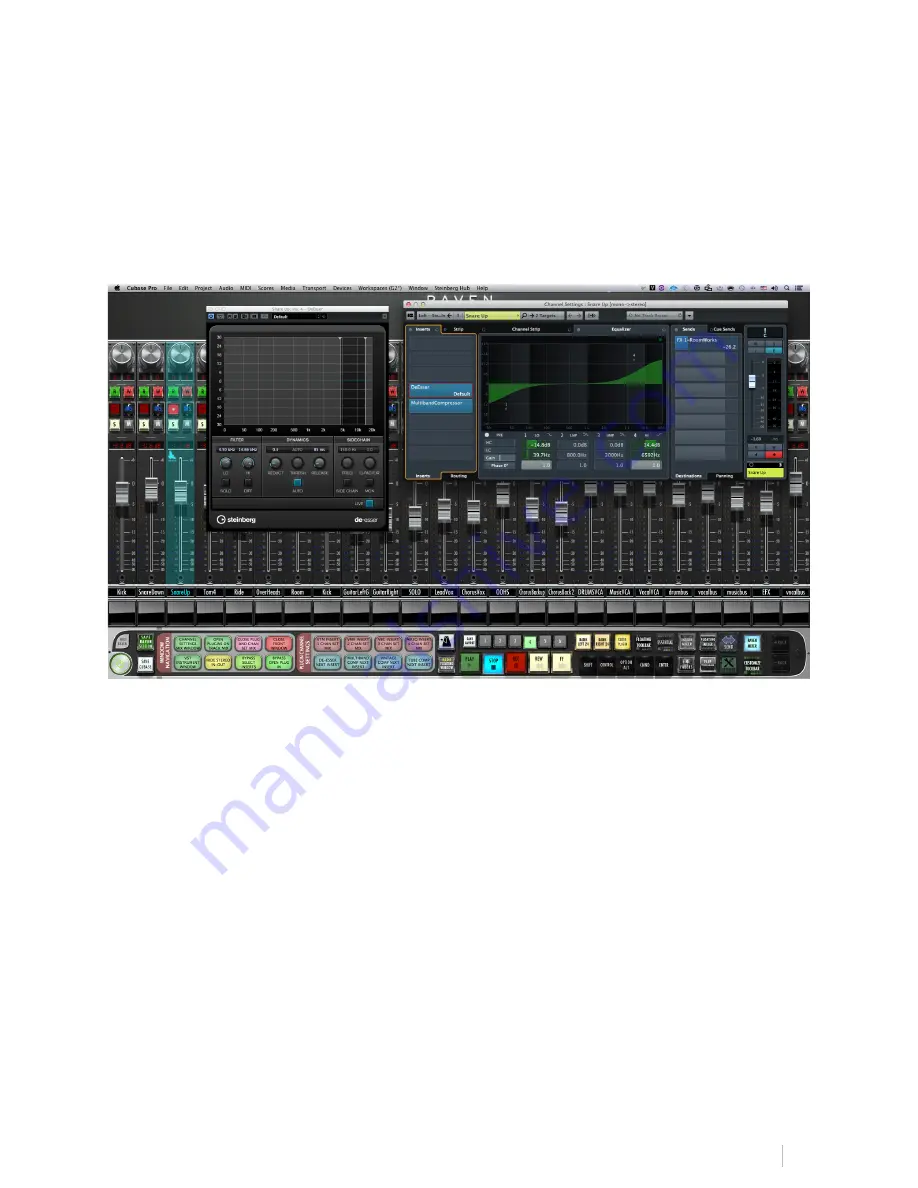
Select any plugin slot to bring up the plugin drop-down list.  
 

3. 

Touch and hold the “No Insert” tab to activate the plugin list. We suggest 
dragging your finger down the list to get the most accurate response.  
 

4. 

Release finger to load selected plugin.  


Controlling Plugins: 

 
Using linear vertical or horizontal adjustments, touch the center of the plugin 

parameter you’re wishing to modify. Then, simply adjust the plugin to your 
preference. Single touch works perfectly with all plugins.  


IMPORTANT:  
It is not recommended to touch controls that are small in size.  
Plugins should only be touched when there is a large control that is easy to 
activate via touch. Otherwise, a mouse should be used to control the plugin.  

 
Plugin parameters are controlled by a single touch only. Functionality is the exact 
same as using a mouse and uses the familiar up/down movements to control knobs.  

Summary of Contents for MTi

Page 1: ...RAVEN MTI CUBASE NUENDO USER MANUAL 1 MTi CUBASE NUENDO USER GUIDE BATCH COMMAND SYSTEM MANUAL RAVEN Version 3 0 0 Updated 10 24 2015 REV B ...

Page 2: ...tion 21 MTi2 CALIBRATION 26 Connecting RAVEN MTi to Pro Tools 30 Connecting RAVEN MTi to Cubase or Nuendo 31 INSTALLING RAVEN MTI FOR CUBASE NUENDO 33 Setting Up Aligning Cubase with RAVEN 33 RAVEN MTI CUBASE NUENDO SOFTWARE FEATURES 36 The RAVEN Internal Mixer Cubase Only 36 The RAVEN External Mixer 37 RAVEN Channel Strip 37 Automation Modes 38 Icons 39 RAVEN Toolbar 42 RAVEN Settings 57 Saving a...

Page 3: ... these instructions 3 Regard all warnings 4 Follow all instructions 5 Do not use this apparatus near water 6 Do not block any ventilation openings Install in accordance to the manufacturer s instructions 7 Do not install near any heat sources such as radiators heat registers stoves or other apparatus including amplifiers that produce heat 8 Protect the power cord from being walked on or pinched pa...

Page 4: ...z 1 2A OUTPUT 12VDC 3 33A Moving Make sure the product is turned off unplugged and all cables have been removed It will take a minimum of two people to move your RAVEN MTi although three are recommended Servicing Servicing of the RAVEN MTi is to be done by qualified service personnel only To reduce the risk of electric shock do not perform any servicing other than that contained in the operating i...

Page 5: ...o signal degradation Additionally when switching sources between DVI and HDMI for the display you must press the center button of the remote or the source button on the OSD board behind the meter access panel You must wait a full 6 seconds before the source will change Also there is no RGB input for the MTi Although it will show as a source it should be ignored It will take around 14 seconds to sw...

Page 6: ...imum warranty term required by applicable law B Warranty Recipient The limited warranty applies only to genuine SMT products when sold by an SMT reseller distributor or dealer C Exclusions from Warranty This warranty does not cover problems caused by your acts the acts of others or events beyond SMT s reasonable control SMT does not warrant that use of SMT products will be uninterrupted or error f...

Page 7: ... warranty please contact Slate Media Technology or your local authorized reseller distributor or dealer Product registration at www slatemt com is required in order to process a warranty claim You will be required to provide proof of purchase to validate your claim Hardware may require return to factory and customer is responsible for properly packing and labeling and insuring any warranty returns...

Page 8: ... will make the water bead and drip As a precaution keep a dry cloth at the bottom of the screen to catch any runoff Do not allow moisture from liquids to accumulate on the screen when cleaning Accumulation of liquids can damage internal electrical devices If a damp cloth must be used make sure to remove any excess water immediately after cleaning To clean RAVEN MTi s exterior metal parts use a sim...

Page 9: ...evitalizing solution when you feel the glass has substantially more friction than when you first started using your RAVEN MTi The coating process is very easy and can be done following the steps below All you need is a microfiber cloth and the supplied 4oz bottle of Revitalizer Protector solution IMPORTANT Apply the revitalizer solution in a well ventilated area NOTE The Revitalizer Solution is no...

Page 10: ...he revitalizer solution directly onto the RAVEN MTi glass It should take approximately six sprays to cover the glass completely IMPORTANT Do not spray so much that the solution drips down the screen Excess moisture could damage the display and touch system If you are unsure place a cloth at the bottom of the screen to catch any runoff ...

Page 11: ...er the entire screen IMPORTANT DO NOT WIPE BUFF AWAY ALL OF THE REVITALIZER SOLUTION FROM THE SCREEN The coating on the glass leaves a very thin residual layer of Revitalizer which significantly adds to the slickness and oil repellency Removing all of the product will leave the glass less smooth than desired ...

Page 12: ...n the glass after revitalizing When the screen is turned OFF the glass may appear cloudy This is OK You should not be able to notice this layer when the screen is turned ON If you do wipe gently until you cannot see the oil layer Your RAVEN MTi is now back to its original slickness ...

Page 13: ...e than three simultaneous touches This will not affect the quality of the control surface graphic changes only OSX 10 11 El Capitan is not yet supported Intel i7 or Xeon processor with a clock speed of at least 2 4 GHz Minimum 4GB RAM We recommend 8GB for strong performance Graphics card with minimum 512MB memory though 1GB graphics memory is recommended Any Mac Pro produced after 2010 is ideal an...

Page 14: ...CUBASE NUENDO USER MANUAL 14 RAVEN MTi 1 Dimensions NOTE If you are creating custom furniture for your RAVEN MTi CAD drawings with precise dimensional information may be available on request RAVEN MTi2 Dimensions ...

Page 15: ...the MTi you will also notice an attachable stand adjustable to your desired height We have included two arrows to align the stand with to set your MTi to our recommended height as well as four screws to attach the stand to the MTi body Attach the stand to the back of the MTi using the four screws and to prop the MTi to its inclined state NOTE Do not attempt to plug in any cords until the stand has...

Page 16: ...the MTi stand with the top two holes on the MTi body 2 Attach the stand with four screws in the provided holes still maintaining the arrow s alignment 3 Confirm all four screws are tight and aligned We recommend a 40 angle as displayed below however the stand is adjustable to meet your personal desired angle ...

Page 17: ...RAVEN MTI CUBASE NUENDO USER MANUAL 17 37 Angle 40 Angle ...

Page 18: ...RAVEN MTI CUBASE NUENDO USER MANUAL 18 43 Angle Connecting RAVEN MTi 1 to your computer ...

Page 19: ...ble to the first slot on your computer Note HDMI to DVI or Mini DVI to DVI adapters may be used to connect to your computer but these are not included 2 Connect USB to any available slot on your computer 3 Turn computer on and computer will sync to display 4 In System Preferences click Displays and select the RAVEN MTi as your main display ...

Page 20: ...egradation You will now need to install Multi Touch Drivers in order to get touch response from RAVEN MTi using the RAVEN MTi Installer Package RAVEN MTi 2 RAVEN MTi connects to your computer using a HDMI and USB connection 1 Attach HDMI video cable to the first slot on your computer Note adapters may be used to connect to your computer but these are not included 2 Connect USB to any available slo...

Page 21: ...alibrating the touchscreen is a quick process IMPORTANT Calibration is the most important process for accurate use of the screen Failure to calibrate properly will result in poor touch performance DO NOT RUN ANY APPLICATIONS UNTIL CALIBRATION IS COMPLETED 1 Run the RAVEN MTi installer and download the drivers onto your hard drive NOTE Make sure to use the included UNINSTALL MULTI TOUCH PLATFORM ap...

Page 22: ...an inaccurate calibration point Calibration must be done using a direct and natural touch angle DO NOT CALIBRATE WITH A BEND IN YOUR WRIST OR FROM AN EXTREME ANGLE Failure to do so will result in an inaccurate calibration Correct Touch Angle Incorrect Touch Angle Do not use a stylus or other object to calibrate the screen After calibration is achieved test on desktop applications and software The ...

Page 23: ...sharing the RAVEN MTi DUAL RAVEN SOFTWARE If using two RAVEN s users now have access to the DUAL button on the RAVEN opening menu is will activate the RAVEN Software for DUAL functionality This again only is to be used with two RAVEN s If using multiple displays that are not RAVEN s you should still use the regular version of the RAVEN software DUAL CALIBRATION To calibrate for DUAL RAVEN s set yo...

Page 24: ...posite Follow the instructions on the white screens being Press and hold the left display and then release Then repeat the press hold and release for the right display Now calibrate each screen Use the drop down menu as displayed below on the MultiTouchPlatform application to select each display and hit Calibration ...

Page 25: ...green using your left hand for the left side of the screen and your right hand for the right side of the screen There will be four corners to calibrate Once completed hit Ok Correct Touch Angle Incorrect Touch Angle USING RAVEN DUAL Set the Left Display as your Mixer and Right Display as your Edit Window To flip the displays simply hit the 1 2 2 1 display button by default on the Floating Toolbar ...

Page 26: ...isplay and right hand for the right side of the display There are four corners to calibrate To Calibrate for the RAVEN DUAL setup perform the same process with the two RAVEN s attached Note Use your left hand for the left display and your right hand for the right display when calibrating sitting in the center of the two RAVENs NOTE TRIPLE RAVEN USE ARE NOT YET SUPPORTED SYSTEM PREFERENCES CONFIGUR...

Page 27: ...NUENDO USER MANUAL 27 3 Next hit Show All on the top left of the window and hit Security Privacy 4 On the General tab be sure the option for Allow apps downloaded from ANYWHERE is selected as shown in the picture below ...

Page 28: ... Accessibility from the left menu as imaged below Once selected navigate to your Applications folder in a separate Finder window and add the following applications to the area on the right for allowing apps to control your computer Automator Cubase 8 and or Nuendo 7 RAVEN MTi Terminal Note Terminal is located within your Utilities folder within the Applications folder ...

Page 29: ...USER MANUAL 29 6 For users on OS X 10 7 and 10 8 only on the main System Preferences window select Accessibility from the menu options and confirm Enable access for assistive devices is checked to the ON state as imaged below ...

Page 30: ...7 3 RAVEN MTi We recommend keeping these three applications in your dock at all times Also note that we recommend right clicking the V Control Pro app and having it automatically launch with the Finder Once RAVEN MTi is launched it will sync with your current session and make all connections automatically The mouse will not function in the RAVEN Mixer window however touch will control it from this...

Page 31: ...tion your System Preferences must be configured properly from the previous section in this setup Once configured correctly hit RAVEN Settings and hit the RAVEN SETUP button and RAVEN will automatically configure itself for you IMPORTANT Your OS X Keyboard Settings MUST be set to English for this RAVEN Setup to correctly function 5 To perform the setup manually first you ll need to import and selec...

Page 32: ...evice Setup 7 Now we ll click the plus symbol button on the Device Setup window and select V Control Pro from the list and press Apply If any notifications pop up while configuring this simply accept and continue 8 Next hit go to the Bank drop down menu and select 24 Tracks from the list Note You do not need to configure an input or output for V Control Pro 9 Once completed close the Device Setup ...

Page 33: ... Setting Up Aligning Cubase with RAVEN To setup and align the Cubase or Nuendo Mixer with the RAVEN Internal Mixer manually IMPORTANT NUENDO DOES NOT HAVE AN INTERNAL MIXER THE INTERNAL MIXER FOR NUENDO WILL BE INCLUDED IN A FUTURE UPDATE First toggle to the Mix Console view by hitting Option 2 on the keyboard Next click the Setup Window Layout button on the top left of the Cubase window here Now ...

Page 34: ...ng and dragging the area where the Channel Selector meets the first fader here Note You can hit hide the RAVEN if necessary Now we ll need to remove two tracks from our Channel Selector First remove Stereo In from the top of your session and then remove Stereo Out from the end of your session like this Last we ll need to make sure we have a maximum of 24 tracks showing Use the Key Commands G and H...

Page 35: ...RAVEN MTI CUBASE NUENDO USER MANUAL 35 This is an example of misalignment ...

Page 36: ...e Features RAVEN MTi is loaded with many custom features made for a touch screen The RAVEN Internal Mixer Cubase Only The RAVEN Toolbars provide controls typical of most DAWs From the RAVEN Mixer you are able to have Multi Touch access to all of the controls of the mixer ...

Page 37: ...7 The RAVEN External Mixer RAVEN Channel Strip The RAVEN channel strip is where you find your controls such as faders solos mutes pans inserts and automation modes Fine Faders Tap the DB display window to put single channels into fine mode ...

Page 38: ...RAVEN MTI CUBASE NUENDO USER MANUAL 38 Automation Modes Automation on the RAVEN Internal Mixer Cubase Only The R W Read Write automation buttons can be swiped to activate ...

Page 39: ...te automation buttons can be swiped to activate 1 Select the desired mode and the mode indicator will change Icons The RAVEN has built in icons to help you identify your tracks in a busy mix To load an icon 1 Press and hold the Icon slot below the fader module A floating icon window will appear ...

Page 40: ...RAVEN MTI CUBASE NUENDO USER MANUAL 40 2 Tap an icon and a yellow box will appear around selected image ...

Page 41: ...u wish to load with an image You can also swipe across the icon slot to load the images 4 To remove an icon touch the blank icon box in the palette and then touch the channel icon slot you wish to remove You can also Browse your own Icons from your CUSTOM tab on the icon palette ...

Page 42: ...and is the control center for many essential features It can be viewed with a single double or triple rack space using the and rack buttons To Add or Remove Racks press the to show more racks in your toolbar or to show less racks RAVEN Racks can be customized to show as many or few tools as you would like ...

Page 43: ...k the RAVEN Logo Show on the bottom left hand side of the screen and the RAVEN software will again appear NOTE This can be very helpful when using an internet browser or something that appears hidden behind RAVEN s software overlay FLIP TOOLBAR Using the Flip Toolbar button users can now gain access to their lowest three RAVEN Toolbars without having to display them veritcally Hit the Flip Toolbar...

Page 44: ...sion press yes If not press no Pressing cancel will keep the current RAVEN session running See section on Saving a RAVEN Session for further details 2 Banking Moving between tracks is quick and easy Using your finger on the lower half of the fader plate simply glide one finger across the screen in the direction you would like to move The tracks will move one track at a time in this scenario ...

Page 45: ...RAVEN will only recognize full sets of 24 Tracks If there are remaining tracks after the user has reached the last set of 24 tracks the user should then switch to single track banking to reach the last tracks on the Raven Mixer If you ever feel your Internal Mixer fader alignment is not incorrect simply use the Banking Buttons in either direction and your alignment should restore unless there is a...

Page 46: ...he only track visible will be the right side of any stereo track in your session Touch the button again to see left panners and mono tracks 8 Pan Mode This changes the control of the pan knobs from rotary to traditional up down In rotary mode move your finger in a circular motion around the perimeter of the knob In up down mode touch the middle of the knob and move up or down to adjust pan 9 NAVPA...

Page 47: ...where on the screen by grabbing one of the two side handles NOTE Separate your fingers when using a two finger gesture for proper performance Toolbar NAVPAD NOTE Press the Track Zoom button to toggle between individual Track Zoom or Track Zoom All Within RAVEN Settings we have included the NAVPAD Response Button When touched users are able to adjust the NAVPAD sensativity of their touch from level...

Page 48: ... touching the RAVEN Mixer button and see the actual Pro Tools mixer Please note the Pro Tools mixer will not be multi touch 11 Fine Faders Tap this button to put faders into FINE mode where finger movements are slowed to tenths of a DB Use the FINE FADERS button to put all faders into fine mode Tap the DB display window to put single channels into fine mode ...

Page 49: ... included the ability to control the response of the Fine Faders by pushing and holding the Fine Faders button on the RAVEN Toolbar Adjust between 1 and 20 1 being the slowest response for extreme detail and 20 being the fastest Fine Fader response time ...

Page 50: ... Customize Toolbar mode Simply Press the button and it will latch Drag icons and buttons around the toolbar to your liking Press the button again and it will unlatch allowing you to use your custom tool layout NOTE This also works with adding to your Floating Toolbar Essentials Palette ...

Page 51: ...ese buttons will bring up their own customizable floating window You can populate these windows with tools that are essential to your workflow and can move them anywhere on the screen Once the Floating Toolbar or the Essential button is pressed the semi transparent window will appear with the familiar Customize Toolbar button Rack buttons and Hide RAVEN button ...

Page 52: ...to the desired palette The palette will automatically resize to fit more or less tools in your configuration Press Customize Toolbar button again to exit Your Essentials Palette Floating Toolbar are now ready to use You may now remove racks all racks if you want to work with just the Floating Toolbar Essentials Palette To bring back the RAVEN Toolbar simply press the Rack button ...

Page 53: ... get back to easily Press Save layout and choose a number 1 4 1 6 or 1 8 to save To recall your saved layout press the assigned button Revert to Last will bring up the previous layout that was displayed this is in case of accidental saves or changes to Batch Commands and or the RAVEN Toolbar 15 Grid Modes Press any of these buttons to select the grid mode you wish to work with ...

Page 54: ...17 Tool Palette These buttons activate the tools commonly used in Cubase Nuendo Since they are located on the toolbar there is no need to reach to the top of the Cubase Nuendo screen to select tools Tools with multiple functions can be toggled by pressing the tool button until the right function is selected 18 Duplicate Clip Loop Easy tools to duplicate and loop sound clips in the Edit window ...

Page 55: ...ut Zooms in or out of a section in the Edit window 20 Floating Mixer Brings up a bank of faders on a floating window over the Edit window Pressing the floating mixer button will engage the floating mixer that can be adjusted and moved anywhere on the screen ...

Page 56: ...floating mixer can be expanded or collapsed by pressing the or button on the floating mixer header The mixer can be viewed as 8 16 or 24 channels Pressing the pan button will switch the top section of the mixer from automation modes to pan modes ...

Page 57: ...or right to bank by one track at a time Do not touch the fader cap for a banking motion Users can also bank more quickly by using two fingers on the faceplate of the fader tracks and swipe left or right to bank by 24 tracks at a time RAVEN Settings Touch the Settings button and the tool racks will appear At the very top you ll notice a RAVEN Settings toolbar There are thirteen buttons on the RAVEN...

Page 58: ...a user gets things to the way they like them with saved layouts etc The user can set their current layout to launch at default by touching the Set User Default button Once highlighted to User Default the user knows that they are using their layout as default 4 Restore Factory Default Factory Default Restores the RAVEN software to factory settings 5 VIDEO Direct link to our RAVEN Videos on our Slat...

Page 59: ...orum You can trade Batch Commands here as well as ask questions to other RAVEN Users 8 Extern Mixer Intern Mixer Switches the default Mixer between the Integrated DAW overlay and the External free standing Mixer as a user preference External Mixer has both the tracks faders as well as their corresponding Sends 1 8 To access the Sends 1 8 simply touch the CHANNEL button and the External Mixer will ...

Page 60: ...d above to see their SENDS A E Racks and corresponding faders 10 NAVPAD Response Within RAVEN Settings is the NAVPAD Response Button included to allow users to adjust the NAVPAD Sensitivity from 1 to 20 1 being slow and precise and 20 being quick and forceful Note Easily flip between REGULAR direction and INVERSE direction for all navigation with the NAVPAD Touch the text REGULAR or INVERSE to tog...

Page 61: ...Touch Platform application directly within your software and instantly re calibrate 12 SWITCH RAVEN Easily switch between different RAVEN DAW support software Example Cubase 8 to Pro Tools 11 13 CHECK FOR UPDATES Easily check to confirm your RAVEN software is up to date ...

Page 62: ...RAVEN MTI CUBASE NUENDO USER MANUAL 62 14 SWITCH DEFAULT LAYOUTS Easily change between preset default layouts we have included for various workflows including Basic Advanced and MIDI ...

Page 63: ...ile than your RAVEN Session so be sure to save both frequently when changes have been made Saving a RAVEN Session The RAVEN software allows you to save your current layouts icons and other customizations to a dedicated session folder You can save this folder with your DAW sessions and instantly recall them at any point in time To Save A Raven Session 1 Hit the Save RAVEN Session button 2 Choose a ...

Page 64: ...RAVEN MTI CUBASE NUENDO USER MANUAL 64 3 Press Save To Load a RAVEN Session 1 Press the Load RAVEN Session button 2 Locate your previously saved RAVEN Session folder and press open ...

Page 65: ...N Software to its factory settings press cancel if you don t want to complete this action Project Window RAVEN allows for single touch control over the Cubase Nuendo Project windows Familiar tools and functions can be easily accessed with your fingertips offering an improved workflow All of the edit tools can be accessed from the toolbar as discussed in the previous section Experiment with button ...

Page 66: ...if some Working with Plugins Loading Plugins On The RAVEN Mixer Loading plugins is easy with the RAVEN External Mixer Hit the INS button next to the Record button above the channel strip and the Channel Settings window will open 1 Hit the INS button on a given channel The floating plugin window will then open The floating plugin window can be moved anywhere on the screen ...

Page 67: ...ents touch the center of the plugin parameter you re wishing to modify Then simply adjust the plugin to your preference Single touch works perfectly with all plugins IMPORTANT It is not recommended to touch controls that are small in size Plugins should only be touched when there is a large control that is easy to activate via touch Otherwise a mouse should be used to control the plugin Plugin par...

Page 68: ...be opened and closed using the Close Plugin button found in the RAVEN Toolbar Use the Toggle Channel Settings Batch Command to toggle on and off the Channel Settings window as well HIDE FLOATING WINDOW This button alllows users to quickly Show Hide any floating windows showing including their sends automation window and even multiple plugins at once ARROW CURSORS Easily control your keyboard curso...

Page 69: ...omplete with over one hundred preset Batch Commands however it is very easy for users to create their own and even share with other RAVEN users The Batch Command System window contains multiple functions as explained below Editing A Batch Command Push and hold one of the Batch Command buttons on the RAVEN Toolbar The Batch Command Menu will launch and you can use the various buttons explained belo...

Page 70: ...u can achieve a similar result by duplicating however certain commands take better to repetition and others require a duplicate with independent delays on each command line QuickList Press the QuickList button in the Batch Command System to enter a Pre Programed menu selection or mouse click to the command sequence We have defined the QuickList items by their title however for details on the speci...

Page 71: ...Commands For further search refinement users can quickly filter your search results between various worflow types such as General Music Post and more within the Factory tab Remove Select an undesired Key Command or QuickList item by touching and highlighting it and then hit Remove to eliminate the selected item from the command sequence ...

Page 72: ...ton This includes Name Color Name Color On the bottom left of the Batch Command Menu there is an empty bar for naming your Batch Command and a block of multiple colors to choose a color for the Batch Command on the RAVEN Toolbar Save Use the Save button to save a custom Batch Command Be sure to give it a name you will recognize in the QuickList USING THE QUICKLIST MENU ...

Page 73: ...ch Commands for you however there is a lot of potential for customization As an example we have included a Pitch Shift 12 Cents Batch Command however you want it to Pitch Shift 5 Cents This is how it s done First push and hold an empty Batch Command to open the programming menu Note You can overwrite an existing Batch Command by pushing and holding a button and hitting Clear All Now you can either...

Page 74: ...may be able to create one for you and other RAVEN users NAMING BATCH COMMAND PANELS Push and hold on the label on the side of each Batch Command Panel to open the Naming and color coding interface of the entire Batch Command Panel BATCH COMMAND PANEL QUICKLIST Save and recall entire Batch Command panels from the Batch Command Panel QuickList After pushing and holding the label of one of the Batch ...

Page 75: ...tomized Batch Command Panel to your Batch Command Panel User QuickList to use to locate across multiple different layouts CLEAR ENTIRE BATCH COMMAND PANEL Push and hold on the Batch Command Panel label and hit Clear All to completely delete the contents of a Batch Command Panel quickly Be careful when using this function as it will delete the entire contents of a Batch Command Panel including Name...

Page 76: ...nd locate your saved Batch Command within the USER tab of the QuickList menu RECORD YOUR OWN BATCH COMMAND Users can also use the Record feature to record and save their own custom Key Command Menu Selection and Mouse Click Batch Commands To record push and hold on an empty Batch Command and hit the Record button Perform the sequence you wish to set to the button and once completed hit the record ...

Page 77: ... screen location Be sure when performing the recorded Batch Command that the window locations are the same as when recorded as the Batch Commands require the correct X Y Axis locations LOAD EXPORT Easily share customized Batch Commands on our RAVEN Forum by visiting our website www slatemt com and visiting the Forum Create a Batch Command and Save it to your user tab Then just selected it in your ...

Page 78: ...RAVEN CUBASE NUENDO BASIC LAYOUT USER MANUAL 1 RAVEN 3 0 USER MANUAL CUBASE NUENDO BASIC LAYOUT RAVEN CUBASE NUENDO BASIC LAYOUT MANUAL Version 3 0 Updated 10 22 2015 ...

Page 79: ... TRACK STATUS 18 RAVEN MTX MTI CUBASE NUENDO BASIC LAYOUT 4 OF 8 20 LAYOUT 4 1 WINDOW NAVIGATION 20 LAYOUT 4 2 PLUGIN CHANNEL SETTINGS 21 RAVEN MTX MTI CUBASE NUENDO ADVANCED LAYOUT 5 OF 8 23 LAYOUT 5 1 NAMING MIXER 23 LAYOUT 5 2 INSTANT TRACK COLORS 24 RAVEN MTX MTI CUBASE NUENDO ADVANCED LAYOUT 6 OF 8 26 LAYOUT 6 1 CREATE NEW FX TRACKS 26 LAYOUT 6 2 WINDOWS 28 RAVEN MTX MTI CUBASE NUENDO ADVANCE...

Page 80: ...For many of the Batch Commands to function you need to install the RAVEN Key Commands into the Cubase Nuendo Key Commands Menu We have pre programmed default layouts for the music user The additional default layouts will be released in the future However many post production Batch Commands are available in the QuickList Post tab The user has full flexibility to relocate reprogram and delete Batch ...

Page 81: ...e mouse will not click the correct location Right click the toolbar palette and set the toolbars to default as some mouse clicks are programmed to click items in the toolbar Note For most mouse clicks to function correctly it is required that only one main window is opened and in front Use Close background windows to close any extra windows that would cause the mouse to change its click location i...

Page 82: ...YOUT 1 1 FADER FOCUS SHOW ONLY AUDIO TRACKS In any window press SHOW ONLY AUDIO TRACKS to fader focus only audio tracks SHOW ALL TRACKS In any window press SHOW ALL TRACKS to fader focus all tracks SHOW SELECTED TRACKS In any window press SHOW SELECTED TRACKS to fader focus only the selected tracks ...

Page 83: ...R This will type in the name in the selected track as well as the 3 following tracks COPY NAME RIGHT X4 MIXER In the Console Mixer window select the bottom of the desired track so that it is outlined in red and press COPY NAME RIGHT X4 MIXER This will copy the selected track s name and paste it to the next 3 tracks with sequence numbers 2 4 COPY INSERT CHAIN LEFT X3 MIXER In the Console Mixer wind...

Page 84: ...to close the open plugin and the Channel Settings window ZOOM SELECTION In the Project window press ZOOM SELECTION to zoom the screen in on the selected events ZOOM OUT ALL REGIONS In the Project window press ZOOM OUT ALL REGIONS to zoom the screen out and show all events TOGGLE FOLDER STATE In the Project window press TOGGLE FOLDER STATE to toggle all the current folders open or closed LAYOUT 1 4...

Page 85: ... CROP AT RANGE Press CROP AT RANGE to crop the select region at the range selection by trimming the start and end of the region to the selection SPLIT AT CURSOR Press SPLIT AT CURSOR to split the select region at the cursor location SNAP EVENTS Press SNAP EVENTS to change the timeline grid snap to free hand to allow movement of the event to anywhere on the timeline SNAP GRID Press SNAP GRID to cha...

Page 86: ...lected region event CROSS FADE Press CROSS FADE to create a cross fade between two connected regions events FADE IN 10MS Press FADE IN 10MS to create a 10ms fade at the start of the selected region event Note be sure the Info Line is showing FADE OUT 10MS Press FADE OUT 10MS to create a 10ms fade at the end of the selected region event Note be sure the Info Line is showing ...

Page 87: ...OR Press FADE OUT TO CURSOR to create a fade from the end of the region to where your mouse cursor is currently located LAYOUT 2 2 EDITING VIEW PITCH SHIFT Press VIEW PITCH SHIFT to open the Pitch Shift option from the process menu tab PITCH ENVELOPE Press PITCH ENVELOPE to open the Pitch Envelope option from the process menu tab GAIN UP 4 DB Press GAIN UP 4 dB to increase the selected region s vo...

Page 88: ...ED REGION to mute the selected region UNMUTE REGION Press UNMUTE REGION to unmute the selected region LAYOUT 2 3 WINDOWS CHANNEL SETTINGS WINDOW In the Project window press CHANNEL SETTINGS WINDOW to open the Channel Settings window CLOSE FRONT WINDOW In any window press CLOSE FRONT WINDOW to close the most front window ZOOM OUT ALL In the Project window press ZOOM OUT to zoom the screen out to sh...

Page 89: ...ll up down left and right To gain the event up and down To fade in out left and right UNMUTE REGION Press UNMUTE REGION to unmute the selected region FADE IN OUT 5MS In the Project window press FADE IN OUT 5MS to create a 5ms fade at the beginning and end of the selected region FADE IN OUT 50MS In the Project window press FADE IN OUT 50MS to create a 50ms fade at the beginning and end of the selec...

Page 90: ...EN MTX MTi CUBASE NUENDO BASIC LAYOUT 3 of 8 Note Any Batch Commands using the Channel Settings window must have the default windows to work correctly If the Channel Strip settings are showing then Tab in the commands will not reach the correct location ...

Page 91: ...lect it LOAD PRESET CHAIN 3 In the Console window press LOAD PRESET CHAIN 3 to open the Load window and search for Preset 3 in the folder and select it SAVE PRESET CHAIN 1 In the Console window press SAVE PRESET CHAIN 1 to open the Save window and type in Preset 1 in the Save As window SAVE PRESET CHAIN 2 In the Console window press SAVE PRESET CHAIN 2 to open the Save window and type in Preset 2 ...

Page 92: ...d searching for Reverence in and selecting it from the plugin menu Note The Channel Settings window should be closed for this to work properly VST AMP RACK INSERT 2 Press VST AMP RACK INSERT 2 CHAN SET to add AMP RACK plugin to insert 2 of the selected track by opening the Channel Settings window and tabbing to 2nd insert and searching for AMP RACK in and selecting it from the plugin menu Note The...

Page 93: ...cting it from the plugin menu Note The Channel Settings window should be closed for this to work properly MULTIBAND COMP INSERT 8 CHAN SET Press MULTIBAND COMP INSERT 8 CHAN SET to add MultiBand COMP plugin to insert 8 of the selected track by opening the Channel Settings window and tabbing to 8th insert and searching for Multibandcomp and selecting it from the plugin menu Note The Channel Setting...

Page 94: ...s TUBE COMP NEXT INSERT to close the open plugin scroll to the next insert and search for Tube Comp and add it to the insert VINTAGE COMP NEXT INSERT With the Channel Settings window and current plugin open press VINTAGE COMP NEXT INSERT to close the open plugin scroll to the next insert and search for Vintage Compressor and add it to the insert LAYOUT 3 4 WORKSPACES UPDATE WORKSPACE In any window...

Page 95: ...n plugin and the Channel Settings window ENABLE WRITE OPEN PLUGIN With a plugin open press ENABLE WRITE OPEN PLUGIN to send a mouse click to enable write automation of the plugin OPEN CLOSE INSERTS In the Project window press OPEN CLOSE INSERTS to toggle the Insert Tab in the Inspector either open or closed BYPASS OPEN PLUGIN Press BYPASS OPEN PLUGIN to bypass the plugin that is currently open LAY...

Page 96: ...EFEAT to disable the mute function for the selected track MUTE SELECTED TRACKS With a track selected press MUTE SELECT TRACKS to enable the mute function for the selected track SOLO DEFEAT With a track selected press SOLO DEFEAT to disable the solo function for the selected track SOLO SELECT TRACKS With a track selected press SOLO SELECT TRACKS to enable the solo function for the selected track ...

Page 97: ...ings window for the Mix window Note 1 This key command is different from the open the Channel Settings window key command in the Project window Note 2 To close this Channel Settings window press Close Front window OPEN PLUGINS ON TRACK MIX In the Mix Console window press OPEN PLUGINS ON TRACK MIX to open all the plugins on the selected track Note This is the same key command as opening the Channel...

Page 98: ... STEREO IN OUT to hide the Stereo In and Stereo Out channels BYPASS SELECT INSERTS In the Mix Console press BYPASS SELECT INSERTS to shift tab to the Mix Rack cursor down to the insert tab and bypass all the inserts on the selected track BYPASS OPEN PLUGIN With a plugin window open press BYPASS OPEN PLUGIN to send a mouse click that will bypass the plugin LAYOUT 4 2 PLUGIN CHANNEL SETTINGS VTM INS...

Page 99: ...he Mix Console window with 1 track selected press AIREQ INSERT 4 CHAN SET MIX to load AirEQ onto insert 4 of your selected channel This Batch Command operates in the following order Opens the Channel Settings window in the console Tabs and cursors to insert 4 Searches for Eiosis Air EQ Adds it to the track DE ESSER NEXT INSERT With the Channel Settings window and current plugin open press DE ESSER...

Page 100: ...selected track as well as the 3 following tracks NAME CHORUS X4 MIXER In the Console Mixer window select the bottom of the desired track so that it is outlined in red and press NAME CHORUS X4 MIXER This will type in the name in the selected track as well as the 3 following tracks NAME BG VOCAL X4 MIXER In the Console Mixer window select the bottom of the desired track so that it is outlined in red...

Page 101: ...PY NAME LEFT X4 MIXER This will copy the selected track s name and paste it to the previous 3 tracks with sequence numbers 2 4 from left to right COPY NAME RIGHT X8 MIXER In the Console Mixer window select the bottom of the desired track so that it is outlined in red and press COPY NAME RIGHT X8 MIXER This will copy the selected name and paste it to the next 7 tracks with sequence numbers 2 8 NAME...

Page 102: ...ks open or closed TOGGLE ROUTING In the Console window press TOGGLE ROUTING to toggle the Routing Racks open or closed SAVE SELECTED CHANNELS In the Console window press SAVE SELECTED CHANNELS to open the Preset Save window LOAD SELECTED CHANNEL In the Console window press LOAD SELECTED CHANNELS to open the Preset Load window ...

Page 103: ...n the Project or Mix window press STEREO FX ROOMWORKS to create a new stereo FX track with RoomWorks preloaded This Batch Command operates in the following order Opens the New FX Track dialog window Sends a mouse click to select stereo from the Configurations Menu Sends another mouse click to the Effect dropdown menu Searches for and selects RoomWorks ...

Page 104: ...erates in the following order Opens the New FX Track dialog window Sends a mouse click to select stereo from the Configurations Menu Sends another mouse click to the Effect dropdown menu Searches for and selects VST Amp Rack MONO FX DELAY In the Project or Mix window press MONO FX DELAY to create a mono FX track with Delay preloaded This Batch Command operates in the following order Opens the New ...

Page 105: ...dropdown menu Searches for and selects Bitcrusher LAYOUT 6 2 WINDOWS CHANNEL SETTINGS WINDOW In the Project window press CHANNEL SETTINGS WINDOW to open the Channel Settings window CLOSE FRONT WINDOW In any window press CLOSE FRONT WINDOW to close the most up front window CLOSE PLUGIN AND CHAN SET In the current window press CLOSE PLUGIN AND CHAN SET to close the open plugin and the Channel Settin...

Page 106: ...ttings window for the Mix window Note 1 This key command is different from the open the Channel Settings window key command in the Project window Note 2 To close this Channel Settings window press Close Front window OPEN PLUGINS ON TRACK MIX In the Mix Console window press OPEN PLUGINS ON TRACK MIX to open all the plugins on the selected track Note This is the same key command as opening the Chann...

Page 107: ...d press VST INSTRUMENT WINDOW to toggle the Instrument window either open or close for the selected track CLOSE 1 OPEN PLUGIN With multiple plugins open press CLOSE 1 OPEN PLUGIN to send a mouse click that will close the most up front window BYPASS SELECT INSERTS With a track selected In the Mix Console press BYPASS SELECT INSERTS to shift tab and to the Mix Rack and cursor down to the Inserts Rac...

Page 108: ... window with a track or tracks selected press ADD STEREO REVERB SELECT to add a new stereo FX track with RoomWorks preloaded on to an insert of your selected track s This Batch Command operates in the following order Adds a new FX send Send a mouse click to Configuration and selects stereo Mouse clicks the Effect dropdown menu Searches for and selects RoomWorks ...

Page 109: ... ADD STEREO FX FLANGER SELECT to add a new stereo FX track with Flanger preloaded on to an insert of your selected track s This Batch Command operates in the following order Adds a new FX send Sends a mouse click to Configuration and selects stereo Mouse clicks the Effect dropdown menu Searches for and selects Flanger MONO FX BITCRUSH SELECT In any window with a track or tracks selected press ADD ...

Page 110: ...d select another track and press FX 2 SEND 3 CHAN SET to load the FX 2 send to Send 3 of your selected track This Batch Command operates in the following order Opens up the Channel Settings window tab Cursors over to Send 3 Opens the Sends window Selects FX2 from the list Note The Channel Settings window should be closed before running this command FX 3 SEND 4 CHAN SET In the Project window after ...

Page 111: ...ursors over to Send 6 Opens the Sends window Selects FX5 from the list Note The Channel Settings window should be closed before running this command BITCRUSH SEND 5 CHAN SET In the Project window with the Channel Settings window closed press BITCRUSH SEND 5 CHAN SET to load Bitcrusher to Send 5 of your selected track This Batch Command operates in the following order Opens up the Channel Settings ...

Page 112: ...window Send a mouse click to Send 2 Selects add from the menu Selects stereo from the Configuration dropdown menu on the new FX track window ST FX SEND C CHAN SETTINGS In the Project window with the Channel Settings window closed press ST FX SEND C to create a new stereo FX track on send 3 of your selected track This Batch Command operates in the following order Opens up the Channel Settings windo...

Page 113: ...s a mouse click to Send 2 Selects add from the menu Selects RoomWorks from the Effect dropdown menu on the new FX track window ADD STEREO DELAY SEND C In the Project window with the Channel Settings window closed press ADD STEREO DLEAY SEND C to load a new stereo FX track with Stereo Delay preloaded to Send 3 of your selected track This Batch Command operates in the following order Opens up the Ch...

Page 114: ... COPY SENDS NEXT TRACK to copy the selected track s Sends settings and paste them to the following track This Batch Command operates in the following order Opens the Channel Settings window Tabs and cursors over to the Sends menu Copies the track s Sends settings Scrolls over to the next track Pastes the Sends settings COPY SEND PREVIOUS X3 In the Project window with the Channel Settings window cl...

Page 115: ...k to click the sidechain button on the open plugin COMP INSERT 7SC In the Project window with the Channel Settings window closed press COMP INSERT 7SC to load a compressor to Insert 7 of your selected track s Inserts Rack with sidechaining enabled This Batch Command operates in the following order Opens up the Channel Settings window Tabs and cursor over to Insert 7 in the Inserts Rack tab Adds a ...

Page 116: ...sole window with a plugin and the Channel Settings window open press CLOSE PLUG AND CHAN SET MIX to close the open plugin window and then close the open Channel Settings window TOGGLE INSERTS In the Console window press TOGGLE INSERTS to toggle the insert racks either open or close TOGGLE SENDS In the Console window press TOGGLE SENDS to toggle the Sends Racks either open or close ACTIVATE SEND Wi...

Page 117: ...oice to a new mono FX track on to your selected track This Batch Command operates in the following order Adds a new FX send Sends a mouse click to Configuration Selects mono Clicks the Effect drop menu and selects your preprogrammed plugin of choice Note When editing this Batch Command hit Key Command type in the name of the desired plugin hit key Command again and input the enter key on your keyb...

Page 118: ... SELECT GROUP ST SUBMIX 2 In the Project or Mix window press BUS SELECT GROUP ST SUBMIX 2 to create a new stereo bus group track named Submix 2 for your selected track This Batch Command operates in the following order Creates a new bus group track Names the bus Submix 2 Selects stereo from the Configuration menu BUS SELECT GROUP MONO SUB 5 In the Project or Mix window press BUS SELECT GROUP MONO ...

Page 119: ...NABLE SELECT With a track selected press RECORD ENABLE SELECT to enable the record function for the selected track MUTE DEFEAT With a track selected press MUTE DEFEAT to disable the mute function for the selected track MUTE SELECTED TRACKS With a track selected press MUTE SELECT TRACKS to enable the mute function for the selected track SOLO DEFEAT With a track selected press SOLO DEFEAT to disable...

Page 120: ...HOW SELECTED TRACKS to fader focus only the selected tracks LAYOUT 8 10 VISIBILITY CONFIGS VISIBILITY CONFIG 1 Press VISIBILTY CONFIG 1 to open up the previously created visibility configuration VISIBILITY CONFIG 2 Press VISIBILTY CONFIG 2 to open up the previously created visibility configuration VISIBILITY CONFIG 3 Press VISIBILTY CONFIG 3 to open up the previously created visibility configurati...

Page 121: ...ity configuration NEW CONFIG FOR SELECT TRACKS Press NEW CONFIG FOR SELECT TRACKS to create a new visibility configuration for the selected tracks only This will fader focus the selected tracks copy the name of the first track to the clipboard create a new visibility configuration and paste the clipboard into the configuration name ...

Reviews: