Manuale utente PALMARE IDRO TOUCH RADIO
Manuale utente PALMARE IDRO TOUCH RADIO
Pag.24
Pag.25
Vers. 01 del 07/04/15
Vers. 01 del 07/04/15
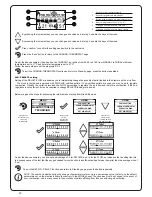
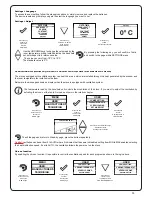
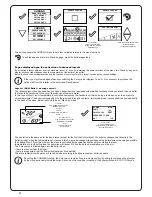
Time and date setting
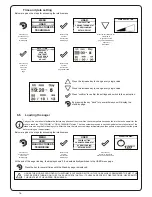
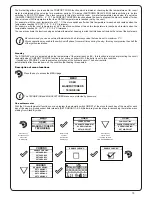
Below are given the steps for accessing the relative menu.
Press the increase key to change every single value
Press the increase key to change every single value
Press “confirm” to confirm the settings and switch to the next option.
By pressing the key “back” for several times you will display the
stand-by page.
Press the key
“access menu” to
access the
MENU page
Press the key
“confirm”
to access the
USER page
Press the key “selection” for
several times
to go to the second
page of the USER menu
and select
SETTINGS.
Press the key
“confirm” to
access the
SETUP
page
Press the key
“confirm”
to access the
page DATE-TIME
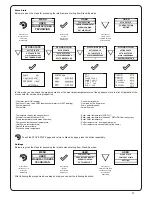
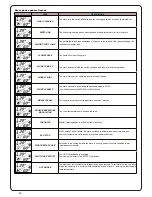
Press the key from STAND-BY mode to quickly display the real and active states of the stove as shown in the figure
below:
POWER: It shows the real power that can be
- MIN: minimum settable power (see power selection menu);
- MAX: maximum settable power (see power selection menu);
the stove is set to maximum power each time it is turned on
- MOD: stove modulation with set parameters reached;
- SANI: if the quick DHW kit is provided, as soon as there is a request for
domestic hot water, the stove switches to DHW power
automatically;
PUMP: the writing ON indicates that the circulator is active and enables water circulation within house system;
3-WAY VALVE: it shows the position of any 3-way valve installed, if there is a quick DHW heat exchanger installed or a DHW boiler
PRESSURE: it indicates the actual pressure of the system read by the transducer installed on the stove.
Press this key to return to STAND-BY page.
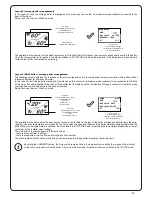
At the end of the auger loading, the display shows 0 “and automatically switches to the USER menu page.
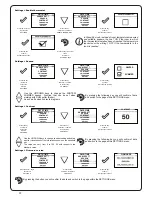
Loading the auger
UNLIKE THE MODELS PROVIDED WITH AUTOMATIC CLEANING DEVICE, IN THIS CASE ALWAYS REMEMBER TO EMPTY THE
GRATE BEFORE TURNING ON THE STOVE AND CHECK THAT ALL ITS HOLES ARE FREE OF OBSTRUCTIONS. NEVER EMPTY
THE GRATE INTO THE HOPPER. FIRE HAZARD.
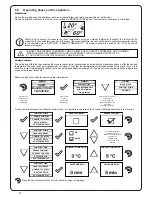
Below are given the steps for accessing the relative menu.
Carry out this operation to facilitate the first start-up phases of the stove; Also check that pellets have been fed into the tank and wait for the
stove to reach the “SHUTDOWN” or “FINAL CLEANING” status. The the number expressed in seconds indicates the rotation time of the
infeed screw during the first loading cycle. After this time, the infeed screw stops immediately and then pellets are emptied from the grate
before turning on the equipment.
Press the key
“access menu” to
access the
MENU page
Press the key
“confirm”
to access the
USER page
Press the key
“confirm” to enable the
rotation of the infeed screw
Press the key for several times until the Stand-by page is displayed.
POWER
PUMP
PRESSURE 1.1 bar
MENU
USER
POWER SELECTION
POWER SETTING
CHRONOTHERMOSTAT
SCREW LOADING
SET AIR-PELLET
USER
MANUFACTURER’S
TECHNICIAN
ENABLE EXT. T.
SEASON
CONTRAST
LANGUAGE
ADJUST
FW VERSION
DATE – TIME
MENU
USER
MANUFACTURER’S
TECHNICIAN
USER
POWER SETTING
CHRONOTHERMOSTAT
SCREW LOADING
SCREW LOADING
SET AIR-PELLET
2
1
,
considered a command.
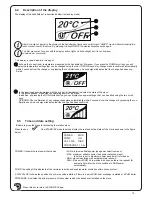
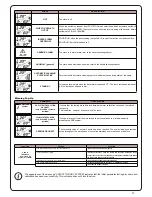
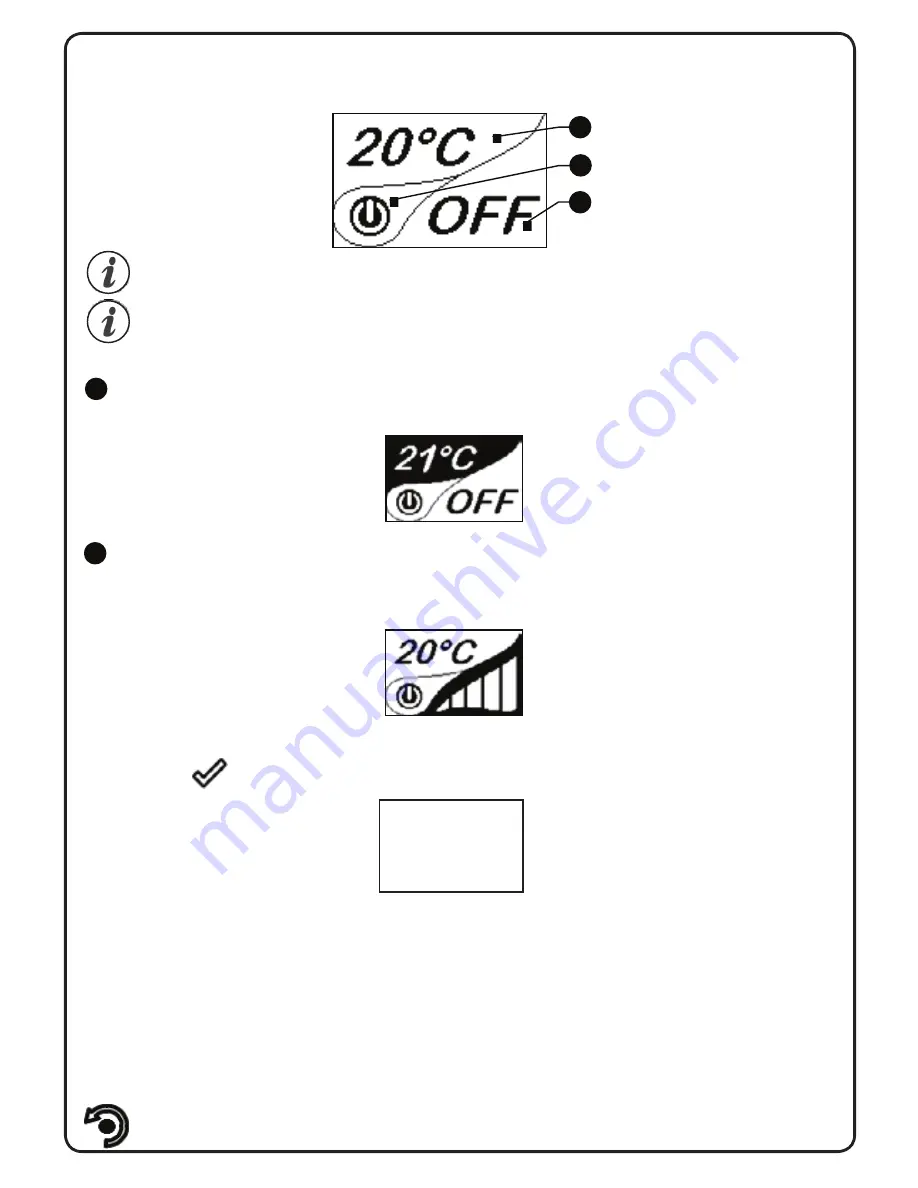
The display is subdivided into three parts:
1. It shows the current room temperature measured by the handheld set. Moreover, if you press the DOWN scroll key you will
display the temperature settings that can be changed using the two UP/DOWN keys. Any change made is confirmed automatically
within 3 seconds from the change or by pressing the confirmation key. A sound signal indicates that the change has been con-
firmed.
In the inactive phases (combined with the 3rd part of the display) indicates the state of the stove.
In the active phases, it indicates the operating power of the stove.
In addition, by pressing the DOWN scroll button, you can display the power settings, that can be edited using the two scroll
keys
UP/DOWN: The confirmation of any change takes place automatically within 3 seconds from the change or by pressing the con-
firmation key. A sound signal indicates that the change has been confirmed.
Time and date setting
Below are given the steps for accessing the relative menu.
POWER MOD
PUMP ON
VAL 3 VIE
RISC
PRESSURE 1.1 bar
15
Manuale utente PALMARE IDRO TOUCH RADIO
Manuale utente PALMARE IDRO TOUCH RADIO
Pag.24
Pag.25
Vers. 01 del 07/04/15
Vers. 01 del 07/04/15
Time and date setting
Below are given the steps for accessing the relative menu.
Press the increase key to change every single value
Press the increase key to change every single value
Press “confirm” to confirm the settings and switch to the next option.
By pressing the key “back” for several times you will display the
stand-by page.
Press the key
“access menu” to
access the
MENU page
Press the key
“confirm”
to access the
USER page
Press the key “selection” for
several times
to go to the second
page of the USER menu
and select
SETTINGS.
Press the key
“confirm” to
access the
SETUP
page
Press the key
“confirm”
to access the
page DATE-TIME
Press the key from STAND-BY mode to quickly display the real and active states of the stove as shown in the figure
below:
POWER: It shows the real power that can be
- MIN: minimum settable power (see power selection menu);
- MAX: maximum settable power (see power selection menu);
the stove is set to maximum power each time it is turned on
- MOD: stove modulation with set parameters reached;
- SANI: if the quick DHW kit is provided, as soon as there is a request for
domestic hot water, the stove switches to DHW power
automatically;
PUMP: the writing ON indicates that the circulator is active and enables water circulation within house system;
3-WAY VALVE: it shows the position of any 3-way valve installed, if there is a quick DHW heat exchanger installed or a DHW boiler
PRESSURE: it indicates the actual pressure of the system read by the transducer installed on the stove.
Press this key to return to STAND-BY page.
At the end of the auger loading, the display shows 0 “and automatically switches to the USER menu page.
Loading the auger
UNLIKE THE MODELS PROVIDED WITH AUTOMATIC CLEANING DEVICE, IN THIS CASE ALWAYS REMEMBER TO EMPTY THE
GRATE BEFORE TURNING ON THE STOVE AND CHECK THAT ALL ITS HOLES ARE FREE OF OBSTRUCTIONS. NEVER EMPTY
THE GRATE INTO THE HOPPER. FIRE HAZARD.
Below are given the steps for accessing the relative menu.
Carry out this operation to facilitate the first start-up phases of the stove; Also check that pellets have been fed into the tank and wait for the
stove to reach the “SHUTDOWN” or “FINAL CLEANING” status. The the number expressed in seconds indicates the rotation time of the
infeed screw during the first loading cycle. After this time, the infeed screw stops immediately and then pellets are emptied from the grate
before turning on the equipment.
Press the key
“access menu” to
access the
MENU page
Press the key
“confirm”
to access the
USER page
Press the key
“confirm” to enable the
rotation of the infeed screw
Press the key for several times until the Stand-by page is displayed.
POWER
PUMP
PRESSURE 1.1 bar
MENU
USER
POWER SELECTION
POWER SETTING
CHRONOTHERMOSTAT
SCREW LOADING
SET AIR-PELLET
USER
MANUFACTURER’S
TECHNICIAN
ENABLE EXT. T.
SEASON
CONTRAST
LANGUAGE
ADJUST
FW VERSION
DATE – TIME
MENU
USER
MANUFACTURER’S
TECHNICIAN
USER
POWER SETTING
CHRONOTHERMOSTAT
SCREW LOADING
SCREW LOADING
SET AIR-PELLET
2
1
,
considered a command.
The display is subdivided into three parts:
1. It shows the current room temperature measured by the handheld set. Moreover, if you press the DOWN scroll key you will
display the temperature settings that can be changed using the two UP/DOWN keys. Any change made is confirmed automatically
within 3 seconds from the change or by pressing the confirmation key. A sound signal indicates that the change has been con-
firmed.
In the inactive phases (combined with the 3rd part of the display) indicates the state of the stove.
In the active phases, it indicates the operating power of the stove.
In addition, by pressing the DOWN scroll button, you can display the power settings, that can be edited using the two scroll
keys
UP/DOWN: The confirmation of any change takes place automatically within 3 seconds from the change or by pressing the con-
firmation key. A sound signal indicates that the change has been confirmed.
Time and date setting
Below are given the steps for accessing the relative menu.
Manuale utente PALMARE IDRO TOUCH RADIO
Manuale utente PALMARE IDRO TOUCH RADIO
Pag.22
Pag.23
Vers. 01 del 07/04/15
Vers. 01 del 07/04/15
Wiring
&RQQHFWWKHSRZHUFRUGWRWKHEDFNRIWKHVWRYHDQGWKHQWRDZDOOVRFNHW7KH,2VZLWFKLQWKH¿JXUH
VKRXOGEHVHWWR,WRSRZHUWKHVWRYH,IYROWDJHLVQRWVXSSOLHGFKHFNWKHVWDWHRIWKHIXVHLQVWDOOHGLQ
WKHER[EHORZWKHVZLWFK$IXVH'XULQJWKHSHULRGVRILQDFWLYLW\ZHUHFRPPHQG\RXGLVFRQQHFWWKH
power cord of the stove.
Preliminary Operations
1(9(5,16(57,1727+(7$1.27+(5.,1'2))8(/27+(5)5207+(3(//(76
COMPLYING WITH THE SPECIFICATIONS BELOW
The handheld set is shown in the picture below:
Description of the handheld set:
The information below will allow you to become familiar with the product and achieve the best performance.
How to insert the batteries in the handheld set:
5HPRYHWKHSURWHFWLYHFRYHURIWKHEDWWHU\RQWKHEDFNRIWKHUHPRWHFRQWURODVVKRZQLQ)LJXUH$DQGLQVHUWWKHEDWWHULHV
PLQLSHQVW\OHEDWWHU\$$$9LQWKHKRXVLQJRIWKHKDQGKHOGVHWDQGREVHUYHWKHSROHV,QVWDOOWKHEDWWHU\SURWHFWLYHFRYHU
DVVKRZQLQ¿JXUH%
7KHKDQGKHOGVHWDIWHUDVKRUWVFUHHQVKRZLQJWKH5DYHOOLORJRZLOOOLVWWKHODQJXDJHVDYDLODEOHLQWKHPHQX
6HOHFWWKHGHVLUHGODQJXDJHXVLQJWKHVFUROONH\VDQGFRQ¿UP\RXUVHOHFWLRQZLWKWKHFRQ¿UPDWLRQEXWWRQ
1
Increase button “UP” (selection key)
2
Decrease key “DOWN” (selection key)
3
ON/OFF or reset from “Sleep” mode key.
4
Display
5
Key for accessing the MENU and back
6
Confirmation key
1
2
5
6
4
3
Figure A
Figure B
In “Sleep” mode, the handheld set
screen is obscured, keeping however
active the radio communication with
the stove to reduce battery con-
sumption.
What to check befor turning on the stove
0DNHVXUH\RXKDYHUHPRYHGDOOSDUWVWKDWSRVHWKHULVNRIEXUQVIURPWKHFRPEXVWLRQFKDPEHURUJODVVYDULRXVLQVWUXFWLRQVRU
stickers).
%HIRUHWXUQLQJRQWKHVWRYHPDNHVXUH\RXKDYH¿WWHGWKHJUDWHRQWKHVXSSRUWEDVHDQGFKHFNWKDWWKHGRRUDQGWKHDVKGUDZHU
are properly close.
How to load the pellets
)XHOVXSSO\FRQVLVWVLQWKHLQVHUWLRQRISHOOHWVIURPWKHWRSRIWKHVWRYHE\RSHQLQJWKHGRRU'XULQJSHOOHWORDGLQJSUHYHQWWKHSHO-
OHWEDJIURPFRPLQJLQWRFRQWDFWZLWKKRWVXUIDFHV
2
3
1
FIRST INSTALLATION?
PRESS THE KEY RADIO
ADJ ON THE STOVE
YES
Handheld touch radio initialization
In order to operate correctly, the handheld set should be interfaced with the electronic board installed inside the stove. For this
UHDVRQRQGLVSOD\DSSHDUVWKHIROORZLQJPHVVDJH
,IWKHKDQGKHOGVHWLVXVHGIRUWKH¿UVWWLPHVHOHFW
YES
XVLQJWKHVHOHFWLRQNH\VDQGFRQ¿UPZLWKWKHGHGLFDWHGNH\
2QWKHGLVSOD\RIWKHKDQGKHOGVHWDSSHDUVWKHIROORZLQJ
+ROGGRZQIRUDIHZVHFRQGVWKHEXWWRQRIUDGLRFRPPXQLFDWLRQ5$',2$'-RIWKH3&%ORFDWHGRQWKHEDFNRIWKHVWRYHWR
initialize the device.
7KHÀDVKLQJ\HOORZ/('LQGLFDWHVWKDWWKHFLUFXLWERDUGLVZDLWLQJWRUHFHLYHWKHVLJQDOIURPWKHKDQGKHOGVHW
%\SUHVVLQJWKHHQWHUNH\RQWKHKDQGKHOGVHWWKHFRPSRQHQWVVWDUWFRPPXQLFDWLQJZLWKHDFKRWKHU$FKHFNVLJQRQWKHGLVSOD\
DFFRPSDQLHGE\DVRXQGVLJQDOVKRZVWKDWWKHLQLWLDOL]DWLRQRIWKHKDQGKHOGVHWKDVEHHQFRPSOHWHGVXFHVVIXOO\
When you replace the batteries, you do not have to run the initialization procedure of the handheld set. In this case, when
on display appears the message “FIRST INSTALLATION ?”, select
NODQGSUHVVWKHFRQ¿UPDWLRQNH\
Description of the display
The display of the handheld set is described below (in stand-by mode):
After 5 minutes of inactivity, the display of the handheld set turns dark, switching to “SLEEP” mode, while maintaining the
radio connection with the stove. By pressing the key ON/OFF, the display becomes active again.
7KH¿UVWSUHVVXUHRIDQ\NH\ZLWKWKHGLVSOD\DFWLYHOLJKWVXSLWVEDFNOLJKWEXWLWLVQRWKRZHYHU
considered a command.
The display is subdivided into three parts
6.4
Description of the display
6.5
Time and date setting
Summary of Contents for Pompeii
Page 14: ...Pull to clean exchanger tube bundle 12 5 8 How to Clean the Tubulators ...
Page 32: ...30 25 Page 16 7 Maintenance Record SIGNATURE WORK CARRIED OUT DATE ...
Page 44: ...42 1 2 x 4 2 12 How to mount the side panels ...
Page 50: ...48 38 4 Maintenance Record DATE WORK CARRIED OUT SIGNATURE 40 ...
Page 52: ......
Page 53: ......


