43
43
RISERVATO AL PERSONALE AUTORIZZATO ALL'INSTALLAZIONE - ONLY FOR INSTALLATION-AUTHORIZED STAFF
0579-M090-0
4.12
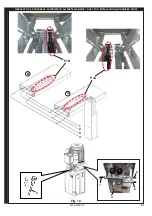
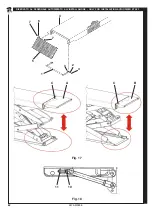
Montaggio rampine di salita
Rif. Fig.
17
- Montare il supporto rampa
1
mediante perno
2
e seeger
3
alla pedana
4
, poi la rampina
5
con perno
6
e seeger
7
.
Prestare attenzione a montare le rampine sul lato corretto rispetto alle pedane. La rampina
A
, di lunghezza maggiore, deve essere
montata dal lato dei cilindri. La rampina
B
, di lunghezza inferiore, deve essere montata dal lato opposto ai cilindri.Al fine di evitare
lo scambio delle rampine, sulle pedane sono presenti i perni saldati
C
che impediscono il montaggio della rampina non
corrispondente.
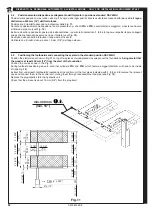
4.13
Registrazione livellamento rampine
Rif. Fig.
18
- Registrazione mediante vite
10
poi fissare con controdado
11
.
4.12
Assembling ramps
Ref. Fig.
17
— Fit ramp support
1
to platform
4
with shaft
2
and circlip
3
, then fit ramp
5
with shaft
6
and circlip
7
.
Make sure the ramps are attached to the correct side of the platforms. Ramp
A
, longer, must be mounted on the cylinders side. Ramp
B
, shorter, must be mounted opposite to the cylinders side. To prevent confusing the ramps, the platforms have welded pins
C
to
avoid assembling the incorrect ramp.
4.13
Adjusting the levelling of the ramps
Ref. Fig
18
- Adjust using screw
10
then fasten with counternut
11.
Summary of Contents for RAV540IU
Page 9: ...9 0579 M090 0 Fig 1 2 1 3 4 3 4 5 5...
Page 10: ......
Page 11: ......
Page 12: ......
Page 13: ......
Page 16: ...16 16 0579 M090 0 1 1 9000 lbs 1 1 G Fig 3...
Page 26: ...26 26 0579 M090 0 Fig 7B...
Page 48: ...48 48 0579 M090 0 Fig 22 1 2 3...
Page 56: ...56 56 0579 M090 0 3 1 2 4 B A Fig 25...
Page 69: ...69 0579 M090 0 NOTE NOTES AMMERKUNGEN NOTES NOTAS...


