background image

40

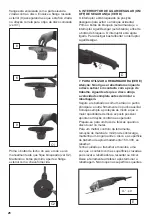
The direction in which the cutting is performed is 

important.

The machine must always work in an up-grinding 

motion. Therefore, never move the machine in 

the other direction! Otherwise, the danger exists 

of it being pushed uncontrolled out of the cut.

9. TO REPLACE THE BRUSHES (SEE F)

Before any work on the machine itself, pull 

the mains plug.

Remove the screw securing the motor brush 

cover. Remove the cover, gently lift out, and 

pull the spade connector free. Hold back the 

coil spring and slide the worn brush out of the 

housing, carefully release the spring. Locate the 

replacement brush, (in the same orientation) 

whilst again holding back the coil spring. Ensure 

the brush is located and free to move, release 

the spring; it should now sit within the groove on 

the brush. Re-attach the spade connector to the 

terminal, replace the cover and secure.

WORKING HINTS FOR 

YOUR GRINDER

1. Your angle grinder is useful for both cutting 

through metals, i.e. for removing screw heads, 

and also for cleaning / preparing surfaces, i.e. 

before and after welding operations.

2. Different types of wheel/cutter will allow the 

grinder to meet various needs. Typically, wheels/

cuttings are available for mild steel, stainless 

steel, stone and brick. Diamond impregnated 

discs are available for very hard materials.

3. If the grinder is used on soft metals such as 

aluminum, the wheel will soon clog and will have 

to be changed.

4. At all times, let the grinder do the work, do not 

force it or apply excessive pressure to the wheel/

disc.

5. If cutting a slot ensures that the cutter is kept 

aligned with the slot, twisting the cutter may 

cause the disc to shatter. If cutting through thin 

sheet only allow material, excessive penetration 

can increase the chance of causing damage.

6. If cutting stone or brick, it is advisable to use a 

dust extractor.

TROUBLESHOOTING

Although your new angle grinder is


really very 

simple to operate, if you do experience problems, 

please check the following:

1. If your grinder will not operate check the power 

at the main plug.

2. If your grinder wheel wobbles or vibrates, 

check that outer flange is tight, check that the 

wheel is correctly located on the flange plate.

3. If there is any evidence that the wheel is 

damaged do not use as the damaged wheel may 

disintegrate, remove it and replace with a new 

wheel. Dispose of old wheels sensibly.

4. If working on aluminum or a similar soft alloy, 

the wheel will soon become clogged and will not 

grind effectively.

5. If a fault cannot be rectified, return the tool 

to an authorized dealer or its service agent for 
repair.

MAINTAIN TOOLS WITH 

CARE

Remove the plug from the socket before 

carrying out any adjustment, servicing or 

maintenance.

Keep tools sharp and clean for better and safer 

performance. Follow instructions for lubricating 

and changing accessories. Inspect tool cords 

periodically and if damaged, have repaired by 

authorized service facility.

Your power tool requires no additional lubrication 

or maintenance. There are no user serviceable 

parts in your power tool. Never use water or 

chemical cleaners to clean

your power tool. Wipe clean with a dry cloth. 

Always store your power tool in a dry place. 

Keep the motor ventilation slots clean. Keep all 

working controls free of dust.

If the supply cord is damaged, it must be 

replaced by the manufacturer, its service agent 

or similarly qualified persons in order to avoid a 

hazard.

F

Summary of Contents for PRO XF2350

Page 1: ......

Page 2: ...2 Instrucciones en Espa ol Instru es em Portugu s Instructions in English...

Page 3: ...ubierta de las escobillas 5 Protector para disco de esmerilar 6 Disco para esmerilar 7 Llave 8 Brida interior 9 Brida exterior 10 Tuerca de ajuste de la abrazadera 11 Palanca de sujeci n del protector...

Page 4: ...s2 Incertidumbre K 1 5 m s El valor total de vibraci n declarado se ha medido seg n un m todo de prueba est ndar y puede emplearse para comparar varias herramientas El valor total de vibraci n declara...

Page 5: ...tencias y las instrucciones para consultarlas en el futuro Con el t rmino herramienta el ctrica que aparece en las advertencias se hace referencia tanto a una herramienta que funcione con bater a sin...

Page 6: ...rramienta podr a causar una lesi n e No trabaje en sitios a los que no alcance bien Trabaje con los dos pies en el suelo y con un buen equilibrio en todo momento Esto permite un mejor control de la he...

Page 7: ...por la herramienta el ctrica Los accesorios que funcionen a una velocidad superior a su velocidad nominal se pueden romper y salir disparados e El di metro exterior y el grosor de su accesorio deben...

Page 8: ...efrigerantes l quidos Utilizar agua u otros refrigerantes l quidos podr a causar descargas o que el operario se electrocute q Su mano debe permanecer en todo momento sobre la empu adura durante los tr...

Page 9: ...disco expuesto hacia el operario El protector ayuda a proteger al operario de fragmentos de disco rotos y del contacto accidental con el disco y las chispas que pudieran inflamar la ropa d Los discos...

Page 10: ...minimizar el riesgo de que el disco se enganche y cause un retroceso Las piezas de trabajo grandes tienden a hundirse por su propio peso Se deben colocar soportes debajo de la pieza de trabajo cerca...

Page 11: ...antiza que solo se pueda montar un protector que se ajuste al tipo de m quina en cuesti n Abra la palanca de sujeci n 11 Coloque el protector 5 con proyecci n espec fica en la ranura correspondiente d...

Page 12: ...TILIZAR EL ESMERIL CONSULTE E Atenci n No encienda el esmeril mientras que el disco est en contacto con la superficie de trabajo Permita que el disco alcance la velocidad m xima antes de iniciar a esm...

Page 13: ...ermitir n utilizar el esmeril para distintas funciones Por lo general los discos de esmerilado corte est n disponibles para acero suave acero inoxidable piedra y ladrillo Existen discos impregnados en...

Page 14: ...o cambio del aparato no conllevar la prolongaci n del plazo de garant a ni un nuevo plazo de garant a Las reparaciones efectuadas disponen de un periodo de garant a establecido por la ley vigente en c...

Page 15: ...15...

Page 16: ...1 24 PGA230S1 8 24 1 25 PGA230S1 8 25 1 26 PGA230S1 8 26 1 27 PGA230S1 8 27 1 28 PGA230S1 8 28 1 29 PGA230S1 8 29 1 30 PGA230S1 8 30 1 31 PGA230S1 8 31 1 32 PGA230S1 8 32 1 33 PGA230S1 8 33 2 34 PGA23...

Page 17: ...tor de bloqueio 4 Tampa da escova 5 Prote o do disco para rebarbagem 6 Disco para rebarbagem 7 Chave 8 Flange interior 9 Flange exterior 10 Porca de ajuste da anilha 11 Alavanca da anilha de prote o 1...

Page 18: ...valor total de vibra es declarado foi medido de acordo com um m todo de teste normalizado e pode ser utilizado para comparar as ferramentas entre si O valor total de vibra es declarado tamb m pode se...

Page 19: ...ltar em choque el trico inc ndio e ou les es graves Guarde todos os avisos e instru es para futuras consultas O termo ferramenta el trica nos avisos refere se s ferramentas el tricas com fio ou s ferr...

Page 20: ...es de ligar a ferramenta el trica retire as chaves de ajuste ou a chave inglesa Uma chave inglesa ou outra chave ligada a uma pe a girat ria da ferramenta el trica pode p r em causa a integridade f si...

Page 21: ...amenta Um funcionamento mais acelerado dos acess rios face respetiva velocidade nominal pode fazer com que se partam e sejam projetados e O di metro exterior e a espessura do acess rio devem situar se...

Page 22: ...idade f sica INSTRU ES DE SEGURAN A ADICIONAIS PARA TODAS AS OPERA ES RESSALTO E AVISOS ASSOCIADOS O ressalto uma rea o repentina a um disco em rota o disco de apoio escova ou qualquer outro acess rio...

Page 23: ...res n o s o adequados velocidade superior de ferramentas mais pequenas e podem rebentar INSTRU ES ADICIONAIS DE SEGURAN A PARA AS OPERA ES DE CORTE AVISOS DE SEGURAN A ADICIONAIS PARA OPERA ES DE CORT...

Page 24: ...eduzir o risco de les o o utilizador deve ler o manual de instru es Aviso Use prote o para os ouvidos Use prote o para os olhos Use uma m scara de prote o contra o p Isolamento duplo Os res duos dos p...

Page 25: ...s uma prote o adequada quele tipo de m quina pode ser montada Abrir a alavanca de bloqueio 11 Coloque a prote o do disco 5 com a proje o codificada na fenda codificada no eixo da cabe a do motor e ro...

Page 26: ...ILIZAR A REBARBADORA VER E Aten o N o ligue a rebarbadora enquanto o disco estiver em contacto com a pe a de trabalho Aguarde at que o disco atinja a velocidade completa antes de iniciar a rebarbagem...

Page 27: ...e opera es de soldadura 2 Diferentes tipos de discos cortadores permitir o que a rebarbadora responda a diversas necessidades Tipicamente os discos cortadores est o dispon veis para a o m dio a o inox...

Page 28: ...mpra ATEN O Guarde o seu recibo como prova da sua compra A repara o ou troca do produto n o constitui uma extens o do prazo da garantia ou mesmo uma garantia nova A repara o de ferramentas defeituosas...

Page 29: ...29...

Page 30: ...1 24 PGA230S1 8 24 1 25 PGA230S1 8 25 1 26 PGA230S1 8 26 1 27 PGA230S1 8 27 1 28 PGA230S1 8 28 1 29 PGA230S1 8 29 1 30 PGA230S1 8 30 1 31 PGA230S1 8 31 1 32 PGA230S1 8 32 1 33 PGA230S1 8 33 2 34 PGA23...

Page 31: ...Lock off switch 4 Brush cover 5 Wheel guard for grinding 6 Wheel for grinding 7 Spanner 8 Inner flange 9 Outer flange 10 Clamp adjustment nut 11 Guard clamping lever 12 Auxiliary handle 13 Spindle 14...

Page 32: ...ation total value may also be used in a preliminary assessment of exposure WARNING The vibration emission value during actual use of the power tool can differ from the declared value depending on the...

Page 33: ...ol 2 ELECTRICAL SAFETY a Power tool plugs must match the outlet Never modify the plug in any way Do not use any adapter plugs with earthed grounded power tools Unmodified plugs and matching outlets wi...

Page 34: ...the power tool or these instructions to operate the power tool Power tools are dangerous in the hands of untrained users e Maintain power tools Check for misalignment or binding of moving parts break...

Page 35: ...sory contacting a live wire may make exposed metal parts of the power tool live and could give the operator an electric shock k Position the cord clear of the spinning accessory If you lose control th...

Page 36: ...owards the operator The guard helps to protect operator from broken wheel fragments and accidental contact with wheel and sparks that could ignite clothing d Wheels must be used only for recommended a...

Page 37: ...walls or other blind areas The protruding wheel may cut gas or water pipes electrical wiring or objects that can cause kickback ADDITIONAL SAFETY RULES FOR ANGLE GRINDER Warning Make sure the handle...

Page 38: ...r 11 Place the wheel guard 5 with coded projection into the coded groove on the spindle of the machine head and rotate to the required position working position To fasten the wheel guard 5 close the c...

Page 39: ...d other hand firmly around the auxiliary handle Always position the guard so that as much of the exposed disc as possible is pointing away from you Be prepared for a stream of sparks when the disc tou...

Page 40: ...e cutter may cause the disc to shatter If cutting through thin sheet only allow material excessive penetration can increase the chance of causing damage 6 If cutting stone or brick it is advisable to...

Page 41: ...ty is invalid where defects are caused by or result from 1 Misuse abuse or neglect 2 The tool has not been used for rental purposes 3 Repairs attempted by unauthorised repair centres 4 Damage caused b...

Page 42: ...42...

Page 43: ...1 24 PGA230S1 8 24 1 25 PGA230S1 8 25 1 26 PGA230S1 8 26 1 27 PGA230S1 8 27 1 28 PGA230S1 8 28 1 29 PGA230S1 8 29 1 30 PGA230S1 8 30 1 31 PGA230S1 8 31 1 32 PGA230S1 8 32 1 33 PGA230S1 8 33 2 34 PGA23...

Page 44: ......

Reviews: