background image

Page 5

LTE Cellular (Units Are Carrier Specific):

1.

 Open the Cellular Gateway by unscrewing the screw on the left side of the front cover with a Phillips screwdriver 

    and gently pull up on the left side. 

2.

 Insert standard size SIM card (25mm x 15mm) into J4 with the perforated edge first and the gold contact side facing   

    downward. Push until you hear it click. If SIM card does not click into place, the wrong size SIM card is being used. 

    Note:

 Do NOT use a nano or micro size SIM card with an adapter. The adapter edge can catch and cause 

    permanent damage. 

3.

 Wait for the LED lights to turn on. Check the SIM LED to make sure it is amber colored. If it is flashing red, check 

    that the SIM card has been inserted correctly and has an active 4G data/voice plan.  

4.

 A signal strength test is recommended. Check the signal strength by using the built-in network signal strength 

    scanner. To use the scanner function, turn on SW1 dipswitch 1 to ON (check that dipswitch 4 is also ON). When 

    finished, turn SW1 dipswitch 1 back to “OFF”. 

5.

 The RUN LED should change color to flashing green when the main power connection is made. If you see any


    other color, please consult the LED indication chart below.
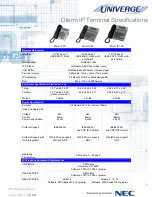
LOW COVERAGE

MEDIUM COVERAGE

LED COLORS

OPTIMAL COVERAGE

Minimum 

Signal Strength 

for Operation

6.

 Place the lid back on the top of the Cellular Gateway and fasten the lid with the screw.

VoIP & Wi-Fi VoIP:

See additional manual. 

RUN LED FLASHES GREEN

POWER SUPPLY IS OK

BAT LED IS ALWAYS ON

BATTERY IS OK

SIM LED IS AMBER

DEVICE IS CONNECTED TO THE NETWORK

COVERAGE LED IS GREEN OR AMBER

GOOD COVERAGE

SLIC LED IS GREEN

DEVICE IS IN STANDBY

Summary of Contents for 2100-PLC Cellular 12v Pedestal

Page 1: ...00 PLL Landline 12v Pedestal 2100 PLC Cellular 12v Pedestal N56W24720 N Corporate Circle Sussex WI 53089 800 451 1460 www rathcommunications com RP8500PLL Ver 8 04 21 Installation Operations Manual Made in the USA 2 Year Warranty ...

Page 2: ...st with site preparation installation and maintenance It is our sincere hope that your experience with us has and will continue to surpass your expectations Thank you for your business The RATH Team N56W24720 N Corporate Circle Sussex WI 53089 800 451 1460 www rathcommunications com Table of Contents Description Safety Guidelines Site Preparation Items Needed Installation Communication Phone Progr...

Page 3: ...DA compliant hands free operation LED call status indicator Powder coated steel construction inside and out Aluminum access panels powder coated inside and out Weather and vandal resistant Blue beacon and strobe Strobe turns on upon phone activation Recessed illuminated face plate Internal anchor base plate Ability to program up to 5 emergency numbers Remote or on site programmable Panels secured ...

Page 4: ...ires from the 120v power supply to the wires in the Pedestal using the waterproof wire nuts located on the wires Connecting the Phone and Turning On the Electric Power 1 Locate the gray phone cable coming out of the NEMA 4 box 2 If using an analog phone line for communication connect tip and ring from phone line run through conduit to red and green phone cable coming out of the NEMA 4 box Note If ...

Page 5: ...rectly and has an active 4G data voice plan 4 A signal strength test is recommended Check the signal strength by using the built in network signal strength scanner To use the scanner function turn on SW1 dipswitch 1 to ON check that dipswitch 4 is also ON When finished turn SW1 dipswitch 1 back to OFF 5 The RUN LED should change color to flashing green when the main power connection is made If you...

Page 6: ...erval is 1 minute A Press 8 Enter 3 digit number in minutes Ex 2 minutes 002 Step 5 To Exit Program Mode A Press Stop for 3 seconds Step 1 To Begin Program Mode A Call into phone by dialing the number of the Pedestal B After first simulated ring Press Wait for 4 tones C Key in security code Default is 1111 Wait for confirmation tones Step 2 To Program Emergency Numbers A Press 1 Phone number Wait ...

Page 7: ...ted the phone If you answer NO to any question proceed to the Troubleshooting Section Push the emergency button on the front of the Pedestal Yes No RATH recommends the Pedestal be tested on a regular basis to ensure proper operation Adjusting the Volume Volume Adjust VR1 Mic Sensitivity VR2 If the volume is too low or high adjust it by referring to the diagram and instructions below Note Refer to ...

Page 8: ...is not providing a disconnect signal Contact the appropriate party to make sure the disconnect signal is provided When the called party hangs up busy signal is heard through speaker Phone company or phone system is not providing a disconnect signal Operator needs to press to disconnect the call Disconnect time on phone needs to be lowered see page 6 Pedestal appears non functional Strobe does not ...

Page 9: ...Page 9 Wiring ...

Reviews: