background image

Operating Z4200U 


11 


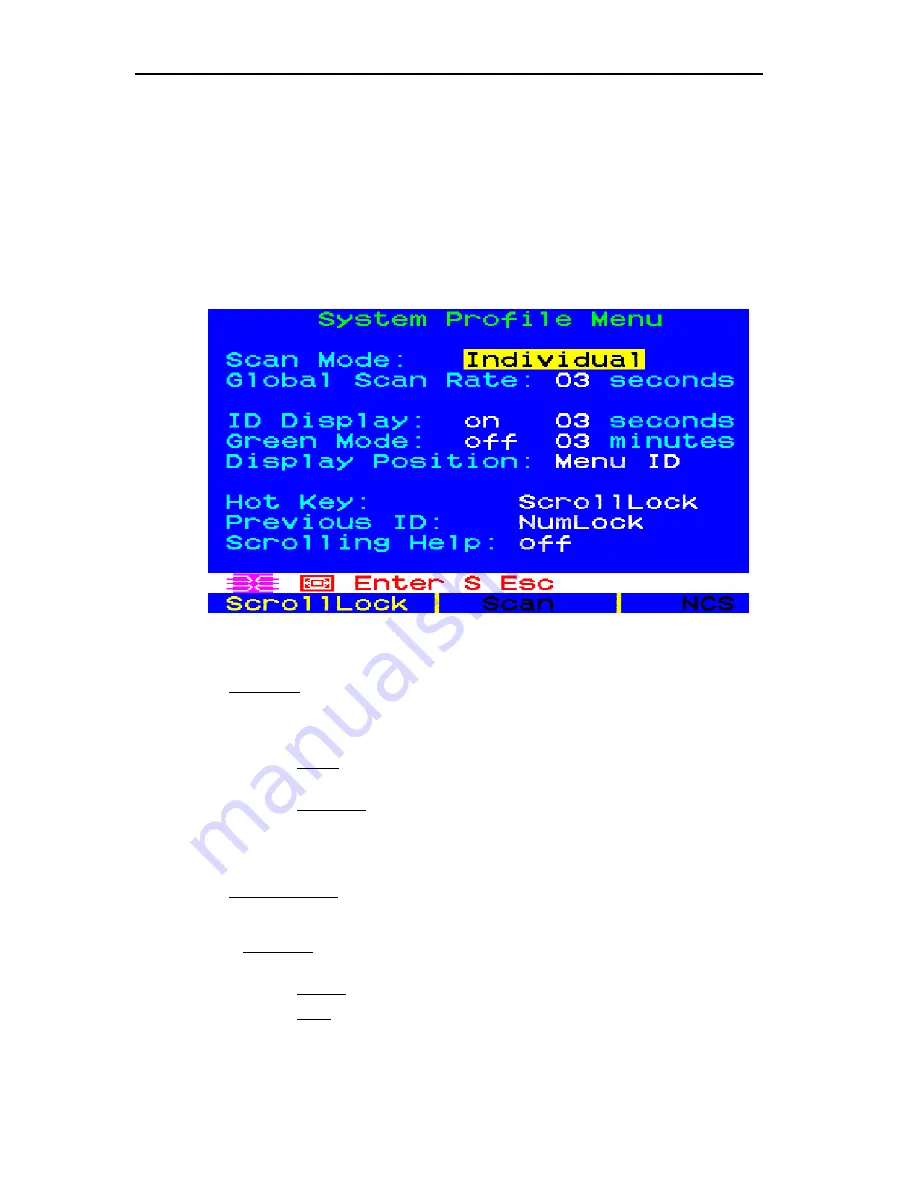
System Profile Menu


The 

System Profile

 M

enu 

<

F4

>  (Figure 11) can be used to make changes to parameters that effect overall system 

functionality. 

Select fields to be edited by pressing 

<Tab>

 (moves forward) 

<Shift-Tab>

 (moves backward), 

< >,


< >

< >

or 

< > 

keys to move to desired field.  Press 

<Enter>

 to begin editing.  Highlighted area will turn green. Use the 

< >,


< >

 keys to select choices in each field or make entries as explained below. Press <Enter> when editing is 

done. Highlighted area will turn from green to yellow. Press <S> to save changes, and <ESC> to exit 

System Profile 

Menu

.  To exit System Profile Menu without saving changes, press <ESC> and then <N> or <ESC> again. 

Figure 11.  

[F4] System Profile Menu


• 

Scan Mode:

  By pressing <

F6

> to toggle ON scan mode, the user station can scan through all 

attached computer channels at a specified time interval. Global or Individual scanning is 
available. Default setting is Global. When scan mode is activated the word “Scan” at the 

bottom of the OSUI is highlighted in yellow. 

− 

Global:   

 Scans each channel for the same amount of time, as indicated under 

Global 

Scan Rate

− 

Individual:  

 Scans each channel for the specified time set per channel, as shown in 

Selection Menu

. (Setting each channel’s individual scan rate is a function of 

the Edit Menu <

F3

>, where individual channel scan times can be set 

between 03 and 30 seconds. Default is 03 seconds.) 

• 

Global Scan Rate:

  Sets the time duration for which each channel will be scanned. Use the 

< >

 and 

< >

 keys to set between 03 and 30 seconds. Default setting is 03 seconds. 

• 

ID Display:

  The 

ID Display

 is a small window that shows computer name when switching or 

scanning between channels.  Two fields control it: 

− 

On/Off:

  Use 

< > 

and 

< >

 keys to toggle between on and off. 

− 

Time:

  Use 

< >

 and 

< >

 keys to increment or decrement the desired time period.  

A “- -“ indicates the ID window will be shown all the time.  Default setting is 
On/03 seconds. 

Summary of Contents for Z-SERIES -

Page 1: ......

Page 2: ......

Page 3: ...The Netherlands Tel 31 10 284 4053 Fax 31 10 284 4049 E mail sales europe raritan com http www raritan com Raritan Computer Japan Inc Kuga Building 7F 11 6 Kuramae 4 chome Taitoo ku Tokyo 111 0051 Jap...

Page 4: ...mful interference to radio communications Operation of this equipment in a residential environment may cause harmful interference Product names mentioned in this document are trademarks or registered...

Page 5: ...I Table of Contents...

Page 6: ......

Page 7: ...ANT CABLE INFORMATION 4 3 INSTALLATION 5 Quick Start 5 Installing More Computers 7 Installing Local User Console to UKVMSC 8 4 OPERATING Z4200U 9 APPENDIX A UTP CABLING FAQS 13 APPENDIX B PARAGON DIRE...

Page 8: ......

Page 9: ...rts high resolution video to 1600 x 1200 Locate user up to 1 000 feet away with Category 5e UTP cable Admin Port for on site flash firmware upgrades Z Series Z4200U Components Figure 1 Z4200U Basic Co...

Page 10: ...2 Introduction Product Photos Figure 2 User Station USTS Front Back Front Back of UKVMSC UKVMSPD Figure 3 Z Series Computer Interface Modules Z CIMs...

Page 11: ...Sun K B Not currently supported For connection of Sun keyboard to operate USTS PS 2 K B For connection of PS 2 keyboard to operate USTS Video HD15 For connection of multisync VGA monitor to view conne...

Page 12: ...e of non certified cabling can result in video and data degradations that users may find unsatisfactory Certified Raritan cable products listed above are widely available and competitively priced When...

Page 13: ...n USTS ports Plug in and power ON monitor A blank Selection Menu Figure 9 will appear on the user console monitor The message banner across the bottom will say Searching Note Installation requires bas...

Page 14: ...play on the Selection Menu of the User Console attached to the USTS This represents the connected computer For UKVMSP Z CIM Connect the 6 pin mini DIN keyboard and mouse and HD15 video connectors on t...

Page 15: ...and mouse and HD15 video connectors on the UKVMSP Z CIM to computer s keyboard mouse and video ports 2 Attach Z CIM to Z4200U chain Remove Z CIM Terminator from the last Z CIM s UTP IN port and set a...

Page 16: ...use and monitor to UKVMSC s local ports Figure 7 to enable direct access to a computer locally Connect optional DC power adapter p n A10D1 06MP to UKVMSC and plug power cord into AC outlet Plug in and...

Page 17: ...to switch between selected channels to access computers F3 View the Edit Menu Figure 10 change computer name or scan rate Can also be used to designate the Home computer channel F4 View the System Pr...

Page 18: ...he time interval in seconds that a channel s computer is to remain displayed on monitor during scanning It can also be used to designate a channel as a Home computer 1 Press or to highlight in yellow...

Page 19: ...Global or Individual scanning is available Default setting is Global When scan mode is activated the word Scan at the bottom of the OSUI is highlighted in yellow Global Scans each channel for the same...

Page 20: ...ct ScrollLock CapsLock NumLock or Left Alt or Left Shift Default setting is ScrollLock Rapidly pressing selected Hot Key twice activates Z4200U s On Screen User Interface OSUI Previous Channel Key Use...

Page 21: ...haracteristics for transmitting high quality video over long distances Can I use non certified Cat 5e cable Yes however you may not get the same performance as you would with Raritan certified Categor...

Page 22: ...lengths of cable however slight differences in twist rates results in measurably different rates of data transmission among each twisted pair The arrival time delta is called delay skew How does this...

Page 23: ...ain directly to Raritan s Paragon with a single Category 5e UTP cable NOTE Support for Paragon Direct Connect of Z CIM requires Paragon UST1 firmware version 2K10 or higher and UMT8 firmware version 2...

Page 24: ...es Transmitters UKVMSC for PC with local port Dimensions 4 3 W x 3 6 D x 1 0 H 108mm W x 91mm D x 25mm H Weight 0 7 lbs 0 3 kg Power optional 100V 240V 50 60 Hz 5VA Ports RJ45 in out plus local PC KVM...

Page 25: ...p to 42 servers and eliminate the traditional KVM switch box and all hard to manage server to switch cable It is designed to support the most challenging demands of server management where space is at...

Page 26: ...in the order of their placement within the Z4200U chain The second channel on the Selection Menu represents the computer or channel name that is second alphabetically not second physically in the cha...

Page 27: ...ey For activating On Screen User Interface OSUI To activate the OSUI press the Hot Key twice rapidly default ScrollLock ID Display A single line display shown on monitor to identify a channel that has...

Page 28: ......

Page 29: ...255 34 8350...

Reviews: