


Vector Solo 65kV Applicator - Maintenance
22
AH-08-02.6
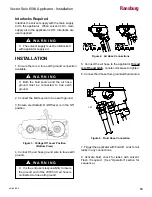
DO NOT
allow the fluid lines to stand
empty without flushing first! This will cause
dried paint flaking and clogging of the fluid
lines, applicator passages, and/or nozzles.
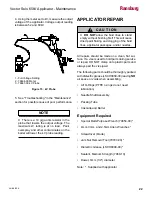
C A U T I O N
!
All repairs should be made on a clean, flat sur-
face. If a vise is used to hold parts during service
or repair, DO NOT clamp onto plastic parts and
always pad the vise jaws!
The following parts should be thoroughly packed
with dielectric grease (LSCH0009-00) leaving
NO
air space or voids when assembling:
• All O-Rings (PTFE o-rings do not need
lubrication)
• Needle Shaft Assembly
• Packing Tube
• Cascade and Barrel
Equipment Required
• Special Multi-Purpose Wrench (79854-00) *
• 4mm, 3mm, and 2.5mm Allen Wrenches *
• Screwdriver (blade)
• Jam Nut Removal Tool (79793-00) *
• Dielectric Grease (LSCH0009-00) *
• Sealant, Medium Strength (7969-10)
• Dowel, 6mm (1/4") diameter
Note: * Supplied with applicator
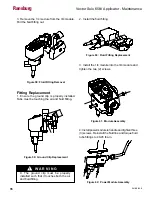
APPLICATOR REPAIR
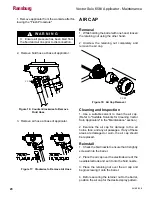
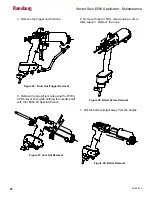
Figure 15: kV Probe
There is a 10 giga ohm resistor in the
probe that lowers the output voltage. The
maximum kV rating is at no load. Paint
overspray and other contaminates on the
barrel will lower the kV probe reading.
NOTE
4. Using the meter set to kV, measure the output
voltage of the applicator. Voltage output reading
is between 52 and 60kV.
5. See "Troubleshooting" in the "Maintenance"
section for possible cause of poor performance.
1 - Full Voltage Setting
2 - 76634-00 Meter
3 - 76667-00 kV Probe
Ransburg


