background image

CONSUMER SERVICE

If you have any product enquiries, or in the event of a problem 

with your appliance once it has been installed, please  

telephone 0870 789 5107.

CONSUMER SERVICE LINES OPEN:


Monday to Thursday  8am–6pm

Friday  8am–5pm

Saturday  9am–1pm

WARRANTY

Your manufacturer warranty covers goods of our own brand for 
defective workmanship and materials for a period of 1 year from the 
date of purchase. This warranty covers mechanical breakdown and 
proven cosmetic and manufacturing defects.
You will receive an additional FREE full 12 months guarantee by 
registering your purchase using the FREEPOST form provided. 
Alternatively, call free on 0800 587 5747, quoting reference 
RMGX57A, or register online at www.rangemaster.co.uk.
Any damage, blemishes or chips identified upon receipt of the 
product must be reported within 90 days – proof of purchase 
may be required to establish validity. Scratches on the surface of 
ceramic hobs must be reported within 14 days. Scratches caused 
by usage are not covered. Accidental damage is not covered by the 
manufacturer’s warranty.

For warranty compliance, the requirements are  

that the appliance:

• 

Has been correctly installed in accordance with current 
legislation, relevant British and European Standards and Codes 
of Practice, by a suitably competent person registered with 
Gas Safe or equivalent body and, where applicable, a qualified 
electrician.

• 

Has been used solely for domestic cooking purposes.

• 

If in use in the UK*, has not been taken abroad as a personal 
export. (In the Republic of Ireland conditions may vary, so 
consult your retailer.)

• 

Is not second-hand or a refurbished appliance. The 
manufacturer’s warranty is not transferable.

• 

Has not been subject to misuse, accidental damage or 
modification, and has not deteriorated due to normal 
domestic wear and tear, and the manufacturer’s 
recommendations concerning cleaning materials have been 
followed.

• 

Has not been repaired by persons or organisations other than 
those authorised to act on behalf of AGA Rangemaster.

Exceptions:


• 

Items not included under the free 1 year guarantee include 
pan supports, griddles, wok rings, baking trays, grill pans, 
trivets, filters, light bulbs and other consumable accessories. 

• 

Any damage caused other than through normal use. 

• 

Breakdowns associated with cooking spillage.

• 

Cosmetic deterioration deemed to be normal wear and tear. 

This warranty is in addition to your Statutory Rights.

*  Only certain models can be adapted for use with Mains Gas 

supplied in the Channel Islands and Isle of Man.

OUT OF WARRANTY

Service work should only be carried out by technically competent 
and suitably qualified personnel.

For your own safety, always make sure that work is carried out by 
a Gas Safe registered engineer for gas appliances or an approved 
electrician for electrical models.

For a competitive quote and to arrange for a Rangemaster approved 
engineer to attend, call Consumer Services on: 0870 7895107.

SPARE PARTS

To maintain optimum and safe performance, we recommend that 
only genuine Rangemaster spare parts are used. These are available 
from most major spares stockists, including ourselves.

Contact Consumer Services on 0870 7895107, who will be happy to 
help.

STANDARDS 

Rangemaster cookers are designed and manufactured to a 

recognised international quality standard, which meets the 

requirements of BS EN ISO 9001, BS EN ISO 14001 and OHSAS 18001 

for continually improving environmental procedures.
Rangemaster cookers comply with the essential requirements of the 

appropriate European Directives, and carry the CE mark.

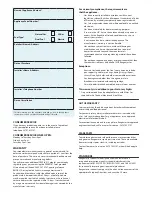
Name of Appliance & Colour*

Appliance Serial Number*

Fuel Type*

Natural Gas

LP Gas

Dual Fuel

Electric

Retailer’s Name & Address

Date of Purchase

Installer’s Name & Address

Installer’s Telephone Number

Date of Installation

*  This information is on the appliance data badge - look in the appliance 

instructions to find out where the data badge is located.

Summary of Contents for Elise 110 Dual Fuel

Page 1: ...Elise SE 110 Dual Fuel Britain s No 1 Range Cooker USER GUIDE INSTALLATION INSTRUCTIONS ...

Page 2: ... sugar and serve immediately with cream or crème fraiche FRUITY BAKED PUDDING Serves 4 6 Ingredients 3kg 6 lb skinned and boned loin of pork 2 x 70g packs prosciutto Grated zest of 2 lemons Bay leaves Salt and freshly ground black pepper For the sauce 1 tablespoons plain flour 4 tablespoons lemon juice Chicken stock water Method 1 Preheat the oven to 220 C for a conventional oven 200 C for a fan o...

Page 3: ...anel and Doors 14 Ovens 14 Cleaning Table 15 6 Troubleshooting 16 7 Installation 18 Dear Installer 18 Safety Requirements and Regulations 18 Provision of Ventilation 18 Location of Cooker 19 Conversion 19 Positioning the Cooker 20 Moving the Cooker 21 Fitting the Stability Bracket or Chain 21 Repositioning the Cooker Following Connection 22 Conversion to Another Gas 22 Levelling 22 Fitting the Han...

Page 4: ...ii ...

Page 5: ...e outside air see Ventilation below People with respiratory or allergy problems should vacate the area for this brief period If You Smell Gas DO NOT turn electric switches on or off DO NOT smoke DO NOT use naked flames DO turn off the gas at the meter or cylinder DO open doors and windows to get rid of the gas DO keep people away from the area affected Call your gas supplier If you are using natur...

Page 6: ... only one third full of fat Filling the pan too full of fat can cause spill over when food is added If you use a combination of oils or fats in frying stir them together before heating or as the fats melt Foods for frying should be as dry as possible Frost on frozen foods or moisture on fresh foods can cause hot fat to bubble up and over the sides of the pan Carefully watch for spills or overheati...

Page 7: ...l knob is pressed in sparks will be made at every burner this is normal Do not attempt to disassemble or clean around any burner while another burner is on otherwise an electric shock could result To light a burner push in and turn the associated control knob to the high position as indicated by the large flame symbol H Fig 2 2 The igniter should spark and light the gas Keep holding the knob press...

Page 8: ...pan supports You should also avoid using unstable and misshapen pans that may tilt easily and pans with a very small base diameter e g milk pans single egg poachers Fig 2 7 The minimum recommended pan diameter is 120mm The maximum allowable pan base diameter is 260mm DO NOT use cooking vessels on the hotplate that overlap the edges Wok Burners The wok burners are designed to provide even heat over...

Page 9: ...ooden utensils n n DO NOT put it crossways it will not fit properly and will be unstable Fig 2 12 n n DO NOT put it on any other burner it is not designed to fit in any of the other pan supports Position the griddle over the hotplate burners resting on the pan support Check that it is securely located The griddle can be lightly brushed with cooking oil before use Fig 2 13 Light the hotplate burner...

Page 10: ...illing for all your grilling needs and defrost to safely thaw small items of frozen food Table 2 1 gives a summary of the multi function modes The multi function ovens have many varied uses We suggest you keep a careful eye on your cooking until you are familiar with each function Remember not all functions will be suitable for all food types Please remember that all cookers vary temperatures in y...

Page 11: ...ooking The recommended cooking temperatures for a fan oven are generally lower than a conventional oven Note Please remember that all cookers vary so temperatures in your new ovens may differ to those in your previous cooker Multi function Oven Functions Defrost This function operates the fan to circulate cold air only Make sure the temperature control is at 0 C and that no heat is applied This en...

Page 12: ...e oven heating light will glow until the oven has reached the temperature you selected It will then cycle on and off during cooking as the oven maintains the selected temperature Operating the Fan Oven Turn the oven knob to the desired temperature Fig 2 18 The oven indicator light will glow until the oven has reached the temperature selected It will then cycle on and off during cooking Fig 2 19 0 ...

Page 13: ...essible when the door is open The maximum weight that can be held by the Handyrack is 5 5kg 12lb It should only be used with the supplied roasting tin which is designed to fit the Handyrack Any other vessel could be unstable It can be fitted at two different heights One of the oven shelves must be removed and the other positioned to suit When the Handyrack is used in its highest position other dis...

Page 14: ...If the oven light fails turn off the power supply before changing the bulb See the Troubleshooting section for details on how to change the bulb Storage The bottom drawer is for storing oven trays and other cooking utensils It can get very warm so do not store anything in it that may melt or catch fire ...

Page 15: ...g the maximum recommended size of a baking tray is 340mm 13 by 340mm 13 When the oven is on do not leave the door open for longer than necessary otherwise the knobs may get very hot Always leave a finger s width between dishes on the same shelf This allows the heat to circulate freely around them To help keep your oven clean cover meat when roasting with foil or use a roasting bag To reduce fat sp...

Page 16: ...40 minutes according to size 2 3 hours 45 60 minutes 40 45 minutes 2 to 3 hours 20 30 minutes 15 20 minutes 15 20 minutes per 500g Steaks according to thickness Conventional Oven Temperature C Shelf Position 160 C 200 C 160 C 200 C 160 C 200 C 160 C 200 C 160 C 200 C 160 C 200 C 140 150 C 220 C 140 C B 150 C B 150 C B 160 C B 190 C B 220 C B 180 C B 180 C B 200 C B 200 C B 200 C B 210 C B 100 C B ...

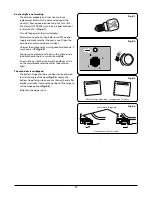
Page 17: ...er heads and caps can be removed for cleaning n n DO NOT put the burner heads in a dishwasher Make sure they are absolutely dry before replacing them The Single Ring Burners When refitting the burner head make sure that the notch lines up with the electrode or hole in the base Check that the burner head is level and that the cap is fitted centrally on the burner head Fig 5 1 The Wok Burner The wok...

Page 18: ... of your cooking below this temperature occasionally remove the panels and wipe with a lint free cloth and hot soapy water The panels should then be dried and replaced and the oven heated at 200 C for about one hour This will make sure the Cook Clean panels are working effectively Do not use steel wool oven cleaning pads or any other materials that will scratch the surface Removing the Oven Lining...

Page 19: ...oth supermarket Sides and plinth Painted surface Hot soapy water soft cloth Splashback rear grille Enamel or stainless steel Hot soapy water soft cloth Cream cleaner with care if necessary Control panel Paint enamel or stainless steel Warm soapy water Do not use abrasive cleaners on lettering Control knobs handles trims Plastic chrome copper or lacquered brass Warm soapy water soft cloth Brass Bra...

Page 20: ...ll charge for their call outs if they are correcting work carried out by your original installer It is in your interest to track down your original installer 6 Troubleshooting Food is cooking too slowly too quickly or burning Cooking times may differ from your previous oven Check that you are using the recommended temperatures and shelf positions see the oven cooking guide The oven control setting...

Page 21: ... your fingers with a glove in case the bulb should shatter unscrew the old bulb Screw in the new bulb screw back the bulb cover Turn on the circuit breaker and check that the bulb now lights The oven door is misaligned The bottom hinge of either oven door can be adjusted to alter the angle of the door Fig 6 3 Loosen the bottom hinge fixing screws and use the notch and a flat bladed screwdriver to ...

Page 22: ...ion and Use regulations The relevant Building IEE regulations In the Republic of Ireland the cooker must be installed in accordance with The installation must be carried out by a competent person and installed in accordance with the current edition of IS813 Domestic Gas Installations the current Building Regulations and reference should be made to the current ETCI rules for electrical installation...

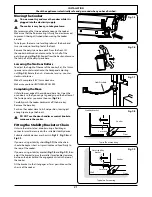
Page 23: ...ce is now set You will need the following equipment to complete the cooker installation satisfactorily Stability bracket If the cooker is to be supplied with gas through a flexible hose a stability bracket or chain MUST be fitted These are not supplied with the cooker but are available at most builders merchants Gas pressure tester manometer Flexible gas hose Must be in accordance with the relevan...

Page 24: ...he flue trim which is fitted to the cooker hob Surfaces of furniture and walls at the sides and rear of the appliance should be heat splash and steam resistant Certain types of vinyl or laminate kitchen furniture are particularly prone to heat damage and discolouration We cannot accept responsibility for damage caused by normal use of the cooker to any material that de laminates or discolours at t...

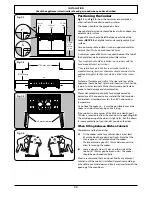
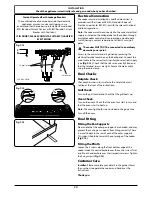
Page 25: ... counter clockwise to lower Make 10 complete 360 turns clockwise Make sure you lower BOTH REAR ROLLERS Completing the Move Unfold the rear edge of the cardboard base tray Open the oven doors so that you can get a good grip on the bottom of the fascia panel as you move the oven Fig 7 6 Carefully push the cooker backwards off the base tray Remove the base tray Position the cooker close to its final ...

Page 26: ...f these instructions Levelling You are recommended to use a spirit level on a shelf in one of the ovens to check for level Place the cooker in its intended position taking care not to twist it within the gap between the kitchen units as damage may occur to the cooker or the units The front feet and rear rollers can be adjusted to level the cooker To adjust the height of the rear of the cooker use ...

Page 27: ... the cooker easier The hose should be fitted so that both inlet and outlet connections are vertical so that the hose hangs downwards in a U shape Ideally the hose supply connection should be within the shaded area A Fig 7 12 For Natural Gas the flexible hose must be in accordance with BS669 For LP Gas it should be capable of 50mbar pressure 70 C temperature rise and carry a red stripe band or labe...

Page 28: ...n the grill control and check that the grill heats up Oven Check Turn on the ovens Check that the oven fans start to turn and that the ovens start to heat up Note The oven light bulb is not included in the guarantee Turn off the ovens Final Fitting Fitting the Pan Supports Please note that the outer pan supports are handed and may prevent the centre pan supports from fitting correctly There is a s...

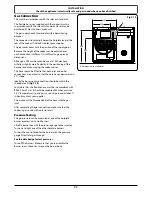
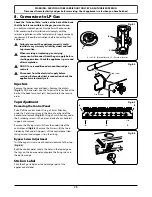
Page 29: ...oned or unauthorised gas controls n n Disconnect from the electrical supply before servicing Before electrical reconnection check the appliance is electrically safe Injectors Remove the burner caps and heads Remove the old jets Fig 8 1 Fit the new jets see the Technical Data section at the back of the book for correct jets Reassemble in the reverse order Tap Adjustment Removing the Control Panel P...

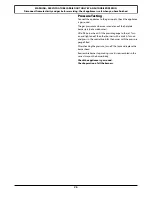
Page 30: ...sured at one of the hotplate burner jets not a wok burner Lift off a burner head Fit the pressure gauge to the jet Turn on and light one of the other burners with a match Turn on and press in the control knob for the burner with the pressure gauge fitted After checking the pressure turn off the taps and replace the burner head Reassemble burner top making sure it is reassembled in the correct way ...

Page 31: ...tat A2 Left hand multi function oven control switch A3 Left hand multi function oven base element A4 Left hand multi function oven top element outer pair A5 Left hand multi function oven browning element inner pair A6 Left hand multi function oven fan element A7 Left hand multi function oven oven fan B1 Right hand fan oven thermostat B2 Right hand fan oven control B3 Right hand fan oven element B4...

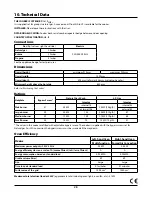
Page 32: ...Wok burner 57 3 5kW internal 78 3 5kW 246g h internal 53 external 126 external 82 Large burner 40 3 0kW 134 3 0kW 210g h 87 Medium burner 32 1 7kW 109 1 7kW 119g h 68 Small burner 28 1 0kW 75 1 0kW 70g h 51 The valves in this cooker are fitted with adjustable bypass screws The cooker is supplied with the bypass screws set for Natural gas For LPG conversion the bypass screws must be screwed all the...

Page 33: ...29 Notes ...

Page 34: ...30 Notes ...

Page 35: ...dations concerning cleaning materials have been followed Has not been repaired by persons or organisations other than those authorised to act on behalf of AGA Rangemaster Exceptions Items not included under the free 1 year guarantee include pan supports griddles wok rings baking trays grill pans trivets filters light bulbs and other consumable accessories Any damage caused other than through norma...

Page 36: ...red Office Juno Drive Leamington Spa Warwickshire CV31 3RG Search Rangemaster UK Rangemaster continuously seeks improvements in specification design and production of products and thus alterations take place periodically Whilst every effort is made to produce up to date literature this booklet should not be regarded as an infallible guide to current specification nor does it constitute an offer fo...

Reviews: