Manual-2
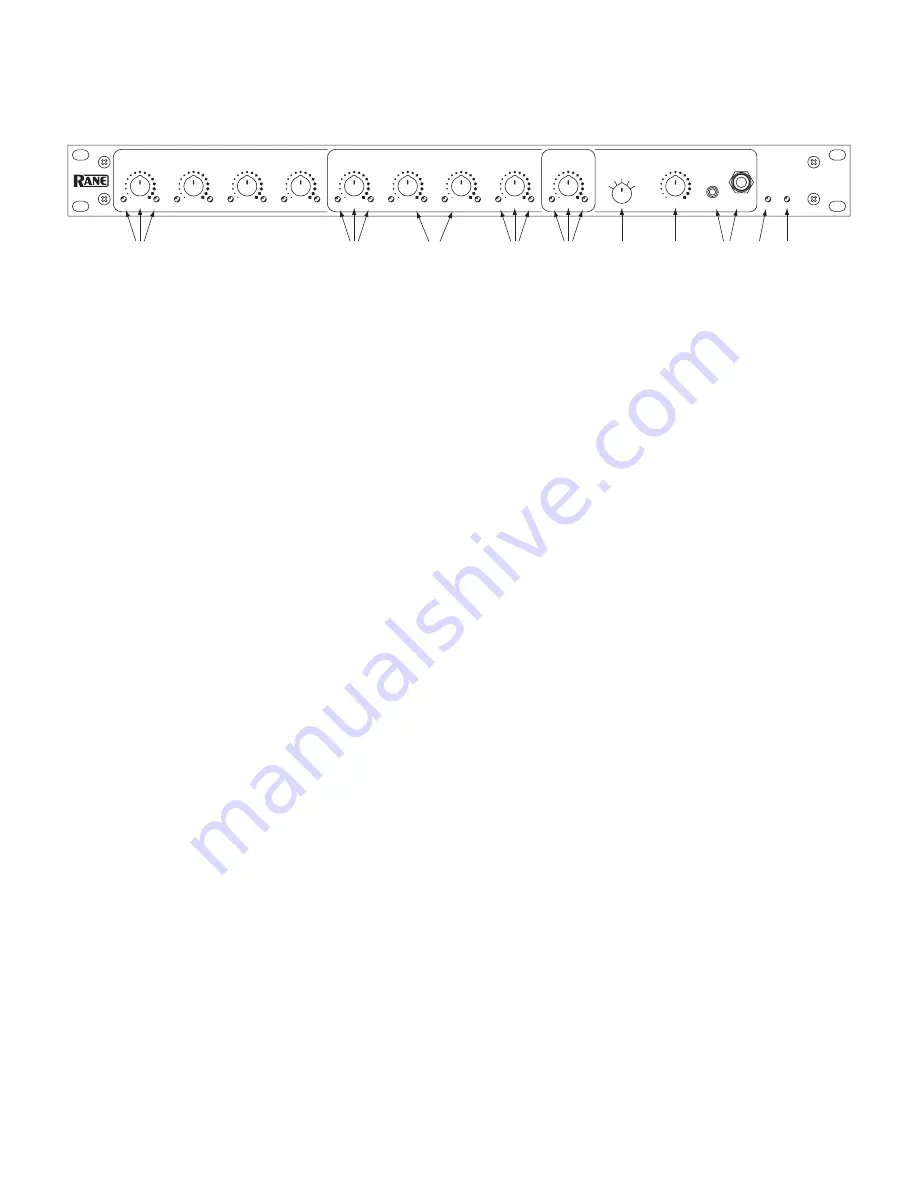
FRONT PANEL DESCRIPTION
1
MIC INPUT LEVEL
controls
adjust the mic input gain. The green Signal indicators inform of audio presence. Overload
indicators warn of excessive signal levels.
2
MIC MIX LEVEL
control
adjusts the volume of all mixed microhones, including all upstream microphones when cascading
additional mics from a Rane AM2 (sold separately). Signal and Overload indicators inform and warn.
3
AUX 1
&
AUX 2 MIX LEVEL
controls
alter the mix volume of the Aux 1 and Aux 2 inputs, respectively. Corresponding Signal
and Overload indicators flank each.
4
USB MIX LEVEL
control
adjusts the mix volume of the USB audio received from a computer connected to the rear panel USB
Audio jack. Signal and Overload colors are reminiscent of holiday lights.
5
Main
OUTPUT LEVEL
control
adjusts the level of the mix exiting the XLR output and the RAD Port output. The Record
Output level is not affected by this control.
6
PHONES SOURCE
cue switch
selects which audio is heard in the headphone outputs: the mix of all Mics, the Aux 1 input, the
Aux 2 input, the USB audio input, or the Main Output. This allows listening in headphones to any single input before turning
each up in the mix using the MIX controls, or listening to the main mix before turning it up in the PA for the world to hear.
7
PHONES LEVEL
control
adjusts the volume of both the 3.5 mm and ¼" headphone jacks.
8
PHONES
include both 3.5 mm and ¼" headphone jacks for either size headphone plug.
9
LOCATE
indicator
helps system installers identify a specific AM1 Automixer when using Rane’s Mongoose Tracker software.
0
POWER
indicator
lights whenever adequate power is applied to the unit.
AM1
AUTOMIXER
POWER
LOCATE
PHONES
MIX
SIG
OL
SIG
OL
LEVEL
SIG
OL
LEVEL
SIG
OL
LEVEL
MIC MIX
SIG
OL
LEVEL
AUX 1
SIG
OL
LEVEL
AUX 2
SIG
OL
LEVEL
USB
SIG
OL
LEVEL
OUTPUT
SIG
OL
LEVEL
AUX 2
AUX 1
USB
MICS
OUTPUT
SOURCE
LEVEL
LEVEL
MIC INPUTS
1
2
3
4
1
2
5
8
4
6 7
90
3