


4
1.
Both upper and lower heater energized
2.
Both upper and lower heater energized
, hot air motor energized
3.
Both upper and lower heater energized, rotation motor energized
4.
Both upper and lower heater energized, rotation and hot air motor energized
5.
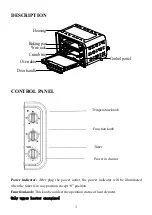
Temperature knob:
Turn the knob clockwise to set the temperature. The max temperature
could be set is 230
℃
, and is suitable for toasting bread, broiling chicken or steak.
Timer:
Turn the timer to set the operation time. Max time can be set is 60 minutes. If the
timer has run to “0” position, the toasting process will be stopped and a bell sound can be
heard.
BEFORE THE FIRST USE
Unpack the appliance and place it on a horizontal surface. Remove out any insert card,
poly bag. Then use a damp cloth to carefully wipe the inner cavity wall and housing. Clean
all the detachable parts in hot, sudsy water before using.
NOTE
:
1. Initial start-up operation may result in minimal smell and smoke (about 15 minutes).
This is normal. It is due to the protective substance on heating elements which protect
them from salt effects during shipping from factory. So it is recommended to operate
oven dry for about 15 minutes at the first, moreover, Make sure to keep good
ventilation of the room.
2. On the wall of inner cavity there are 2 different height of rack guide (slot).
3. You can place the rack at different height to achieve the best toasting performance
depending on the status of heat element and size of food. If only upper heat element is
energized it is suggest place the rack on the first slot to obtain the heat directly
provided that at least 30mm distance has maintained between top of food and top heat
element.