background image

4

06.14

 Josef Kihlberg a.560PN22

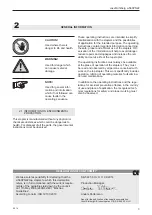
Use for the intended purpose

The top stapler is intended for stapling of card board. 

This stapler was designed and manufactured for safe 

handling during the stapling operation.

Possible misuse

Do not fire any staples into the air or use the stapler 

with any other materials than mentioned above.

Servicing

The following maintenance work must be carried out 

at regular intervals, varying with working conditions 

and workload:

–    daily check of compressed air pressure 

  5.0–6.0 bar (73–87 psi).

–    clean the stapler regularly.

–    check the condition of the stapler at regular inter- 

    vals for defects or worn parts. Never use a stapler

  that has defective or worn parts (for servicing tasks

  refer also to chapter 7.1 until 7.3).


3


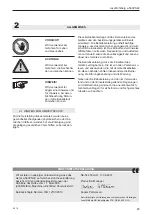
SAFETY INSTRUCTIONS

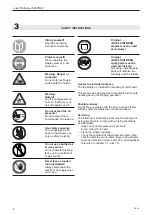
Inform yourself!

Read the operating 

instructions carefully.

Protect yourself!

When operating the 

stapler, wear eye, ear 

protection

.

Warning: Danger of 

crushing!

Do not put your fingers 

underneath the nozzle.

Warning:

Hazard!

Lay the compressed air 

hose so that there is no 

risk of tripping over it.

Do not exceed the air 

pressure! 

Do not exceed the re-

commended air pressure.

Use safety coupling! 

For connecting the air 

hose to the stapler, use 

only a safety coupling. 

Do not use a bottled air 

or gas source! 

Do not operate this stap-

ler by using a bottled air 

or gas source.

Never leave a loaded 

tool unattended!

Always disconnect the 

tool from air supply when 

not in use.

PD[

EDU

0

2

4

6 8 10

12
14
16

.,+/%(5*

2ULJLQDO

KIHLBERG

Original

Original

JOSEF KIHLBERG 

staples must be used 

exclusively!

Original 

JOSEF KIHLBERG 

spare parts must be 

used exclusively! 

Not using original spare 

parts will dissolve the 

warranty and the liability.

Summary of Contents for Josef Kihlberg a.560PN22

Page 1: ...g the tool read the operating in structions carefully Vor dem Gebrauch des Ger tes die Betriebs anleitung aufmerksam lesen OPERATING INSTRUCTIONS Translation of original manual BRUKSANVISNING Original...

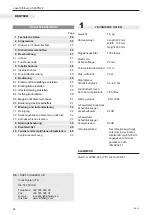
Page 2: ...FASTENERS Staple JK560 22K 7 8 Art No 401331 Page 1 Technical data 2 2 General information 3 2 1 Information on environmental protection 3 3 Safety instructions 4 4 Description 5 4 1 Design 5 4 2 Func...

Page 3: ...of application for the intended purpose The operating instructions contain important information concerning the safe proper and efficient use of the staplers Ob servation of the information will help...

Page 4: ...7 3 3 SAFETY INSTRUCTIONS Inform yourself Read the operating instructions carefully Protect yourself When operating the stapler wear eye ear protection Warning Danger of crushing Do not put your finge...

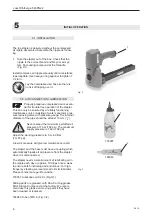
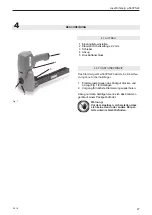
Page 5: ...nst the carton and pull the trigger Fig 1 4 2 Move the stapler and repeat Never fire it without any work piece 4 1 DESIGN 1 Adjustment penetration depth 2 Adjustment not in us at 22 mm staplers 3 Push...

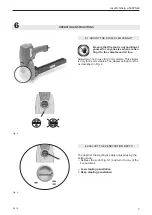
Page 6: ...reducing valve with pressure gauge The internal diameter of the pipe should be at least 10 mm 3 8 Never exceed the maximum permitted air pressure of 7 bar 102 psi The maximum supply pressure is 7 bar...

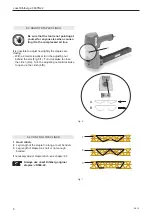
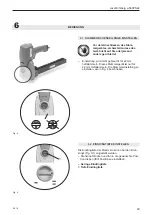
Page 7: ...ompressed air line Adjustment not in use for 22 mm stalers This stapler is only for 22 mm staples The stapler setting must be as described in Fig 4 Fig 4 22mm Fig 5 6 2 ADJUST THE PENETRATION DEPTH Th...

Page 8: ...slot Fig 6 1 Turn clockwise to close the clinch 6 A Turn the adjusting nut anticlockwise to open up the clinch 6 B A B Fig 6 Fig 7 To short Correct To long staple Fel To short Correct To long staple F...

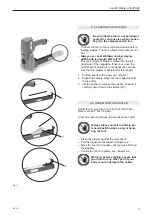
Page 9: ...Pull the pusher all the way out Fig 8 1 2 Place three staple strips into the magazine from the top 8 2 3 Lift the pusher to release the pusher Forward it carefully until it reach the staples 8 3 6 6...

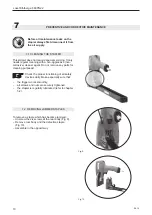
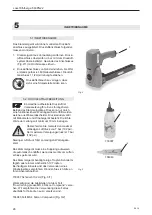
Page 10: ...functioning of all safety devices daily Make especially sure that the trigger works smoothly all screws and nuts are securely tightened the stapler is regularly lubricated refer to chapter 5 2 Before...

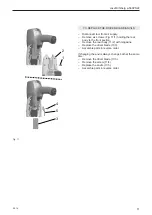
Page 11: ...holding the rear body to the front section Remove the rear body 11 2 with magazine Replace the driver blade 11 3 Assemble parts in reverse order If changing the anvils always change both at the same...

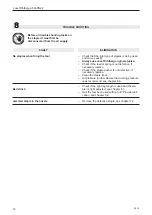
Page 12: ...sary replace Check if the staple pusher is not defective If necessary replace Clean the staple track Air pressure too low Secure that working pressure is as recommend see chapter 6 6 Check if the righ...

Page 13: ...401331 Page 1 Technische Daten 24 2 Allgemeines 25 2 1 Hinweis zum Umweltschutz 25 3 Sicherheitsvorschriften 26 4 Beschreibung 27 4 1 Aufbau 27 4 2 Funktionsprinzip 27 5 Inbetriebnahme 28 5 1 Inbetrie...

Page 14: ...t dem Ger t arbeiten Zu diesen Arbeiten z hlen insbesondere die Bedie nung die St rungsbehebung und die Wartung Neben der Betriebsanleitung und den im Verwender land und an der Einsatzstelle geltenden...

Page 15: ...2 4 6 8 10 12 14 16 Bestimmungsgem sse Verwendung Dieses Klammerger t ist zum Heften von Pappe Kar ton vorgesehen Dieses Klammerger t wurde zum sicheren Umgang w hrend des Heftvorganges entwickelt M...

Page 16: ...n und Abzug Fig 1 4 bet tigen 2 Vorgang f r n chste Klammerung wiederholen Abzug nur dann bet tigen wenn sich das Klammer ger t auf einem Packgut befindet 4 1 AUFBAU 1 Eindringtiefe einstellen 2 Klamm...

Page 17: ...llt werden welche aus Wasserabscheider Druckreduzierventil mit Manometer und lnebelger t besteht Die lichte Weite der Leitung soll minimum 10 mm betragen berschreiten Sie niemals den maximal zul ssig...

Page 18: ...d nicht gebraucht f r 22 mm heftklammern Dieses Klammerger t ist nur f r 22 mm Heftklammern Die Klammereinstellung so einstellen wie in Fig 4 beschrieben 6 2 EINDRINGTIEFE EINSTELLEN Die Eindringtiefe...

Page 19: ...hen im Uhrzeigersinn bewirkt ein st rkeres Schliessen drehen im Gegenuhrzeigersinn bewirkt eine weni ger starke Umklammerung 6 4 HEFTUNG KONTROLLIEREN 1 Gute Heftung 2 Klammerschenkel zu lang oder zu...

Page 20: ...nz nach hinten schieben 2 Drei Klammerstreifen von oben 8 2 in das Maga zin einsetzen 3 Schieber anheben und nach vorne zum Klammer steifen 8 3 f hren 6 6 BEDIENUNG DES DECKELHEFTERS Fig 8 1 2 3 Luftd...

Page 21: ...Besonders zu berpr fen sind dass der Abzug sich reibungslos bewegt dass alle Schrauben und Muttern korrekt angezo gen sind dass das Ger t wie in Kapitel 5 2 beschrieben regelm ssig geschmiert wird F...

Page 22: ...gazin entfernen Entfernen Sie die hintere K rper 11 2 mit dem Magazin Antriebsschiene 11 3 ersetzen Die Montage erfolgt in umgekehrter Reihenfolge Muss die Rillenplatte 11 5 ersetzt werden immer beide...

Page 23: ...et werden Immer Josef Kihlberg Originalklammern ver wenden Kontrollieren ob die Magazinfeder in Ordnung ist N tigenfalls ersetzen Kontrollieren ob der Schieberkolben in Ordnung ist N tigenfalls ersetz...

Page 24: ...x ring Fix ring 1 13 972142 O ring O ring 1 53 972084 O ring O ring 1 54 972077 O ring O ring 1 59 972176 O ring O ring 2 xx 972004 O ring O ring 2 xx 972009 O ring O ring 2 xx 972169 O ring O ring 2...

Page 25: ...ruv 2 30 164297 Driver blade Drivare 1 39 174074 Feed spring Frammatarfj der 1 52 133179 Trigger cpl Avtryckare kpl 1 53 972084 O ring O ring 1 54 972077 O ring O ring 1 59 972176 O ring O ring 2 65 9...

Page 26: ...blade a560 Drivare a560 Antriebsschiene a560 1 31 150420 Bushing Bussing B chse 1 32 163321 Penetration eccentric Excenter Exzenter 1 33 946696 Screw Skruv Zylinderschraube 1 34 166226 Rear nozzle pla...

Page 27: ...ring O ring 1 67 972020 O ring O ring O ring 1 70 134307 Piston complete Kolv komplett Kolben kpl 1 71 134310 Clinch unit complete a560 Bockenhet kpl a560 Klammereinheit kpl a560 1 72 132797 Rail asse...

Page 28: ...52 53 54 55 56 57 67 66 65 64 63 73 X X 62 61 59 60 59 58 39 40 41 42 43 44 41 45 46 47 48 49 50 15 16 37 20 21 22 23 24 25 20 21 22 23 24 25 26 27 28 30 29 31 32 33 34 35 X 37 38 72 71 17 18 1 19 3...

Page 29: ...06 14 51 Josef Kihlberg a 560PN22 Notes...

Reviews: