background image

17

If it is found that there is excessive draught in the chimney then either an adjustable 

flue damper or alternatively a draught stabiliser should be fitted. The adjustable flue 

damper should not close off the flue entirely but should in its closed position leave a 

minimum continuous opening free area of at least 20 % of the total cross sectional 

area of the flue or fluepipe.

Adequate provision e.g. easily accessible soot door or doors must be provided for 

sweeping the chimney and connecting fluepipe.

You should also familiarise yourself with the draught conditions for chimneys with 2 

flues.

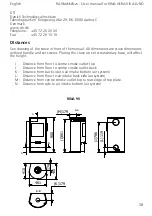
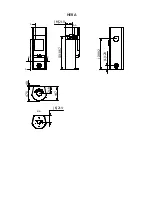
The flue outlet spigot is either 150 mm (6”) in diameter, or 129 mm (5”) in diameter. 

For strong draughts, the chimney or flue should be fitted with a draught stabiliser. In 

which case, it is important to ensure that there is a free flow-through area of minimum 

20 cm² when the regulating gate is shut. Otherwise, the fuel energy may not be used 

optimally. 

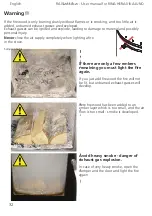
If, at any time, you are unsure about the condition of the chimney, you should contact 

a chimney sweep.

Remember that access to the access door should be kept clear.
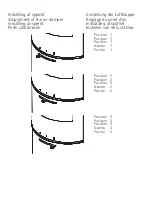
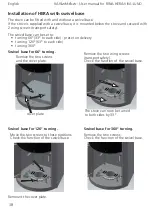
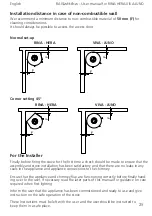
Installation

The stove is a free standing stove and is placed on fireproof material.

This appliance may only be installed by a qualified Rais dealer/installer, otherwise the 

warranty is voided.

When installing the appliance, all local rules and regulations, including those referring 

to national and European standards need to be complied with. Local authorities and a 

chimney specialist should be contacted prior to set up. 

It is prohibited to carry out unauthorised alterations to the stove.

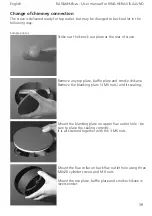
There must be plenty of fresh air in the room where the stove is being installed, in order 

to ensure proper combustion - possibly through an airbox connection. Note that any 

mechanical exhaust ventilation - e.g. an extraction hood - may reduce the air supply. 

Any air grates must be placed in such a manner, that the air supply is not blocked.

The floor structure must be able to carry the weight of the wood burning stove, as 

well as the weight of a chimney, if necessary. If the existing floor construction doesn’t 

meet this requirement, suitable measures (e.g. load distributing plate) shall be taken to 

achieve it. RAIS recommends to consult a building expert.

When you choose where to set up your RAIS wood burning stove, you should consider 

the heat distribution to the other rooms. This will enable you to get the best use out of 

your stove. 

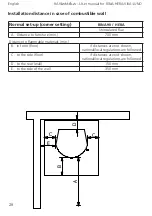
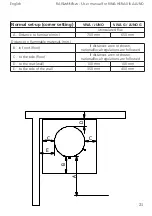
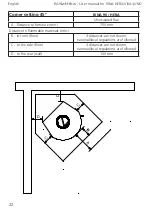
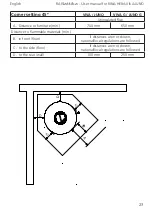
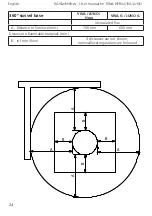
The stove should be set up at a safe distance from inflammable materials. 

See the manufacturer’s plate on the wood burning stove.

Upon receiving the stove must be inspected for defects.

English 

RAIS/

attika

 - User manual for RINA-HERA-VIVA-JUNO

Summary of Contents for Viva Series

Page 1: ...E N U N G S A N L E I T U N G U S E R M A N U A L M A N U E L D U T I L I S AT E U R B R U K E RV E I L E D N I N G B R U K S A N V I S N I N G K Y T T O H J E G E B R U I K E R S H A N D L E I D I N...

Page 2: ...amleledning og intervalfyring DE Hinweis Lesen und befolgen Sie die Bedienungsanleitung Zeitbrandfeuerst tte Nur empfohlene Brennstoffe einsetzen UK Fuel types only recommended Follow the installation...

Page 3: ...VIVA 120 G VIVA 120 G Classic JUNO G JUNO G Classic Viva 98 G Viva 120 G Juno G M rkeplade Merkeplate M rkpl t Tyyppikilpi Viva 98 Viva 120 Juno M rkeplade Merkeplate M rkpl t Tyyppikilpi EN 13240 20...

Page 4: ...mper R glage du volet d air Innstilling av spjeld Indst lling af spj llet Pellin s t minen Instellen van de luchtklep Position 1 Posisjon 1 Position 1 Asento 1 Positie 1 Position 2 Posisjon 2 Position...

Page 5: ...omically 1 Effective lighting Use small pieces of wood fir tree and a suit able fire lighter for example paraffined wood wool sawdust Open the air damper so plenty of air is fed to the stove and the g...

Page 6: ...LATION 27 REGULATING THE COMBUSTION AIR 28 USING THE WOOD BURNING STOVE 28 ADJUSTMENT OF THE AIR DAMPER 28 FIRST USAGE 28 LIGHTING AND FUELLING 29 CONTROL 29 Warning 32 UPPER CONVECTION HERA 33 UPPER...

Page 7: ...e It also shows that you care about design and quality in your home To make the most of your wood burning stove it is important that you read the manual thoroughly before installing and using it In th...

Page 8: ...s steel or patina surfaces expansion noise The warranty is invalidated in case of damages caused by overfiring damages caused by external influence and the use of unsuitable fuels non observance of st...

Page 9: ...3 320 225 393 Recommended amount of wood when fuelling kg Distributed on 2 3 logs of wood of approx 25 cm 1 2 1 2 1 2 1 2 1 2 Min uptake min draught Pascal 12 12 12 12 12 Weight kg min depending on th...

Page 10: ...se will affect the height I Distance from floor to centre smoke outlet top J Distance from floor to centre smoke outlet back K Distance from back side to air intake bottom air system L Distance from f...

Page 11: ...B B A A B B A A 1067 I 219 M 120 L 992 J 219 470 40 447 214 K HERA...

Page 12: ...A A B B A A B B VIVA 98 G B B A A B B A A VIVA 98...

Page 13: ...B B A A B B A A VIVA 120 G B B A A B B A A VIVA 120...

Page 14: ...JUNO B B A A B B A A 400 E 250 D 1654 1095 I 235 M 121 L 1015 J 470 235 235 K 1191 JUNO 166 JUNO 120 A A B B A A B B 1654 235 M 121 L 1015 J 495 235 K 470 1095 1191 JUNO G JUNO 166 G JUNO 120 G...

Page 15: ...ow fumes into the house Older properties especially may have chimney faults or the cross section may be too large i e more than 230 mm x 230 mm Remedial action should be taken if required seeking expe...

Page 16: ...d by the Health and Safety at Work Act 1974 It is the responsibility of the installer to ensure that all requirements of this Act are met during the installation works Attention is drawn in particular...

Page 17: ...ualified Rais dealer installer otherwise the warranty is voided When installing the appliance all local rules and regulations including those referring to national and European standards need to be co...

Page 18: ...ng 66 33 to each side preset on delivery turning 126 63 to each side turning 360 Remove the two wing screws transport safety Check the function of the swivel base Remove the two screws and the cover p...

Page 19: ...ar of stove Remove any top plate baffle plate and smoke chikane Remove the blanking plate 3 M6 nuts and its sealing Mount the blanking plate on upper flue outlet hole be sure to place the sealing corr...

Page 20: ...ing RINA 90 HERA Uninsulated flue A Distance to furniture min 700 mm Distance to flammable materials min B in front floor if distances are not shown national local regulations are followed C to the si...

Page 21: ...lue A Distance to furniture min 700 mm 650 mm Distance to flammable materials min B in front floor if distances are not shown national local regulations are followed C to the side floor if distances a...

Page 22: ...90 HERA Uninsulated flue A Distance to furniture min 700 mm Distance to flammable materials min B in front floor if distances are not shown national local regulations are followed C to the side floor...

Page 23: ...5 VIVA JUNO VIVA G JUNO G Uninsulated flue A Distance to furniture min 700 mm 650 mm Distance to flammable materials min B in front floor if distances are not shown national local regulations are foll...

Page 24: ...NA HERA VIVA JUNO 360 swivel base VIVA JUNO Hera VIVA G JUNO G Uninsulated flue A Distance to furniture min 700 mm 650 mm Distance to flammable materials min B in front floor if distances are not show...

Page 25: ...appliance and chimney flue are functioning correctly before finally hand ing over to the user If necessary read the later parts of this manual for guidance on care required when first lighting Inform...

Page 26: ...mend stoking with painted laminated or impregnated wood wood with a synthetic surface painted refuse wood chipboard plywood domestic waste paper briquettes and pit coal as this will produce malodorous...

Page 27: ...stion zone at the bottom of the burning chamber i e the bed of glowing embers This cold air is only used in the lighting stage Secondary air is the air added to the gas combustion zone meaning air whi...

Page 28: ...which the material is subjected to Never use any type of liquid fuel for kindling or maintaining the fire There is a danger of explosion The stove gets very hot when in use always wear protective glo...

Page 29: ...if required 4 Do not attempt to relight the fire until the cause of the fume emission has been identified and corrected If necessary seek expert advice IMPORTANT Warning Note Do not use an aerosol sp...

Page 30: ...door completely after approx 10 15 min depending on the draft conditions in the chimney Adjust the damper to pos 2 see Adjustment of air damper When the last flames are extinguished and there is a nic...

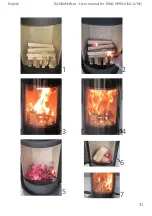
Page 31: ...31 4 1 2 3 5 6 7 English RAIS attika User manual for RINA HERA VIVA JUNO...

Page 32: ...tuel l ge p klem eller t nd op forfra Hvis br ndet kun ulmer eller ryger og der tilf res for lidt luft udvikles der uforbr ndte r ggasser R ggas kan ant ndes og eksplodere Det kan give skader p materi...

Page 33: ...NO 166 JUNO 166 G stoves have a convection grate in the top plate When the stove is getting hot the upper convection can now be opened again turn handle counterclockwise Hereby more warm air will emit...

Page 34: ...e building industry pallet wood should be avoided Only clean when cold Use only stove glass cleaners to re move heavy tar soot deposits All other marks can normally be removed with a damp cloth then d...

Page 35: ...he smoke barrier steel plate Handle the parts with care Remove the baffle plate by tilting it backwards and turning it a little slantwise Pull out the plate carefully Then remove the smoke chicane by...

Page 36: ...tive smoke draught poor condition In case of cold chimney or difficult weather conditions you can compensate by adding more fresh air open the damper to the stove than usual If your stove continues to...

Page 37: ...37 English RAIS attika User manual for RINA HERA VIVA JUNO...

Page 38: ...38 3327006 0110 M5x16 cyl r BN272 3327002 0110 15x7x5 2 3327006 0110 M8x35 pinol ki BN433 English RAIS attika User manual for RINA HERA VIVA JUNO Mounting the soapstones RINA SST...

Page 39: ...0 5 3 pr 100 mm OV UV 190 60 90 English RAIS attika User manual for RINA HERA VIVA JUNO Accessories 2311590 Swivel base Viva 9191590 Swivel base 8142390 Swivel base connection 4317012 Accumulation st...

Page 40: ...1 531061280 5 1 61 00 6 1 1313800 7 1 1314001 8 1 1311790 9 1 1312200 10 1 1315500 1 11 1 1311890 12 1 7301026 13 1 1312090 14 1 5310111 15 1 531060790 16 1 531060890 17 1 5320404sv Steel door Classic...

Page 41: ...For reference see spare parts drawing back of manual xx optional color code 1 1 1312090 2 1 2310601 3 1 2310602 4 1 61 00 5 1 1313800 6 1 1314001 7 1 1311790 8 1 1312200 9 1 1315500 1 10 1 1311890 11...

Page 42: ...1315003 5 1 2310601 6 1 2310602 7 1 61 00 8 1 1313800 9 1 1314001 10 1 1311790 11 1 1312200 1 12 1 1315500 1 1315500 2 13 1 1311890 14 1 7301026 15 1 13160xx 16 1 1312701xx 17 1 1312711xx Glass door d...

Page 43: ...butor For reference see spare parts drawing back of manual 1 1 1314090 2 1 61 00 3 1 1313800 4 1 1314001 5 1 4311790 6 1 1312200 1 7 1 1315500 1 8 1 1311890 9 1 7301026 10 1 433700001 433700002 1 4317...

Page 44: ...1 1315002 3 1 1315004 4 2 1315003 5 1 61 00 6 1 1313800 7 1 1314001 8 1 4311790 9 1 1312200 1 10 1 1315500 1 1315500 2 11 1 1311890 12 1 7301026 13 1 434700001 434700002 1 432700001 432700002 Glass do...

Page 45: ...45 English RAIS attika User manual for RINA HERA VIVA JUNO...

Page 46: ...4 3 5 2 10 8 7 6 12 11 9 1 13 RINA 90...

Page 47: ...4 3 5 2 10 8 7 6 12 11 9 1 13 14 15 16 17 Hera...

Page 48: ...2 4 1 5 6 9 7 11 10 23185 VIVA 9 3 12 8 2 4 11 1 10 9 7 6 5 12 3 8 VIVA 120 VIVA 98...

Page 49: ...5 7 4 4 10 12 8 9 14 13 11 3 6 2 15 1 17 16 5 7 14 1 10 12 8 9 4 3 13 6 11 2 4 15 17 16 VIVA 120 G VIVA 98 G...

Page 50: ...1 2 10 8 1 9 5 3 4 6 7 JUNO 120 JUNO 166...

Page 51: ...1 2 3 4 4 5 6 7 8 9 10 11 12 13 JUNO 120 G JUNO 166 G...

Page 52: ...RAIS A S Industrivej 20 DK 9900 Frederikshavn Denmark www rais dk ATTIKA FEUER AG Brunnmatt 16 CH 6330 Cham Switzerland www attika ch...

Reviews: