background image


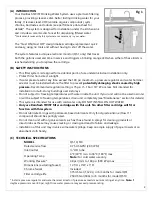
(D) INSTALLATION


Installation shall comply with applicable state and local regulations 

 
TOOLS REQUIRED: 

 Drill, ½” drill bit, Philips & flat-head screwdrivers, adjustable wrench, marker or pencil, a 

sharp knife and measuring tape. 


Unpacking the unit


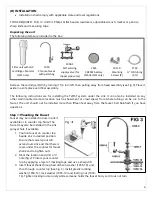
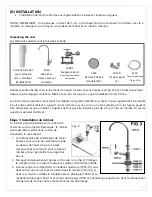
The following items are included in the box: 


Remove the cartridge (QLV) by turning it 1/4 turn left, then pulling away from head assembly (see Fig 9). Place it 
aside in a safe place until final assembly.


The  following  instructions  are  for  installing  the  TWIST  system  under  the  sink.  It  can  also  be  installed  on  any 
other wall mounted remote location (such as basement or crawl space) from where tubing can be run to the 
faucet. The unit should not be installed more than fifteen feet away from the faucet. Call Rainfresh if you have 
questions. 


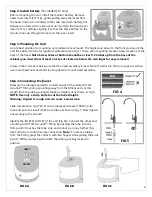
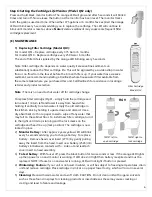
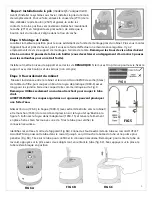
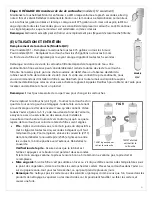
Step 1: Mounting the Faucet 

Faucet may be installed in hole in sink if 
available or in counter top. Note: The 
faucet may also be installed in the sink 
sprayer hole if available. 

1.


Position faucet on counter top 
beside sink in desired position. 
Ensure that swivel spout will 
extend over sink and that there is 
room under the counter for faucet 
shank and to tighten nuts. 

2.


Mark the location and drill a ½” 
hole (fig 2). Protect your counter 
top by applying a layer of masking tape and use a sharp drill.  

3.


Insert faucet shank through escutcheon washer (1050-10), and 
then through counter top (See Fig. 3). Install plastic locating 
washer (1050-12), lock washer (1050-13) and locking nut (1050-
14). Tighten locking nut securely while someone holds the faucet body so it does not turn.  

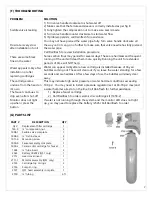
2730 

¼” OD tubing  

(6 ft) 

1011-0 

Mounting 

Screws (2) 

2545 

CR2032 battery 

(Model QS1 only) 

1008-1 

Self-piercing 

supply valve (for 

copper pipes only) 

1050 

Chrome faucet 

with parts bag 

Filter unit with QLV 

car Monitor  

(QS1 only) 

Summary of Contents for Twist QS1

Page 1: ...ndard B483 1 to NSF ANSI Standard 53 for reduction of lead VOC and Cyst e g Cryptosporidium Giardia to NSF ANSI Standard 42 for reduction of chlorine taste odour and to NSF ANSI 372 for low lead requi...

Page 2: ...multi storey buildings over 4 storeys o Do not subject to freezing temperatures with water inside the unit If your unit will not be used in winter or will be subject to freezing temperatures drain un...

Page 3: ...p 1 Mounting the Faucet Faucet may be installed in hole in sink if available or in counter top Note The faucet may also be installed in the sink sprayer hole if available 1 Position faucet on counter...

Page 4: ...embly is level Note If wall is too thin to accept screw then use round head nuts and bolts not supplied to mount head assembly Step 4 Connecting the faucet Measure the tubing required to connect fauce...

Page 5: ...Measure and cut remaining length of plastic tubing to connect saddle valve to INLET AcculinkTM fitting To connect tube to the saddle valve slide compression nut 726 0 and compression sleeve 1008 3 ont...

Page 6: ...turn left and lower it away from head while holding it vertically to retain water Empty the old cartridge in the kitchen sink by holding it upside down and discard Use a dry absorbent cloth or a paper...

Page 7: ...g out These will clear out if you leave the water standing for a few seconds and are harmless After a few days of use the bubbles will slowly clear away The cartridge came undone from the head on it s...

Page 8: ...nt This warranty does NOT cover and is intended to exclude any liability on the part of Envirogard for any incidental damages consequential damages labour charges or any other costs incurred in connec...

Page 9: ...SA B483 1 selon la norme 53 NSF ANSI pour la r duction le plomb le COV les kystes par ex cryptosporidium et giardia selon la norme 42 NSF ANSI effets esth tiques pour la r duction du chlore le go t et...

Page 10: ...u l int rieur du syst me Si vous n utilisez pas votre syst me en hiver ou s il est expos des temp ratures inf rieures 0 C videz le voir la section Entretien pour plus de d tails Ce syst me est destin...

Page 11: ...du robinet Le robinet peut tre install sur le rebord de l vier ou sur le comptoir Remarque le robinet peut aussi tre install dans un trou de douchette le cas ch ant 1 Le robinet doit tre install pr s...

Page 12: ...des crous non compris tape 3 Raccordement du robinet Mesurez la distance entre le robinet et le raccord AcculinkMC de sortie blanc de la t te du filtre puis coupez un bout de tuyau de plastique 1009...

Page 13: ...nstant Mesurez la distance entre la soupape trier et le raccord Acculink d entr e gris et coupez le tuyau la longueur appropri e Glissez l crou 726 0 la bague 1008 3 et le manchon 1603 du raccord comp...

Page 14: ...ant et choisir un produit Remarque Il n est pas n cessaire de couper l eau pour changer les cartouches Pour remplacer la cartouche voir fig 9 Tournez la cartouche d un quart de tour vers la gauche et...

Page 15: ...condes Ce ph nom ne dure pendant quelques jours apr s le remplacement de la cartouche D branchement soudain de la cartouche Caus par une pression d eau excessive ou des coups de b lier dans les tuyaux...

Page 16: ...te garantie Envirogard ne peut tre tenue responsable d aucun dommage indirect y compris les frais de main d oeuvre et tout autre frais d coulant de l achat de l installation de l entretien ou de la r...

Reviews: