


GR5640 User Manual
3
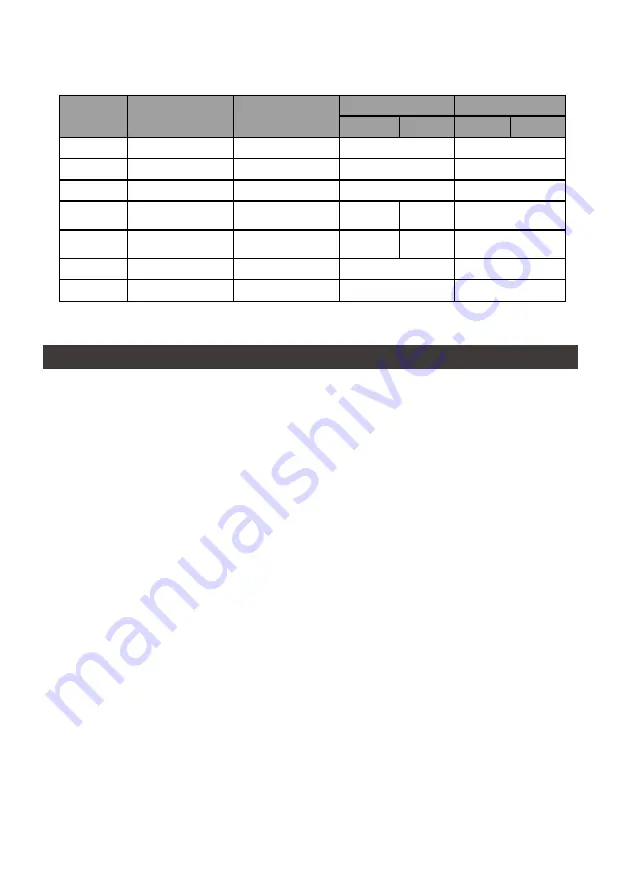
LED Indicators :
3. Hardware Requirements and Precautions
1. When connected to the computer system, it’s prohibited to remove, insert or swap the hard drive
while data transfer is being performed.
2. It’s prohibited to change the positioning of the drives once the initial installation has been
completed as the changes made to the drive positions may destroy the RAID formation.
3. The product needs to be restarted after adding or changing the RAID mode, and the update is
guaranteed to be the new RAID mode.
4. When the Notebook which support USB PD function is only connected to GR5640-SB31+/
GR5640-SBA31+, GR5640-SB31+/GR5640-SBA31+ can provide up to 24W (12V/2A) power
supply, but if then connected to other power supply such like the original Notebook power supply,
Notebook will automatically judge which one will be the main power source, usually the one
which can provide more Wattage will be. At this time, GR5640-SB31+/GR5640-SBA31+ may
be interrupted and re-identified by the Notebook. Therefore, before connecting to other power
supplies, please make sure that there are no data accessed between Notebook and GR5640-
SB31+/GR5640-SBA31+t.
5. GR5640-SB31+/GR5640-SBA31+ can only provide 24W at most, which is different from the
original Notebook power supply. It mainly to extend the Notebook's usage time. Take Macbook
Pro 13" as an example, the original power supply is 60W, assuming it take 2 hours for it to
fully charge the battery , use GR5640-SB31+/GR5640-SBA31+ might need three times time.
Therefore, if user need to use Notebook for a long time, it is recommended to connect the original
power supply first before connect GR5640-SB31+/GR5640-SBA31+.
6.
Whenever turning off or unplugging the GR5640-SBA31 from your computer system becomes
necessary, always remember to safely remove it from your operating system first.
7. It is highly recommended for users to back up important data contained within the GR5640-
SBA31 unit on a regular basis or whenever the user feels necessary to a remote or a separate
storage device. RAIDON will not be responsible for any lost of data caused during the use of the
unit or the recovery of the data lost.
Status
Power status light
System status light
HDD LED
Buzzer
RAID
JBOD
RAID
JBOD
No HDD
Blue light always on
— —
— —
— —
Access
Blue light always on
— —
Blue light flashing
— —
Disk Idle
Blue light always on
— —
Blue light always on
— —
Rebuilding -
Source
Blue light always on
— —
Blue light
flashing
— —
— —
Rebuilding -
Target
Blue light always on
— —
Purple light
flashing
— —
— —
Fan Failed
Blue light always on
Red light always on
Blue light always on
YES
Over Temp
Blue light always on
Red light always on
Blue light always on
YES
Summary of Contents for SAFETank Series
Page 1: ...GR5640 SafeTANK User Manual...
Page 43: ...GR5640 User Manual 41 10 macOS 1 Wi Fi macOS 10 14 Mojave 2 Mac Command R Apple 3 macOS Mac...
Page 44: ...GR5640 User Manual 42 4 macOS macOS 5 6 Mac Mac...
Page 46: ...GR5640 User Manual 44 5 USB 6 7...
Page 47: ...GR5640 User Manual 45 8 Windows 10 9 USB BIOS UEFI USB 10 Windows 10...


