


GR5640-SB31+ User Manual
20
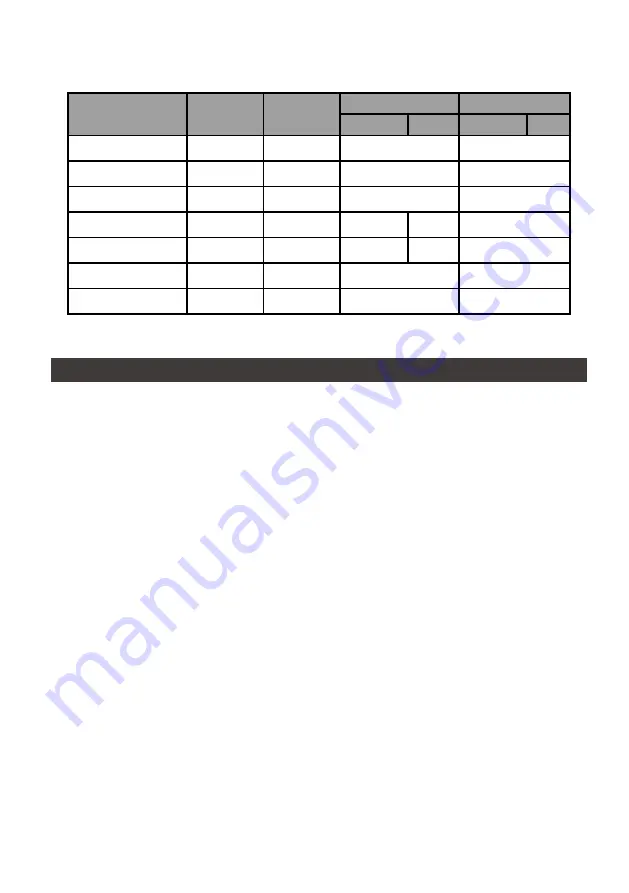
燈號一覽表
:
狀態
電源指示燈
系統警示燈
硬碟狀態顯示燈
蜂鳴器
RAID
JBOD
RAID
JBOD
無硬碟
藍燈恆亮
— —
— —
— —
資料存取
藍燈恆亮
— —
藍燈閃爍
— —
硬碟閒置
藍燈恆亮
— —
藍燈恆亮
— —
資料重建 - 來源碟
藍燈恆亮
— —
藍燈閃爍
— —
— —
資料重建 - 資料碟
藍燈恆亮
— —
紫燈閃爍
— —
— —
風扇故障
藍燈恆亮
紅燈恆亮
藍燈恆亮
YES
過熱 ≧ 50 ℃
藍燈恆亮
紅燈恆亮
藍燈恆亮
YES
3.
硬體需求與注意事項
1.
本系統同一時間只可透過一組介面與一台電腦執行資料傳輸。
2. RAID 5
的容量形成是將硬碟中最小容量乘上三倍後,
RAID 0
乘上四倍,之後會被視為一個大儲存
容量;因此,用本系統前必須每顆硬碟裝置槽都已完成硬碟安裝,並建議全部使用相同品牌與同規
格之全新硬碟。同時,如果需要更換新的硬碟時,也請您務必購買規格、容量、廠牌相同的硬碟,
若您無法購買到符合上述條件的硬碟時,請選購容量大於另一硬碟最少
20GB
。
3.
硬碟格式化後,由電腦主機作業系統所辨識
GR5640-SB31+
的實際容量會與硬碟廠所標示的容量
加總後,有所差異。
4.
當系統運作時,請勿任意移除任何一顆硬碟,以免導致資料遺失。
5.
完成系統初始化安裝後,在使用上請勿任意變更硬碟位置;此動作將可能導致系統無法形成
RAID
。
6.
在新增或變更
RAID
模式後需重新啟動產品,以確保完成更新為新的
RAID
模式。
7.
當您發現硬碟故障時,請參考章節
8"
硬碟故障排除與硬碟更換步驟說明
"
,並依照程序進行故障硬
碟的更換。
8.
當您需要關閉或移除
GR5640-SB31+
時,務必透過您所操作的作業系統中執行硬碟安全移除後,
方可進行電源關閉動作。
9.
在
RAID 5
模式下儲存系統僅容許單顆硬碟故障。因此,當您發現二顆以上的硬碟顯示故障時,您
先前以儲存的資料可能已損毀或遺失;在
RAID 0
模式下,當您發現一顆以上的硬碟顯示故障時,
您先前以儲存的資料可能已損毀或遺失。建議您可尋找專業硬碟資料救援服務,試著將您損毀或遺
失的資料重新取回。
10.
強烈建議除了使用
GR5640-SB31+
的資料儲存功能外,請針對重要資料備份到另一個儲存裝置或
遠端備份,雙重備份您重要的資料。若您儲存在
GR5640-SB31+
的資料損毀或遺失,
RAIDON
將
不負任何的責任。


