11
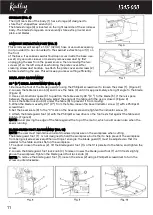
STORAGE (FIG. 6)
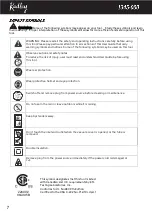
The right rear side of the body (1) has a storage (2) designed to
store the T-shaped hex wrench (3).
The blade storage (4) is located on the right rear side of the scroll saw
body. The blade storage can conveniently store extra pin-end and
plain-end blades.
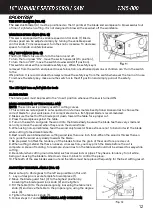
SAWDUST EXTRACTION PORT (FIG. 7)
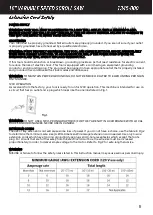
This scroll saw will accept a 1-1/4” (32mm) hose or vacuum accessory
(not provided) to be connected to the sawdust extraction port (1) on
the front
of the base. If excessive sawdust buildup occurs inside the base, use
a wet/ dry vacuum cleaner or manually remove sawdust by first
unplugging the saw from the power source, then removing the two
screws (2) on the left side of saw holding the plate cover. After
cleaning all sawdust buildup, re-attach the plate cover and screws (2)
before restarting the saw. This will keep your saw cutting efficiently.
BEVEL STOP ADJUSTMENT
90 ° (0 °) BEVEL ADJUSTMENT (FIG. 8, 9)
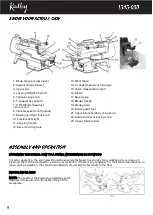
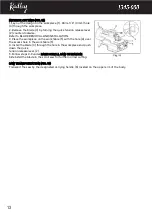
1. Remove the foot of the blade guard (2) using the Phillips® screwdriver to loosen the screw (1). (Figure 8)
2. Loosen the table lock knob (3) and move the table (4) until it is approximately at a right angle to the blade.
(Figure 9)
3. Use a combination square (6) to position the table exactly 90 ° (0 °) to the blade (5). If there is space
between the square and the blade, adjust the angle of the table until the gap is closed. (Figure 9)
4. Lock the table lock knob (3) under the table (4) to prevent it from moving.
5. When the blade is exactly 90 ° (0 °) from the table, loosen the bevel indicator screw (7) with a Phillips®
screwdriver.
6. Set the bevel scale (8) to the “0” mark on the bevel scale and retighten the indicator screw (7).
7. Attach the blade guard foot (2) with the Phillips® screwdriver so the foot rests flat against the table and
tighten. (Figure 8)
NOTE: Avoid placing the edge of the table against the top of the motor, which could cause noise when the
saw is running.
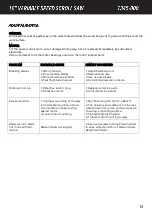
BLADE GUARD FOOT ADJUSTMENT (FIG. 10)
NOTE: The user must maintain a constant downward pressure on the workpiece when cutting.
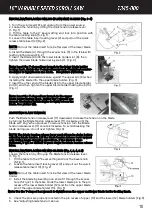
The blade guard foot (1) is not designed to hold the workpiece, but rather to help prevent the workpiece
from being raised excessively.When cutting at an angle, the blade guard (1) must be adjusted so that it is
parallel to the table and lies flat on the workpiece.
1. To adjust, loosen the screw (2), tilt the blade guard foot (1) so that it is parallel to the table, and tighten the
screw.
2. Loosen the blade guard foot lock knob (3) to raise or lower the blade guard foot (1) until it rests slightly
above the workpiece.Tighten the blade guard foot lock knob (3).
NOTE: To remove the blade guard foot (1), loosen the screw (2) using a Phillips® screwdriver to turn the
screw counterclockwise.
M
O
U
N
T


