34
Trunking Operations
8
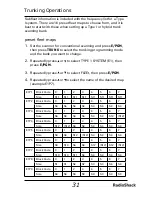
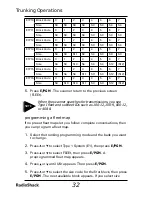
. Enter the frequency using the number keys according to the
following guide, then press
E/PGM
.
•
For Motorola Type II VHF (E2-VHF Hi band) use 5kHz steps
between 5 kHz – 100 kHz.
•
For Motorola Type II UHF (E2-UHF band) use 12.5kHz steps
between 12.5 kHz – 100 kHz.
9
. Press . The display changes to the offset channel entering
mode.
1
0. Enter an offset channel using the number keys, then press
E/PGM
. You can only input the frequency between 380 – 759.
1
1. Press
. /CLR /DELAY
. The scanner returns to the previous
screen. Repeat steps 5-10 if you want to program another
con
fi
guration.
Motorola disconnect tone detect function
When this function is disabled, the radio looks for squelch
before returning to the control channel instead of waiting for the
disconnect tone. Only in rare instances will you need to adjust
the default settings. The condition to return to control channels
depends on whether the signal is present or not.
1
. Select the trunking programming mode and the bank you want
to change.
2
. Press or to select Motorola Type 2 or Motorola Type 1, then
press
E/PGM
.
3
. Press or to select Eot, then press
E/PGM
.
4
. Press or to select Eot ON or Eot OFF, then press
E/PGM
.
If you set the squelch so you hear a hissing sound, the
scanner will remain on the voice channel, even when a
disconnect tone is transmitted or there is no signal at all.
NOTE

