background image

    STOP when you reach the desired section.  Press PLAY to resume 
    normal play. 
 
    To temporarily stop play, press PAUSE.  To resume play, press PAUSE 
    again. 
 
    Press STOP/EJECT to stop the tape.  Press STOP/EJECT again to open 
    the cassette compartment. 
 
Note:  When the tape reaches the end, the Chronosette-276 automatically 
       stops and releases the tape-handling parts. 
 
USING THE SLEEP FEATURE TO PLAY A CASSETTE TAPE 
 
1.  Set the function selector to TAPE. 
 
2.  Load a cassette tape.  (See "Loading a Cassette Tape." 
 
3.  Set the sleep time as described in "Using the Sleep Feature." 
 
4.  Press PLAY.  The tape plays for the set time period and 
    automatically turns off. 
 
To manually stop the tape, press STOP/EJECT.  When the tape reaches 
the end, the Chronosette-276 automatically stops and releases the 
tape-handling parts. 
 
RECORDING WITH THE BUILT-IN MICROPHONE 
 
You can make live recordings with the built-in microphone.  Follow these 
steps to make a live recording. 
 
Note:  Before you record, be sure the erase-protection tabs are in place 
       on the cassette tape.  To prevent erasing the cassette tape 
       accidentally, remove the erase-protection tabs. 
 
1.  Set the function selector to TAPE. 
 
2.  Load a blank cassette tape in the cassette compartment. 
 
3.  Press RADIO ON. 
 
4.  Press RECORD to start recording.  RECORD and PLAY lock down. 
 
    Press STOP/EJECT to stop recording.  RECORD and PLAY release. 
 

Summary of Contents for Chronosette-276

Page 1: ...nutes before it automatically shuts off Snooze Timer temporarily silences the buzzer radio or tape alarm so it sounds again in about 7 minutes Back Up Battery keeps the clock and alarm running for up...

Page 2: ...AC power cord If the BATTERY SENTINEL indicator lights change the battery If the display flashes after an AC power failure the battery is too low to accurately run the clock Replace the battery and re...

Page 3: ...ette 276 for improved FM reception Your local Radio Shack store has a complete line of external antennas to choose from To connect an external FM antenna to the Chronosette 276 slightly loosen the 2 s...

Page 4: ...ndicator lights when you receive an FM stereo station To improve reception for weak FM radio stations set AM FM FM STEREO to FM The sound changes from stereo to monaural mono but the sound quality imp...

Page 5: ...STOP EJECT to open the cassette compartment door 3 Load the cassette with its open edge up and the full reel to the right The side facing you is the side that plays 4 Close the cassette compartment do...

Page 6: ...tape plays for the set time period and automatically turns off To manually stop the tape press STOP EJECT When the tape reaches the end the Chronosette 276 automatically stops and releases the tape h...

Page 7: ...M band First record a short segment and play it back to listen for the beating sound If you hear the beat set BEAT CUT to its other position and resume recording 6 Press STOP EJECT to stop recording R...

Page 8: ...times Follow these steps to set ALARM 1 1 Press and hold down ALARM SET The display shows the current alarm time setting and the AM PM indicator 2 While holding down ALARM SET 1 press the appropriate...

Page 9: ...manually silence the alarm before the 59 minutes pass as follows Buzzer Alarm set OFF RADIO ALARM to OFF and then back to ALARM Radio Alarm press RADIO OFF Tape Player press RADIO OFF The alarm will...

Page 10: ...tabs does not prevent a bulk eraser from erasing the tape Erasing a Cassette Tape If you no longer want a recording you can record over it or erase it To record over a cassette tape record as usual T...

Page 11: ...After you put on the earphones adjust the volume to a comfortable listening level Do not increase the volume once you have established a comfortable listening level Over time your ears adapt to the vo...

Page 12: ...tly and carefully Dropping it can damage circuit boards and cases and can cause the Chronosette 276 to work improperly Keep the Chronosette 276 away from excessive dust and dirt which can cause premat...

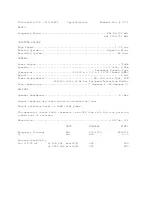
Page 13: ...Requirements AC 120 volts 60Hz 10W 220 240 volts 50 Hz for European Australian Models Room temperature 77 degrees F 25 degrees C AM BAND Speaker impedance 8 ohms Output readings are taken across a non...

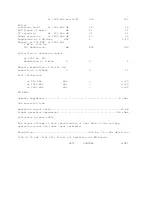
Page 14: ...Modulation at 5 mV m 2 5 Whistle modulation of 2nd or 3rd harmonic at 1 100mVm 3 15 Dial Calibration at 540 kHz kHz 20 at 1000 kHz kHz 50 at 1600 kHz kHz 80 FM BAND Speaker impedance 8 ohms Use resist...

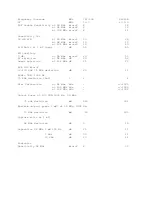
Page 15: ...on at 98 MHz dB 60 50 Image rejection at 106 MHz dB 26 20 ACA 100 microV 400 kHz 75 KHz deviation dB 20 15 Audio THD 1000 Hz 75 kHz deviation 1mV 2 4 Dial Calibration at 88 MHz kHz 1000 at 100 MHz kHz...

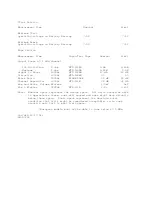
Page 16: ...Distortion 1000Hz MTT 118BN 3 5 Erase Ratio 1000Hz BLANK TAPE 50 dB 45 dB Channel Separation 1000Hz MTT 141N 36 dB 32 dB Hum and Noise Volume Minimum 2 5mV 5mV Wow Flutter 3000Hz MTT 111N 0 2 0 40 No...

Reviews: