background image

Installation

10

3. Plug one end of the supplied modular 

cord (short for a wall plate, long for 
direct wall mounting) into the 

TEL LINE

jack on the base’s back.

4. Insert the supplied AC adapter's barrel 

plug into the 

DC IN 9V

 jack.

5. Route the 

adapter and 
modular cords 
through the 
base’s grooves.

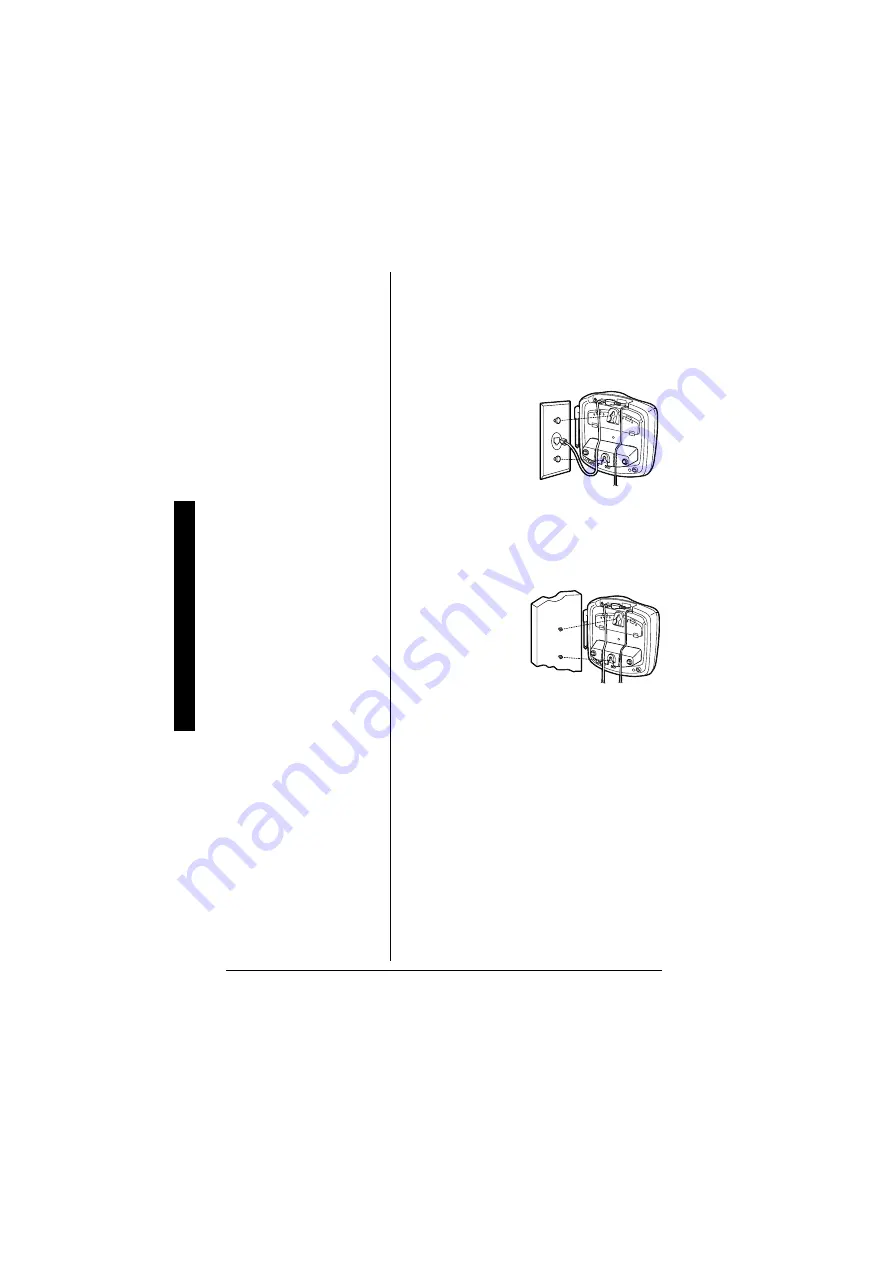
6. For a wall plate, 

plug the modular 
cord’s other end into the wall plate jack, 
then align the base’s keyhole slots with 
the wall plate studs and slide the base 
downward to secure it.

For direct wall 
mounting, align 
the base’s 
keyhole slots 
with the 
mounting 
screws and 
slide the base downward to secure it.

7. Plug the adapter into a standard AC 

outlet.

8. Lift the base’s antenna to a vertical 

position.

C

ONNECTING

/C

HARGING THE

B

ATTERY

 P

ACK

The phone comes with a rechargeable 
nickel-metal hydride (Ni-MH) battery pack in 
the handset, but not connected. Before 
using your phone, you must connect the 
battery pack, then charge it for about 15–20 
hours.

Summary of Contents for 43-3871

Page 1: ...conversations See Voice memo on page 61 Phone Pick Up Detection stops recording when you pick up any phone on the same line as the answering system and resets to answer the next call Call Screening le...

Page 2: ...ook 33 Storing Phone Numbers Names Distinctive Rings and Speed Dial 33 Steps for Entering Names and Special Characters 34 Viewing the Phonebook 36 Making Calls Using the Phonebook 37 Speed Dialing 37...

Page 3: ...ve calls if there is an AC power failure The digital answering system stores up to 12 minutes of messages on a computer chip and records each message s day and time This gives you advanced capabilitie...

Page 4: ...ATEMENT Your telephone compiles with Part 68 of the FCC Rules Upon request you must provide the phone s FCC registration number and REN to your phone company These numbers are on the base unit Your ph...

Page 5: ...any notifies you of these changes in advance so you can take the necessary steps to prevent interruption of your telephone service This device complies with part 15 of the FCC rules Operation is subje...

Page 6: ...sh bowl kitchen sink or laundry tub in a wet basement or near a swimming pool 2 Avoid using a telephone other than a cordless type during an electrical storm There may be a remote risk of electric sho...

Page 7: ...he incoming caller information even when you are already talking on the phone READ THIS BEFORE INSTALLATION We have designed your phone to conform to federal regulations and you can connect it to most...

Page 8: ...dset s range If you have a choice of several locations try each to see which provides the best performance Your telephone connects directly to a modular telephone line jack If your telephone wiring do...

Page 9: ...plied with heads that fit into the keyhole slots on the base Drill two holes 315 16 inches apart Thread a screw into each hole letting the heads extend about 1 8 inch 1 Detach the bracket from the bot...

Page 10: ...ack then align the base s keyhole slots with the wall plate studs and slide the base downward to secure it For direct wall mounting align the base s keyhole slots with the mounting screws and slide th...

Page 11: ...harging the Battery Pack If the battery pack becomes weak during a call Low Battery flashes When this happens you cannot make a call until you recharge the battery pack If the display is blank and the...

Page 12: ...n overnight charge replace it with a new 3 6 volt 800 mAh battery pack with a connector that fits the socket in the battery compartment You can order a replacement battery pack through RadioShack Inst...

Page 13: ...kie Use them at sporting events or while shopping to stay in contact with family members or friends You must set the two handsets to DirectLink Mode to utilize this feature Room Monitor This feature a...

Page 14: ...programmed distinctive ring memory locations AutoTalk Default is off Allows you to answer the phone without pressing TALK FLASH or SPEAKER When the AutoTalk is set to On simply remove the handset fro...

Page 15: ...Saver the answering system picks up after two rings if you have new messages and after four rings if there are none see page 21 Record Time Set the duration for recording the incoming messages You hav...

Page 16: ...umber in the Area Code option your local area code does not appear in the Caller ID message For calls received from outside your local area code you will see a full 10 digit number see page 23 Note If...

Page 17: ...to select an item Press SELECT to confirm your selection For detailed instructions see the following sections for the desired submenu 5 To exit the menu press END or place the handset to the cradle Di...

Page 18: ...ss SELECT RoomMonitor appears and you hear sounds in the room where the handset is installed Handset speaker is on the rear side Place the handset so the speaker is not covered 4 To finish the Room Mo...

Page 19: ...pointer You will hear the ringer or melody as you scroll through the options 3 Press SELECT You will hear a confirmation tone Distinctive Ringer Setup 1 Enter the Handset Setup menu and then the Dist...

Page 20: ...on page 17 2 Use the number keypad 0 9 tone or MENU DEL to enter or edit the name 3 Press SELECT You will hear a confirmation tone Selecting a Language 1 Enter the Handset Setup menu and then the Lang...

Page 21: ...ECT You will hear a confirmation tone Setting the Ring Time 1 Enter the Answ Setup menu and then the Ring Time submenu see Entering the Menu on page 17 2 Press VOL RING or VOL RING to select a Ring Ti...

Page 22: ...guage of your Answering System 1 Enter the Answ Setup menu and then the Language submenu see Entering the Menu on page 17 2 Press VOL RING or VOL RING to choose English Fran ais French or Espa ol Span...

Page 23: ...a confirmation tone Setting CIDCW Caller ID on Call Waiting 1 Enter the Global Setup menu and then the CIDCW submenu see Entering the Menu on page 17 2 Press VOL RING or VOL RING to select CW On CWDX...

Page 24: ...ress SELECT If you choose All Memory go to step 4 3 Press VOL RING or VOL RING or the number keypad 0 9 to select the phonebook location you want to export and then press SELECT 4 Press VOL RING or VO...

Page 25: ...VOL RING to select Yes and then press SELECT You will hear a confirmation tone When de registration is complete Deregistration Complete appears 4 After de registering the handset move to Replacing the...

Page 26: ...e handset and press TALK FLASH Handset Off the Cradle Press any number key tone or Any Key Answer or press TALK FLASH Handset Off the Cradle Press SPEAKER To make a call Handset Off the Cradle 1 Press...

Page 27: ...ang up Press END or return the handset to the cradle Auto Standby Toentera pause within the dialing sequence When you dial the number in standby mode press REDIAL PAUSE P appears in the display which...

Page 28: ...DIAL PAUSE repeatedly to display the number to be deleted 3 Press MENU DEL 4 Press VOL RING or VOL RING to choose Yes 5 Press SELECT The redialed number is deleted Storing a Redial Record 1 Press REDI...

Page 29: ...he DO NOT DISTURB LED right To cancel ringer mute press DO NOT DISTURB again You can also mute the ringer tone while the phone is ringing by pressing DO NOT DISTURB on the base To mute the ringer tone...

Page 30: ...WITCH OVER Some telephone companies use equipment that requires pulse dialing sometimes referred to as rotary dialing If you need to enter tone dialing digits you can switch over to tone dialing durin...

Page 31: ...lly improve the sound by setting the Clarity Booster to on This works only when the phone is in use 1 Press MENU DEL during talk mode while phone is in use 2 Press VOL RING or VOL RING to move the poi...

Page 32: ...the call FLASH AND CALL WAITING If you have Call Waiting service and a call waiting tone sounds while you are on a call press TALK FLASH to accept the waiting call There is a short pause and then you...

Page 33: ...enter the storing operation press the SELECT key 2 Press SELECT Store Edit Name appears 3 Enter the name up to 16 characters by using the number keypad see the Steps for Entering Names and Special Cha...

Page 34: ...on the number keys to select the desired characters With each press of a number key 0 9 the displayed character appears in the following order upper case letters first lower case letters next and fin...

Page 35: ...mode press 2 Press SELECT Store Edit Name appears 3 Press 6 once and then press to move the cursor to the right 4 Press 6 six times 5 Press 8 six times 6 Press 4 six times 7 Press 3 five times 8 Press...

Page 36: ...st when you press VOL RING from last to first when you press VOL RING You can also use letters on the number keys to select the first letter of the desired name Press a number key 2 9 and 0 once for t...

Page 37: ...honebook location to dial see Viewing the Phonebook on page 36 3 Press SELECT The number in the displayed phonebook location is dialed 4 To hang up press END SPEED DIALING If you store a phone number...

Page 38: ...cation to be edited appears press SELECT Store Edit Name appears 2 Follow the steps 3 to 7 under Storing Phone Numbers Names Distinctive Rings and Speed Dial on page 33 34 to complete the editing oper...

Page 39: ...ou must subscribe to Caller ID services through your local telephone provider to use these features When the telephone rings the Caller ID feature allows you to view the caller s name and phone number...

Page 40: ...is received Unknown Number 2 When you pick up the phone the display changes to Talk AutoTalk feature is set to on VIEWING THE CALLER ID LIST The Caller ID list stores information for incoming calls e...

Page 41: ...ID List on page 40 2 Press MENU DEL Delete Caller ID appears 3 Press VOL RING or VOL RING to choose Yes 4 Press SELECT You will hear a confirmation tone Deleting all Caller ID names numbers 1 When th...

Page 42: ...stance call or pressing will set or cancel an area code see page 23 Storing Caller ID messages in the Phonebook Messages shown in the Caller ID list can be stored in the phonebook The phone number and...

Page 43: ...G or VOL RING to select CW Deluxe and then press SELECT 3 Press VOL RING or VOL RING or the number keypad 1 7 to select an option 4 Press SELECT A confirmation screen will appear and returns back to t...

Page 44: ...lay When you register additional handset to the base the handset ID will be assigned 1 Before registering the extra handset the battery pack MUST be charged for 15 20 hours 2 Place the extra handset i...

Page 45: ...irectLink standby mode press TALK FLASH 2 Select the handset to which you wish to DirectLink with by pressing the number keys 1 4 Your handset will then page the other handset 3 On the receiving hands...

Page 46: ...to talk with from the selection list within 30 seconds To select the handset or the base press VOL RING or VOL RING and then press SELECT If you select All all handsets and the base will be paged An...

Page 47: ...ND or INTCM PAGE on the base Call Transfer Feature From handset to handset or to the base 1 During a call press HOLD TRSF INTCM on the handset 2 Select a handset or the base to transfer the call withi...

Page 48: ...swer is On or pick up the handset from the cradle when Auto Talk is on 3 To speak to the caller press TALK FLASH on the receiving handset REPLACING THE BASE If the base unit is replaced with a differe...

Page 49: ...ickly review save or delete the messages you choose You will never have to worry about a tape wearing out jamming or resetting improperly The Integrated Answering System is easy and convenient to use...

Page 50: ...ve a message after the tone Recording a personal outgoing message Greeting You can record a greeting up to 30 seconds long must be more than 2 seconds long 1 When the phone is in the standby mode pres...

Page 51: ...s 3 will display for high 2 for medium 1 for low and 0 for off 1 When the phone is in standby mode press VOL RING or VOL RING repeatedly to scroll through ringer volumes The ringer level is displayed...

Page 52: ...OTES Answering System Settings For your convenience voice prompts will guide you through the menu setup mode To scroll through the menu options repeatedly press CLOCK MENU on the base in standby mode...

Page 53: ...ds the day and time you set are announced for your review Setting a PIN code To play your messages from a remote location you will need to enter a two digit Personal Identification Number PIN code To...

Page 54: ...t ring time setting 2 4 6 Toll saver appears on the base and it is announced 2 Press SKIP SELECT or REPEAT SELECT until the desired ring time appears 3 Press SET to select the new ring time A confirma...

Page 55: ...choice If you want to use your own greeting you may want to change your greeting to omit the prompt to leave a message Refer to Recording a Personal Outgoing Message Greeting on page 50 The following...

Page 56: ...n all new messages are played back using the remote playback feature see pages 62 the Message Alert tone will automatically deactivate The tone will not deactivate until all new messages are played ba...

Page 57: ...base speaker will let you hear the calls as the machine records the message To adjust the volume press VOL RING or VOL RING If you set the answering system to Off you cannot screen a call To mute the...

Page 58: ...ned to play your new messages first After you play all your new messages you can then play your old messages Playing your messages 1 When the phone is in standby mode press XPLAY STOP The system annou...

Page 59: ...To repeat the current message press REPEAT SELECT after a few seconds of beginning the message To quickly scroll backwards through a message press and hold REPEAT SELECT To repeat the previous messag...

Page 60: ...essages and return to standby The message counter shows the number of messages stored in memory Deleting a message To maintain maximum record time delete the old messages 1 Press XPLAY STOP to review...

Page 61: ...rom the handset 1 During a conversation press MENU DEL on the handset 2 Press VOL RING or VOL RING to select Call Record and then press SELECT Recording a Call appears on the handset and flashes on th...

Page 62: ...e You can operate your answering system from a remote location using any touch tone telephone 1 Call your telephone number and wait for the system to answer If the answering system is off it will answ...

Page 63: ...shed hang up to exit the system The answering system automatically returns to standby Command Function 0 then 1 Repeat a Message 0 then 2 Playing incoming Messages 0 then 3 Skipping a Message 0 then 4...

Page 64: ...ing messages press two For help press zero You will hear a beep 3 Enter a command within 30 seconds You may select a command from the following chart NOTES If you press END before the answering system...

Page 65: ...Message 2 Playing incoming Messages 3 Skipping a Message 4 Deleting a Message 5 Stop Operation 6 Answering System On 7 Memo Record Stop 8 Greeting Message Record Stop 9 Answer System Off 0 Help Guida...

Page 66: ...cover on the side of the handset then insert the headset s plug into the jack Connecting a headset disconnects the handset s earpiece and microphone VOL RING or VOL RING on the handset also controls t...

Page 67: ...ck both ends of the base telephone line cord Make sure the AC adapter is plugged into the base and wall outlet Disconnect the AC adapter for a few minutes and then reconnect it Remove the base ID see...

Page 68: ...see Replacing the Base Setting on page 25 and register the handset see Register the Handset to the Base on page 44 The handset doesn t communicate with another handsets Remove the base ID see Replaci...

Page 69: ...com or call 1 800 The Shack 843 7422 and follow the menu options Modifying or tampering with the phone s internal components can cause a malfunction and might invalidate its warranty and void your FC...

Page 70: ...he event of a product defect during the warranty period take the product and the Ra dioShack sales receipt as proof of purchase date to any RadioShack store RadioShack will at its option unless otherw...

Reviews: