background image

In

s

ta

lla

ti

o

n

8

INSTALLATION

Before using your phone, carefully peel the 
protective film off the display. The film 

protects the handset window during 
shipment and is not necessary to any phone 

function.

S

ELECTING


A

 L

OCATION

You can place the phone’s base on a desk 
or table, or mount it on a standard wall plate 

or directly on a wall. Select a location that 

is:

Ô

• near an accessible AC outlet 

• near a telephone line jack

• out of the way of normal activities

• away from electrical machinery, 

electrical appliances, metal walls or 
filing cabinets, wireless intercoms, 
alarms, and room monitors

• away from other cordless phones

The base’s location affects the handset’s 
range. If you have a choice of several 

locations, try each to see which provides the 

best performance. 
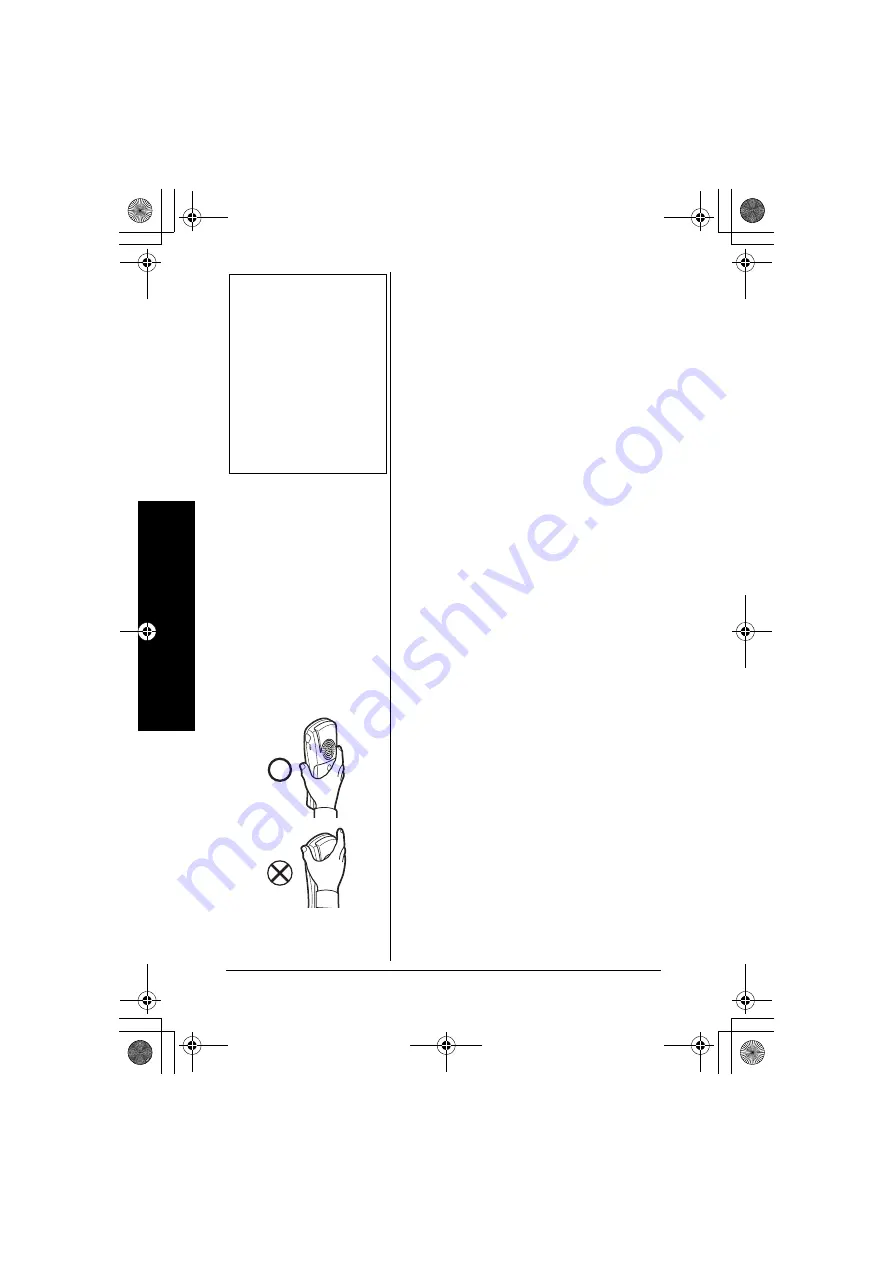
The handset antenna is located on the 
back, above the ringer speaker. For 

maximum communication range, do not 

hold the handset in such a way as to cover 
the antenna by your hand. Also, place the 

handset in the upright position while not in 

use so the antenna can pick up the signals 
from the base.
When there is obstacle such as metal or 

concrete wall between the handset and the 

base, the operation might be affected. Try to 
keep free from obstruction.

Ô

 NOTE 

Ô


If your home has specially 
wired alarm equipment 
connected to the telephone 
line, be sure that installing 
the system does not disable 
your alarm equipment.
If you have questions about 
what will disable alarm 
equipment, contact your 
telephone company or a 
qualified installer.

Correct

Incorrect

43-3580.book  8 ページ  2004年1月26日 月曜日 午前10時19分

Summary of Contents for 43-3580

Page 1: ...oming call is received and the Caller ID information matches the information in one of the memory locations the distinctive ring that has been stored for that particular caller sounds See Distinctive...

Page 2: ...ch over 28 Travelling Out of Range 28 Privacy Mode 29 Three Way Conferencing 29 Flash and Call Waiting 29 Using One Touch Voice Mail Access 30 Phonebook 31 Storing Phone Numbers Names Distinctive Ring...

Page 3: ...other end of the house to answer the phone You can transfer outside calls to other handsets If you subscribe to Call Waiting with Caller ID the phone shows you the incoming caller information even wh...

Page 4: ...ed your phone to conform to federal regulations and you can connect it to most telephone lines However each phone and each device such as a telephone or answering machine that you connect to the telep...

Page 5: ...radio frequency energy various products may produce depending on their intended usage This product has been tested and found to comply with the FCC s exposure criteria For body worn operation the FCC...

Page 6: ...kitchen sink or laundry tub in a wet basement or near a swimming pool 2 Avoid using a telephone other than a cordless type during an electrical storm There may be a remote risk of electric shock from...

Page 7: ...ming caller information even when you are already talking on the phone READ THIS BEFORE INSTALLATION We have designed your phone to conform to federal regulations and you can connect it to most phone...

Page 8: ...ge If you have a choice of several locations try each to see which provides the best performance The handset antenna is located on the back above the ringer speaker For maximum communication range do...

Page 9: ...r into a standard AC outlet On a Wall Plate or Wall To mount the phone directly on a wall you need two screws not supplied with heads that fit into the keyhole slots on the bracket Drill two holes 315...

Page 10: ...ydride Ni MH battery pack in the handset but not connected Before using your phone you must connect the battery pack then charge it for about 15 20 hours 1 Press down and slide off the battery compart...

Page 11: ...month If you are not going to use your phone for an extended period disconnect the battery pack This increases the battery pack s usable life The supplied battery pack should last for about a year If...

Page 12: ...ide of the handset then insert the headset s plug into the jack Connecting a headset disconnects the handset s earpiece and microphone VOL RING or VOL RING on the handset also controls the headset s v...

Page 13: ...the handset speaker phone is used Talk The Privacy icon appears when the Privacy Mode is turned on Turning on the phone Hanging up the phone Confirmation Done Deleting Deleted Making a call Find Hands...

Page 14: ...that appears directly above it For example when the handset is in standby mode pressing soft key 1 will redial the last dialed number When the handset is in talk mode pressing soft key 1 will mute th...

Page 15: ...ake full advantage of all the phone features The table below lists the default settings Function Default Settings Edit Voice Mail None Ringer Tones Flicker Distinctive Ring On Auto Talk Off Anykey Ans...

Page 16: ...porting events or while shopping to stay in contact with family members or friends You must set both handsets to DirectLink Mode to activate this feature For detailed operation instruction refer to Us...

Page 17: ...ey Select the Handset Setup menu and then the Edit Voice Mail submenu Edit V_mail No appears 2 Enter your personal access number using the number keypad 0 9 TONE the DELETE soft key or the PAUSE soft...

Page 18: ...oll through the options 3 When you reach the ringer tone you want press the OK soft key You will hear a confirmation tone Distinctive Ringer Setup Distinctive Ringer allows you to assign a designated...

Page 19: ...ny buttons to answer the call 1 Press the MENU soft key Select the Handset Setup menu and then the AutoTalk submenu 2 Press VOL RING or VOL RING to select On or Off 3 Press the OK soft key You will he...

Page 20: ...to enter or edit the name 3 Press the OK soft key You will hear a confirmation tone Selecting a Language Language selects which language the menu display will use Choose from English French or Spanish...

Page 21: ...The Animation screen displays animations on the handset LCD The animations will be displayed on the LCD screen during a call ringer volume setting when you hang up and during other functions See Anima...

Page 22: ...y 5 Press VOL RING or VOL RING to choose AM or PM and then press the SAVE soft key You will hear a confirmation tone Setting CIDCW Caller ID on Call Waiting Caller ID on Call Waiting CIDCW displays th...

Page 23: ...service If you are not sure of your dialing system set the unit to tone dialing Make a trial call If the call connects leave the setting as is otherwise set the unit to pulse dialing If your phone sy...

Page 24: ...a confirmation tone Deregister the Handset Deregister HS clears the handset s ID from the main base unit and the base ID from the handset You will usually only deregister the handset if you are havin...

Page 25: ...dset Off the Cradle Press any number key TONE or Anykey Answer or press TALK FLASH Handset Off the Cradle Press SPEAKER To make a call Handset Off the Cradle 1 Press TALK FLASH 2 Listen for the dial t...

Page 26: ...d number is dialed 4 To hang up press END Deleting a Redial Record 1 With the phone in standby mode press the REDIAL soft key To hang up Press END or return the handset to the cradle Auto Standby Toen...

Page 27: ...mbers Names Distinctive Rings and Speed Dial on page 31 ADJUSTING THE HANDSET RINGER EARPIECE AND SPEAKER VOLUME You can adjust the handset ringer and earpiece speaker volume separately Press the volu...

Page 28: ...r to tone dialing during the call This feature is useful when you need tone dialing to use automated systems for example entering your bank account number after you have called your bank Initially mak...

Page 29: ...oin a conference call press TALK FLASH or SPEAKER to use the handset speakerphone 3 To leave a conference call simply hang up as you normally would All other parties will remain connected 4 To end a c...

Page 30: ...r personal access number you can dial your mailbox with the touch of a button When you have messages simply press the soft key If you have not entered the access number or it has been deleted when you...

Page 31: ...of the phonebook locations used 2nd line How to search press the number keypad VOL RING or VOL RING 3rd line How to enter the storing operation press the STORE soft key 4th line The BACK COPY and STO...

Page 32: ...case letters next and finally the number corresponding to the key NOTES Storing Phone Numbers Names Distinctive Rings and Speed Dial The pause key counts as one digit Pressing the PAUSE soft key more...

Page 33: ...Press the STORE soft key Store Edit Name appears 3 Press 6 once and then press to move the cursor to the right 4 Press 6 six times 5 Press 8 six times 6 Press 4 six times 7 Press 3 five times 8 Press...

Page 34: ...ter and so on The first location that begins with the letter you entered appears For example to search for Movies press 6 once Press VOL RING or VOL RING until the phonebook location is displayed 3 To...

Page 35: ...r key 0 9 associated with the speed dial until the phone number appears and then press TALK FLASH or SPEAKER The number stored in the speed dial SPD1 SPD0 is dialed EDITING OR ERASING A DATA 1 When th...

Page 36: ...names and numbers You can transfer one memory phonebook location at a time or all memory locations at once 1 When the phone is in standby mode press 2 Press the COPY soft key 3 Press VOL RING or VOL...

Page 37: ...ed to as Chain Dialing An example of this is a bank account number Store the account or special number in one of the phonebook locations Refer to Storing Phone Numbers Names Distinctive Rings and Spee...

Page 38: ...te and time The incoming call information is stored in the Caller ID record If the Caller ID service includes the caller s name the name will appear in the display up to 15 characters You may receive...

Page 39: ...new repeatedly press VOL RING to scroll through the messages from the latest to the earliest or VOL RING to scroll back through the messages To view the Caller ID messages with alphabetical search pr...

Page 40: ...a confirmation tone Deleting all Caller ID names numbers 1 When the phone is in standby mode press CID 2 Press the DELETE soft key Delete All appears 3 Press VOL RING or VOL RING to choose Yes 4 Press...

Page 41: ...one number and name of the party on the Caller ID list can be stored in memory 1 When the phone is in standby mode view the Caller ID message to be stored Then press the STORE soft key Store Edit Name...

Page 42: ...and returns back to the call Your phone is pre programmed with seven call waiting options You may select to ask the calling party to hold send them a busy message forward them to your voice mail or a...

Page 43: ...n a call is received REGISTER THE HANDSET TO THE BASE If you purchase an extra handset you need to register the handset to the base before use Only one handset can be registered at a time Handsets sup...

Page 44: ...ectLink mode first DirectLink call 1 Press the MENU soft key and select the DirectLink Mode menu To enter DirectLink mode press ENTER appears 2 Press the ENTER soft key to enter DirectLink mode You wi...

Page 45: ...G and then press the OK soft key If you select All all handsets will be paged An intercom tone sounds To Cancel intercom press the CANCEL soft key on the initiating handset 3 On the receiving handset...

Page 46: ...unds To cancel the transfer press the CANCEL soft key TALK FLASH or SPEAKER on the initiating handset 3 On the receiving handset to answer the page press TALK FLASH the ANSWER soft key or INTCM HOLD O...

Page 47: ...adapter is plugged into the base and wall outlet Disconnect the AC adapter for a few minutes and then reconnect it Deregister the handset see Deregister the Handset on page 24 and register the handset...

Page 48: ...picked up before the second ring The call was placed through a switchboard Call your local telephone company to verify your Caller ID service is current You cannot register the handset at the base Ch...

Page 49: ...ing new SERVICE AND REPAIR If your phone is not performing as it should take it to your local RadioShack store for assistance To locate your nearest RadioShack use the store locator feature on RadioSh...

Page 50: ...1 570 CPFUGV KTGEV KPM QFG 0 KTGEV KPM MENU or OK ENTER OK 9 TGC QFG KCN QFG 8QKEG CKN 6QPG C 6KOG 1 5 672 1 CPFUGV 5GVWR NQDCN 5GVWR GTGIKUVGT 5 1 GTGIKUVGT 5 GU 0Q 1 GTGIKUVTCVKQP QORNGVG 1 2NCEG J...

Page 51: ...NOTES 51 NOTES 43 3580 book 51...

Page 52: ...of a product defect during the warranty period take the product and the Ra dioShack sales receipt as proof of purchase date to any RadioShack store RadioShack will at its option unless otherwise prov...

Reviews: