10 of 15
Radar Speed Sign Operation Manual_MN0036 v23.01
Standard Timers
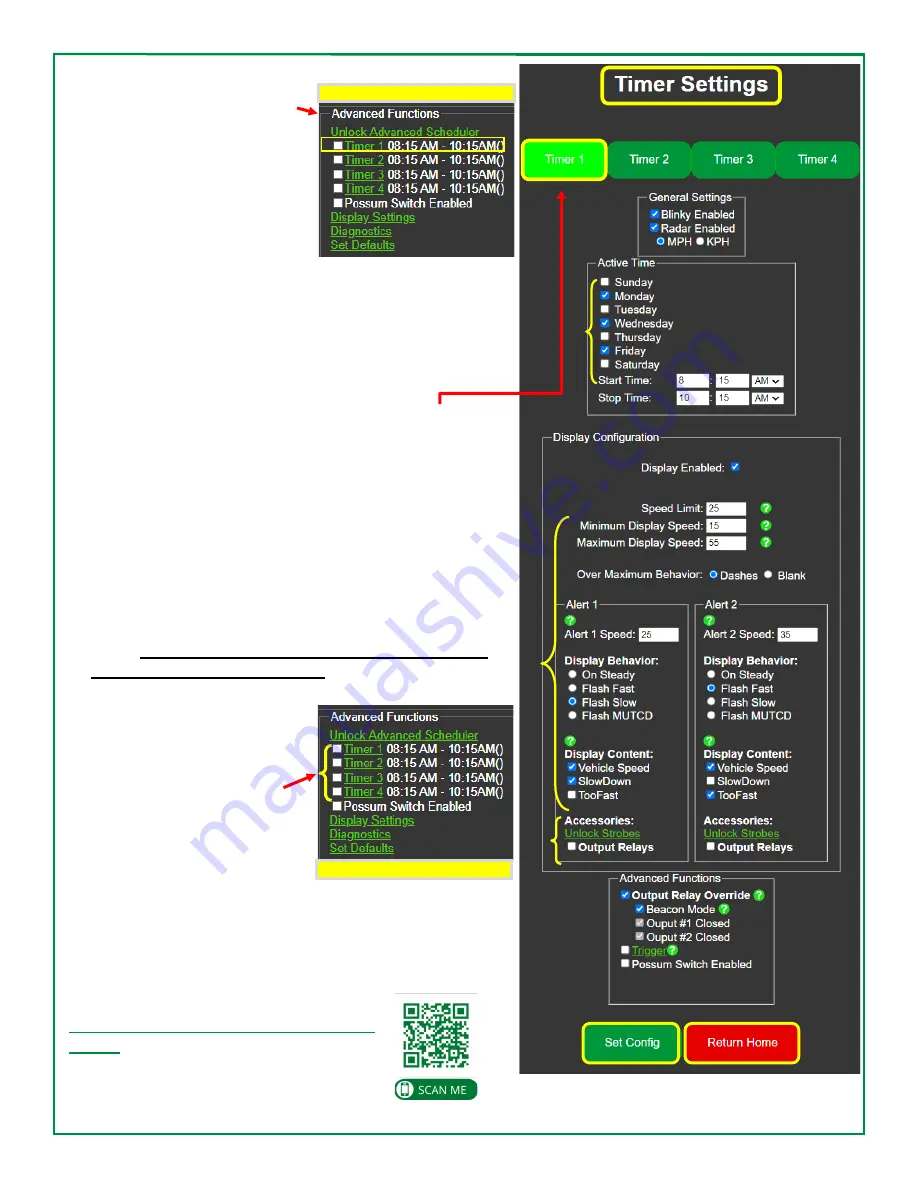
Standard timers can be set under
Advanced Functions
on the
HOME
configuration screen (see
pg. 6 for full screen). This section
is used to set a change of opera-
tion in the sign for a portion of the
day, for instance, a morning or
afternoon school zone setting.
Timer Settings
Keep in mind that for all periods of the day NOT accounted for by
the TIMER settings, the sign will revert to the original settings on
your HOME Configuration screen.
Selecting a timer will take you to Timer Settings.
1.
Select
Timer 1
to set up your first setting of the day.
2.
Select which days of the week for this setting to be
active.
3.
Select the
Start Time
of this setting, including AM or PM.
4.
Select the
Stop Time
of this setting, including AM or PM.
5.
Enter the
Speed
settings and
Alert
display behavior and
display content desired for this time period.
6.
If output relays were purchased with your sign, enter the
Relay options
desired for this time period.
7.
Be sure to save the settings by clicking the
Set Config
button. This refreshes the screen to allow additional timers to
be set.
You will need to save EACH Timer setting as you
go by clicking Set Config button.
8.
Once the Timer settings are completed, click
Return HOME
button. This will take you back
to the
HOME configuration
screen
. You must check the
box of each timer to activate
the Timer setting. Four different
settings may be used each day
of the week PLUS the standard
setting, for a total of 5.
Collecting and Downloading Data
If you purchased the Streetsmart option, please refer to the
Streetsmart Operation Manual for data collection and reporting
instructions which can be downloaded from
our Customer Resource Center
.
https://www.radarsign.com/customer
Password: safety
HOME configuration screen
☑
1
2
3
4
7
8
5
6
HOME configuration screen
☑
☑
1
2
3
4
7
8
5
6


