background image


11 of 16


Radar Speed Sign Operation Manual_MN0025 v21.02


Standard Timers


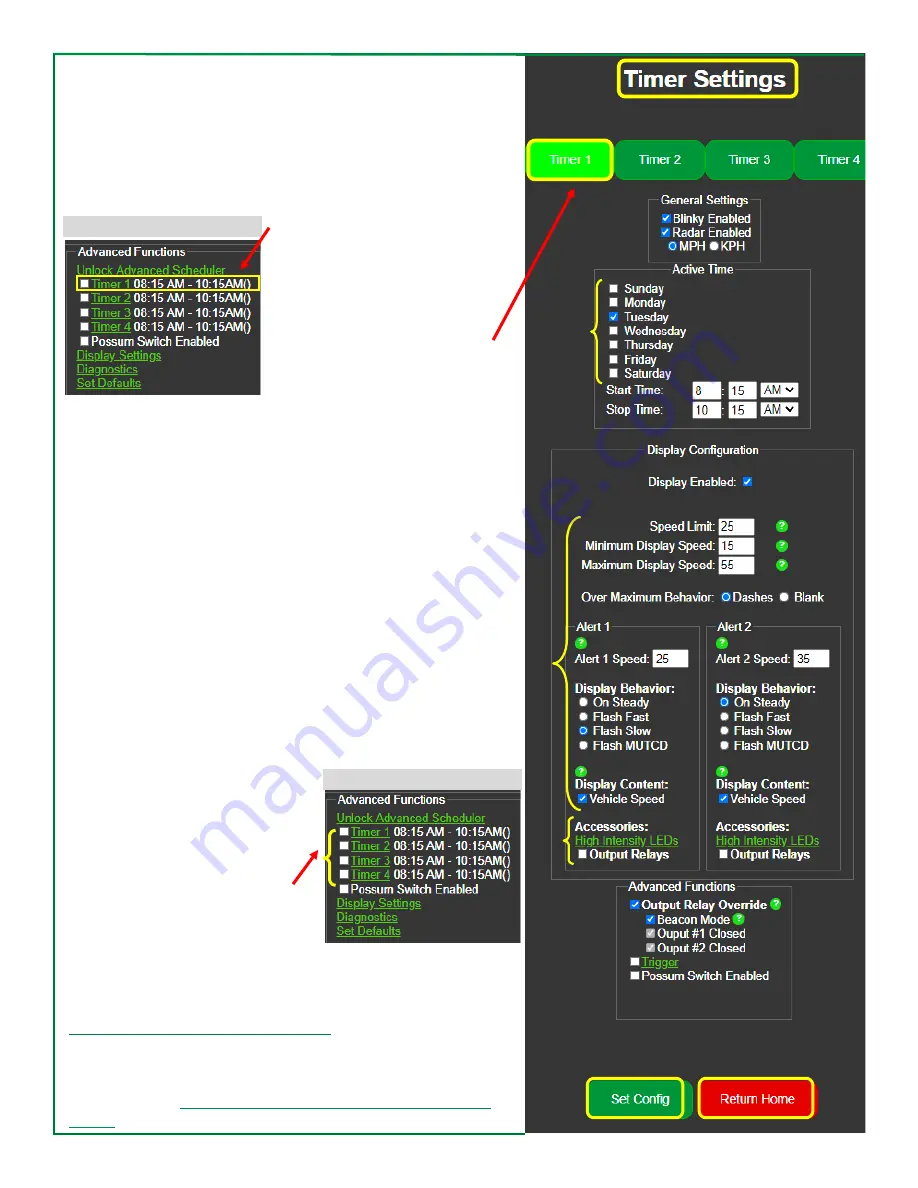
An activation box of timer settings is shown on the bottom of 
the 

HOME configuration screen

. This section is used to 

set a change of operation in the sign for a portion of the day, 
for instance, a morning or afternoon school zone setting.  


Click on timer option

.


Keep in mind that for all periods of 

the day NOT accounted for by the 
TIMER settings, the radar sign will 
revert to the original settings on 
your HOME Configuration screen.


Selecting a timer will take 
you to Timer Settings. 


1.


Select 

Timer 1 

to set up 

your first setting of the day.


2.


Select which days of the week for this setting to be 


active.


3.


Select the 

Start Time 

of this setting, including AM or PM. 


4.


Select the 

Stop Time 

of this setting, including AM or PM.


5.


Enter the 

Speed settings 

and 

Alert activities 

desired 

for this time period. 


6.


If output relays were purchased with your sign, enter the 

Relay options 

desired for this time period.


(

This feature is only available on a TC

-

500

TC

-

600, and TC

-

1000).


7.


Be sure to save the settings by clicking the 

Set Config 


button. This refreshes the screen to allow additional 


timers to be set. You will need to save 

EACH 

Timer 


setting as you go by clicking Set Config button. 


8.


Once the Timer settings are completed, click 

Return 

HOME

 button. This will take 

you back to the 

HOME con-

figuration screen

. You must 

check the box of each timer 
to activate the Timer set-
ting. Four different settings 
may be used each day of the 
week PLUS the standard set-
ting, for a total of 5.


See pg.7 for a full view of the HOME configuration screen. The Timer activation 

box is at the bottom of the screen


Collecting and Downloading Data


If you purchased the Streetsmart option, please refer to the 
Streetsmart Operation Manual for data collection and reporting


 instructions which can be downloaded from our Customer Re-
source Center

.   

https://www.radarsign.com/customer

-

resource

-

center/ 

 Password: safety 


HOME configuration screen


1


2


3


4


7


8


5


6


(9)


HOME configuration screen


Summary of Contents for TC-400

Page 1: ...1 of 16 Radar Speed Sign Operation Manual_MN0025 v21 02 2005 2021 Radarsign LLC All Rights Reserved Radar Speed Sign Operation Manual All Models TC 400 TC 600 TC 1000...

Page 2: ...2 of 16 Radar Speed Sign Operation Manual_MN0025 v21 02 This Page Left Blank...

Page 3: ...the Interface Board pg 15 Warranty pg 16 ______________________________________________________________________________ If you experience any trouble setting up your sign please refer to our Troubles...

Page 4: ...must accept any interference received including interference that may cause undesired operation Customer Support Call 678 965 4814 or 678 520 5152 or email customerservice radarsign com Shipping Addre...

Page 5: ...d equipment To reduce the risk of burns or other acid related injury resulting from exploding batteries Always use the recommended charging systems with this product To reduce the risk associated with...

Page 6: ...o the network say yes You have successfully connected to your radar sign 8 Once connected open your web browser 9 In the address box at the top of your browser enter the following url 10 0 0 1 The con...

Page 7: ...opens it will display the current settings of the radar speed sign The alert settings and advanced functions available will vary depending on the your sign model and the sign options you purchased TC...

Page 8: ...PH KPH settings Select the setting for your country standard Display Configuration 4 Display Enabled Turns the display on or off UNCHECK if you wish to collect traffic statistics in Stealth Mode to ge...

Page 9: ...d Accessories High Intensity LEDS Strobes If you have purchased a sign with strobes select a display Simulated camera flash flash once Strobe 3 rapid flashes Strobe Alternating The choice of Strobe Al...

Page 10: ...the timers 5 Possum Switch A vandalism discouraging feature that causes the sign to play dead after it detects a severe impact If this feature is enabled the sign will disable all outward signs of act...

Page 11: ...your sign enter the Relay options desired for this time period This feature is only available on a TC 500 TC 600 and TC 1000 7 Be sure to save the settings by clicking the Set Config button This refr...

Page 12: ...12 VDC 120 VAC across the input screw terminals The input trigger latches on for two seconds which allows flashing beacon lamps to be used to trigger an input event As long as the input sees a voltag...

Page 13: ...acon Mode the two output relays will alternate at 1 Hz each relay closed for 0 5 seconds then opened for 0 5 seconds This mode is intended to be used in conjunction with school zone beacon lamps Speed...

Page 14: ...Enabling these options forces the relay output s on for the entire duration of the timer In the example shown the relays would be in alternating beacon mode every Monday Wednesday and Friday from 8 1...

Page 15: ...e shown Beacon Mode is enabled for Alert 2 If a car is traveling over 30 MPH the Alert 2 settings take over and the Hyper Alerts will activate Servicing the Interface Board The only user serviceable p...

Page 16: ...is responsible for inbound shipping Radarsign will pay for return shipping to the customer for the entire warranty period if customer is located within North America Customers from a country outside o...

Reviews: