R.E.
Williams
Contractor
Inc.
www.rewci.com
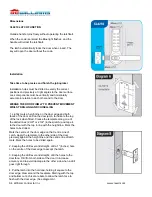
5. Fix the latch with the wood screws, with the bevel
towards the doorframe.
6. Fit the latch support post to the front plate, in the inner
hole A for a right hand hung door, and the inner hole B for a
left hand hung door.
7. Fit the self-adhesive gaskets to the front and back plates.
The gaskets provide friction against the door so that it is not
necessary to over-tighten the fixing bolts to provide stability.
8. Cut the fixing bolts to correct length. Measured from
beneath the bolt head, the length should be the door
thickness, plus approximately 5/8" (inches) to the nearest
cutting point of the bolt.
Please Note:
Always cut the bolts at one of the cutting
points so as not to damage a thread. Use the cutting edges
of pliers to crimp strongly several times around the selected
cutting point. The surplus end should break off quite easily.
9. Put the spindle into the latch with the spring on the front plate side of the door.
10. Remove the battery cover from the back plate, and remove the battery pack. Apply the front plate over the spindle,
passing the latch support posts through the latch and the cable through the door. With
both
parts of the back plate
together place them over the spindle, pull the cable through, and screw the fixing bolts through to the front plate.
11. Using the inside handle boss check that the spindle moves freely, and that the latch retracts and projects smoothly. If
it is tight, loosen the fixing bolts slightly and adjust the position of the back plate until the spindle will turn freely. Tighten
the fixing bolts. Test the spindle again. Do not over-tighten the bolts as this may cause the door to distort and affect the
lock function.
12. With battery pack installed connect the cables, storing any excess cable within the door.
13. Fit the cylinder cover and outside handle to the front plate.
14. Fit the inside handle to the back plate.
The inside handle will now retract the latchbolt. The outside handle will turn freely without retracting the latch. Enter the
ctory Master Code #1234. The Blue light will flash and the outside handle will now retract the latch.
16.
FITTING THE STRIKE PLATE
Position the strike plate on the doorframe so that it lines up with the flat of the
latchbolt, and NOT the plunger. Mark the positions of the fixing screws and draw around the aperture of the strike plate.
Chisel out the aperture to 37/64" (inches) deep to receive the latchbolt. Fix the strike plate to the surface of the frame
using only the top fixing screw. Gently close the door and check that the latchbolt enters the aperture easily, and is held
without too much ‘play’.
When satisfied, draw around the outline of the strike plate, remove it and cut a rebate to enable the strikeplate to lie flush
with the surface. Re-fix the strike plate using both screws.
Please Note:
The plunger beside the latchbolt deadlocks it to protect against manipulation or ‘shimming’. The strike plate
must be accurately installed so that the plunger CANNOT enter the aperture when the door is closed, even when it is
slammed shut.


