background image

5.1. Video/Photo Download

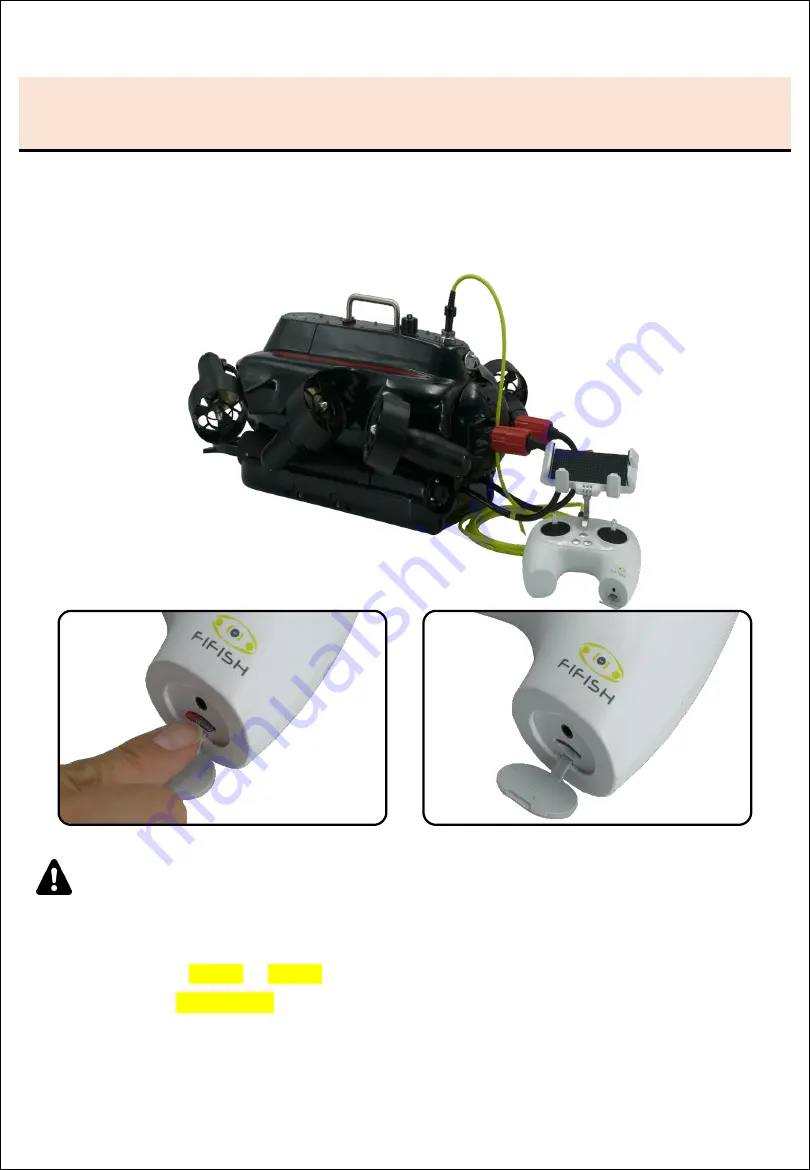
5.1.1. Connect with RC and Submersible with Data Transfer Cable

5.1.2. Insert a microSD card in the RC

1

5.1.3. Software connect (Check the Chapter 3, Page 19-20)

 NOTE 

for microSD card

1. The recommendation for is 

SanDisk

 Ultra/Extreme/Extreme Pro

2. Format in 

FAT32 

or 

exFAT

3. Storage 

64 / 128 GB (NO greater than 128GB)

Chapter 5 Post-Dive

Data Transfer

24

Summary of Contents for FIFISH PRO W6

Page 1: ...Manual V2 0 FIFISH PRO W6...

Page 2: ......

Page 3: ...nnect 19 20 Sensor Calibration Deploy and Retrieve 21 Chapter 4 Controlling 22 23 Definition 22 Controlling Modes 23 Chapter 5 Post Dive 24 32 Data Copy 24 27 Submersible Battery 28 30 RC Charging 31...

Page 4: ...er level water traffics etc Be part of marine protection and conservation for the local coral and marine life Maintain after dive check the Maintenance Guide in page 32 Avoid the reefs rocks seaweeds...

Page 5: ...Special Note Holding on the Launch and Recovery LAR Handle when carrying submersible Holding on the battery handle when carrying the battery Holding the LAR handle and tether behind safety lock when...

Page 6: ...ng the motor frame when carrying submersible Do NOT pull the battery cable when recovery or carrying the submersible Do NOT holding the battery cable when carrying the battery Chapter 1 Backgrounds Sp...

Page 7: ...tween ROV plug safety lock Do NOT turn ON the LED in air longer than 10 second to avoid over heating Do NOT turn ON the laser in air over 10 second especially do NOT point the flammable materials Chap...

Page 8: ...NOT unlock the motor in air over 3 seconds to avoid over heating Check the O ring inside protective caps regularly Check the O ring inside protective caps regularly Chapter 1 Backgrounds Special Note...

Page 9: ...ird party parts Damage caused by operating the unit with a low charged or defective battery Uninterrupted or error free operation of a product Loss of or damage to your data by a product Any software...

Page 10: ...nd videos High capacity lithium battery enhanced with swappable design The standard 10 cm laser scaler is for underwater measurement FIFISH PRO W6 s Q BOX is the underwater connector hub which spilt i...

Page 11: ...Submersible Packing Box Chapter 2 Introduction Standard Package 8...

Page 12: ...2 1 3 4 5 5 6 Spool and RC Packing Box 1 Spool with tether 2 Remote Controller 3 Data Transfer Cable 4 RC Adapter 5 Submersible Adapter 2 6 VR Goggle Chapter 2 Introduction Standard Package 9...

Page 13: ...2 3 1 2 4 Submersible Packaging 1 Submersible 2 Battery Sealing Cap A or Cap B 3 Dust Free Rubber Cap 4 Dust Free Rubber Cap Chapter 2 Introduction Standard Package 10...

Page 14: ...2 1 3 Submersible Packaging 1 Main Camera 2 Secondary Camera 3 Protective film 3 Chapter 2 Introduction Standard Package 11...

Page 15: ...LEDs 2 5 Robotic Arm 6 2nd gen Q motor Pro Thrusters 6 7 ROV Tether Port 8 Safety Anchor Point 1 9 Battery Plug 2 10 Launch and Recovery LAR Handle 11 Q Interface Type A 2 12 2D Image Sonar Cabin 1 L...

Page 16: ...Control Mode Attitude Sport Combine 10 Tether Port 11 Ethernet Port mini USB 12 LED Brightness OFF 1 2 13 Photo Snap 2 14 Clamp Release Button 15 Clamp for Smart Device 16 Charging Port 17 microSD Slo...

Page 17: ...ool Handle 2 Spool Frame 3 Tether Regulator 4 Rotation Reel 5 Rotation Handle 6 Safety Lock 7 ROV Plug 8 RC Plug 9 ROV Plug Position Pin 10 O rings 1 2 3 4 5 6 7 8 8 1 2 9 10 10 Chapter 2 Introduction...

Page 18: ...at https www qysea com support app download 3 1 2 FIFISH Windows App For professional users some sensor require a laptop and Window to run their own App for data processing and analysis FIFISH Window...

Page 19: ...3 2 Hardware Connection Overview of hardware connection 3 2 1 Plug the tether 3 5 mm head into remote controller Chapter 3 Pre Dive Hardware Connect 16...

Page 20: ...3 2 3 Twist off the protective cap then insert ROV Plug into Tether Port finger tight 3 2 2 1 anchor point 3 2 2 2 safety lock on anchor point 3 2 3 1 twist off the protective cap 3 2 3 2 insert ROV...

Page 21: ...lay 5 chimes Do Re Mi Do Mi 3 2 5 System connecting The ON OFF Depth Holding and LOCK UNLOCK will flash and rotate clockwise which indicates Ready to be connected In about 30 seconds the ON OFF and LO...

Page 22: ...ame FIFISHRC_xxxx Enter the password to connect the default password is 1234567890 NOTE You might see the note No Internet Connection keep this connection and do NOT use your cell data 1234567890 3 3...

Page 23: ...on and notifications Even the network did not connect to internet select the Keep Trying WLAN for iOS user Stay Connected for Android user NOTE The operate interface will be introduced in Chapter 6 FI...

Page 24: ...F RC if necessary 3 5 Deploy the ROV ONLY pulling on the tether to deploy the submersible into the water Unlock the thrusters then start to dive NOTE The depth shall greater than 2 meter about 6 feet...

Page 25: ...t Control Stick Left Wheel and Right Wheel into the following symbol The arrows on RC indicate the command and the arrows on ROV indicate the actual movements NOTE From the FPV first person view the b...

Page 26: ...PV Frist Person View do not operate in third person view The ROV will only stay in the same depth with no command input when depth holding ON Combination Mode Combination mode activate the head tracki...

Page 27: ...le 5 1 2 Insert a microSD card in the RC1 5 1 3 Software connect Check the Chapter 3 Page 19 20 NOTE for microSD card 1 The recommendation for is SanDisk Ultra Extreme Extreme Pro 2 Format in FAT32 or...

Page 28: ...Turn ON the Depth Holding submersible will not beep after 10 min static 5 1 5 Press MEDIA then Press DEVICE 5 1 6 Select the Camera SDCard 1 is the main camera SDCard 2 is the secondary camera Chapte...

Page 29: ...cture select Video if you only want to copy out the videos 5 1 8 Press and hold on desired clip over 1 second then you can select the clip s you would like to copy 5 1 9 After you satisfied then press...

Page 30: ...1 Video Photo Download 5 1 10 Select the place to copy Download to remote control is the microSD card in RC 5 1 11 Do NOT minimize the FIFISH App while downloading Chapter 5 Post Dive Data Transfer 2...

Page 31: ...he battery plug 5 2 2 Press the battery release button and holding the back of submersible to unlock the battery then pull out a little 5 2 3 Once the battery has released then pull out the battery wh...

Page 32: ...4 Connect 2 Submersible Adapter 5 2 5 Algin the positing pin 5 2 6 Plug all the way RED LED indicator illuminates while charging and GREEN LED indicator illuminates while fully charged Chapter 5 Post...

Page 33: ...5 2 Submersible Battery 5 2 7 Align the track both side when putting back the battery Chapter 5 Post Dive Submersible Battery 30...

Page 34: ...Red less than 30 Yellow 30 to 70 White 70 or higher 5 3 RC Charging Flashing ON OFF button means RC is charging White steady ON OFF button RC is fully charged Chapter 5 Post Dive RC Charging 31...

Page 35: ...d dry with air blow gun or dust blower 4 Check the propellers after every dive Make sure NO entanglement such as seaweed or fishing lines 5 Inspect the tether for cuts and or nicks or kinks in the out...

Page 36: ...Image Video Setting Shortcut 7 Camera Buttons 8 Tool Box 9 Watermarks 3 3 9 9 9 9 9 NOTE This FIFISH App interface is iOS 4 2 6 In order to provide better user experiences QYSEA software team will kee...

Page 37: ...ROV s Battery in Percentage Camera Buttons 9 Video Photo Mode Switch 10 Record Stop Snap 11 Slow Motion or Normal 1 2 3 4 5 6 7 8 9 10 11 12 13 14 15 16 18 Camera Setting Shortcut 12 ISO 13 White Bal...

Page 38: ...ing Direction 3 28 Compass Note 1 Heading in degrees 0 is North 90 is East 180 is South 270 is West For Example 316 is NW 2 Pitch Angle in Degrees Heading down is in a minus digit degree with downward...

Page 39: ...lot and Spectator ONLY the Pilot can manipulate the settings such as watermarks control preferences camera settings etc The Watermark ON will record to video or write on photo Watermark OFF then no tr...

Page 40: ...on is the RC s motherboard version WiFi Version is the RC s Wi Fi module version ROV Version is the ROV s current software version Camera Version is the camera module software version ROV SN is the id...

Page 41: ...the default is ROV USA Control Mode you can select your preferences if you like Click Confirm after setting As for advance level pilot seek for customized setting demo Please check FIFISH authorized...

Page 42: ...Move Rotate Adjusting the curvature set the center sector output sensitivity Adjusting the attenuation set the maximum output As for advance level pilot seek for explore curvature setting tips Please...

Page 43: ...Select the Sensor Icon in 3rd column Follow the hit on FIFISH App step by step first Gyro Acce then Mag Reboot ROV in FIFISH App and Power ON OFF RC if necessary 1st 2nd 3rd Chapter 6 FIFISH App Sens...

Page 44: ...ht Meter Mode 7 FOV Settings Camera General Setting 7 Live Resolution on FPV 8 Live Bitrate on FPV 9 Color Encoding 10 Video Format NOTE 1 Main Camera and Secondary camera settings are synchronized 2...

Page 45: ...ndicular with the measured surface The distance between 2 dots are 10 cm The object dimension can be calculated by a ruler or image processing software For Example Object dimension processing Object I...

Page 46: ...in column 4 Select the LIVE quality High Medium and Low 2 3 5 Click Start Live Streaming NOTE 1 This feature will request to use the iOS devices For example iPhone or iPad SIM card version 2 LIVE stre...

Page 47: ...amable auto moving commands 1 Press the AUTO to turn ON the Auto Pilot 2 Select moving behavior 3 Set speed of such segment 4 Set time of such segment 5 Program next segment 6 Click Run to activate th...

Page 48: ...Auto Pilot 2nd Gen The Auto Pilot 2nd Gen is able programable auto moving commands Chapter 6 FIFISH App Auto Pilot 45...

Page 49: ...Insert a flash drive 1 2 2 Click the HDMI icon 3 The default is Download Mode the new video will automatically download to flash portable drive NOTE 1 Download and Display mode CANNOT work at same ti...

Page 50: ...casting devices 2 Click the icon to active Display Mode NOTE 1 Download and Display mode CANNOT work at same time more information check the HMDI Box instructions 2 The default resolution is 1080P 60f...

Page 51: ...0 03 m accuracy Keep ROV suspending Operating Temperature 10 C to 60 C 14 F to 140 F Battery Type 6S6P Panasonic 18650 Li ion Rated Capacity 18 000 mAh 21 6 V 388 8 Wh Run time 1 5 hours against 3 kno...

Page 52: ...8 000 K Auto Manual EV Exposure Compensation 3 0 3 0 EV Video Resolution 4K UHD 25 30 fps 1080P FHD 25 30 50 60 100 120 fps 720P HD 25 30 50 60 100 120 200 240 fps Video Format MPEG4 AVC H 264 HEVC H...

Page 53: ...bsf Spool Dimension 389 mm 249 mm 254 mm 9 3 8 inch 8 3 8 inch 8 1 16 inch Spool Weight 11 65 kg 25 lbs 11 oz Weight 0 56 kg 1 lbs 3 oz Clamp Opening 20 2 cm 7 9 in Wireless 5 GHz Wi Fi 11 a n ac Batt...

Page 54: ...85 or UART network for accessories such as image sonar station lock water sampler water sensor etc There are 3 Q Interface Type A in submersible s back stern starboard and stern port side Chapter 7 Ad...

Page 55: ...e B 52 There are 3 Q Interface Type B which have been protect with bottom armor and 2D Image Sonar Cabin bow side 7 2 1 Unfasten 4 nuts with M3 Allen wrench 7 2 2 Open the bottom armor NOTE The roboti...

Page 56: ...rmation Q Interface Type B 53 The 3rd Q Interface Type B is behind the Image Sonar Cabin 7 2 3 Unfasten 2 nuts with M2 5 Allen wrench 7 2 4 Unfasten 2 nuts with M2 5 Allen wrench 7 2 5 Open the Image...

Page 57: ...Chapter 7 Additional Information Q Interface Type B 54 Unlike the Q Interface Type A can be twisted open and close Type B need a lever to open or close...

Page 58: ...ed both A 2 and A3 at same time 360 Mechanical Sonar A 1 A2 or A3 Sidescan Sonar A 1 A2 or A3 Definition A is the Q Interface Type A B is the Q Interface Type B Example A 1 A2 or A3 means this accesso...

Page 59: ......

Reviews: