background image

Page 13

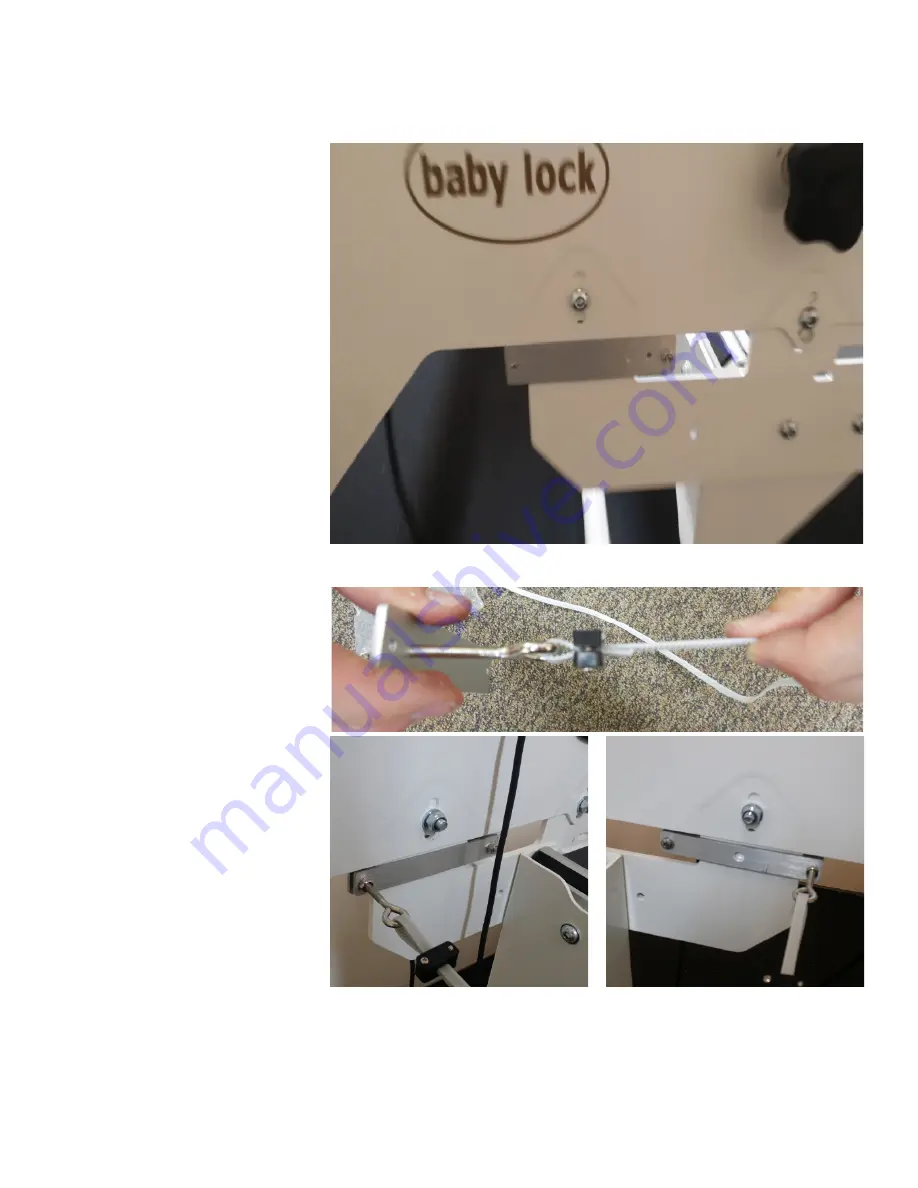
Install White Belt on Baby Lock Pearl Frame 

(Bag X1 and Bag X5)

Clamp the white belt 

brackets onto the each 

end of the frame using 

the provided long 

screws.

(Level the belt and 

brackets with the 

pulley on motor box.)

1

Attach the white belt to 

the eye-bolt using the 

belt clamps to install 

onto the belt bracket. 

Install the eye-bolt 

into one belt bracket,  

stretch white belt the 

length of the frame, 

belt teeth facing up. 

Attach the other end 

of the white belt to the 

remaining eye-bolt and 

install  into opposite 

belt bracket. (Use the 

belt clamp to eliminate 

excess belt length.)

2

Summary of Contents for King Quilter II

Page 1: ...on Instructions 1 Tablet Bracket Remove the two tablet bracket screws as pictured Align Butler tablet bracket as pictured and replace tablet bracket screws Butler tablet should appear as pictured Note...

Page 2: ...red The opposite end of the remote cable will connect to the Butler in the remote port 2 Handlebar Cable Connect the USB connector of the handlebar cable to the King Quilter II as pictured The opposit...

Page 3: ...How to Attach Butler Robotics to a Handi Quilter Baby lock with Studio Fusion Pearl or Momentum Frame Revision 6 23 16...

Page 4: ...tic Anchors 2 Screw M5 x 12mm 2 Washer M5 1 Stylus 5 Zip ties Y1 1 Black Belt 86 4 Plastic Belt Clamps 4 Screw 4 40 x 0 5 X1 1 White belt 12 4 Plastic belt clamps 4 Screw 4 40 x 0 5 In order to accomm...

Page 5: ...Pan head screw 10 24 x 1 2 1 Y belt bracket I8 1 Rear idler bracket 1 Tensioner bracket 2 Lock nut 1 4 20 2 Machine screw 1 4 20 x 1 1 Pulley assembly M8 1 Motor box bracket 2 Lock nut 1 4 20 2 Screw...

Page 6: ...eath the front of the carriage Line the holes on the bracket with the existing holes on the carriage Fasten in place with the provided 1 4 20 x 1 screws 2 Attach the front carriage bracket to black mo...

Page 7: ...Page 5 Line the idler bracket with the existing holes on the rear of the carriage and attach it using the provided 1 4 20 x 1 screws Attach the Rear Idler Bracket Bag I8 1 Idler Bracket...

Page 8: ...sing the provided winged screw and screw If the bracket is pres installed continue to step 2 Install Black Belt Bag Y1 and Bag Y13 1 Carriage bracket Y bracket Winged screw Screw Insert the winged scr...

Page 9: ...Page 7 Install black belt assembly to the underside of the front carriage wheels 2 Black Belt Assembly Black Belt Assembly...

Page 10: ...rriage See Appendix A for help with belt clamps 3 Black Belt Attach the other end of the belt to the Y bracket using another belt clamp 5 Loop the belt around the motor pulley with the teeth facing in...

Page 11: ...Bag X7 Remove the screws indicated to the right from the frame 1 2 Position the bracket onto the frame and use the screws removed in step one to secure it to the frame Offset the screws in the slots...

Page 12: ...h the pulley on the back of the motor box 4 Loop the white belt through the eye on the bolt and secure with a belt clamp Repeat for the opposite side See Appendix A for help with belt clamps Release t...

Page 13: ...and Bag X7 Attach the clamp brackets to the using the provided screws Make sure that they are inline with the pulley on the back of the motor box 1 Attach the eyebolt to the inner clamp with one of t...

Page 14: ...Page 12 Use a belt clamp to secure the belt to each of the eyebolts Release the belt lock lever and run the belt as shown with the teeth facing up Then reengage the lock lever 3...

Page 15: ...with the pulley on motor box 1 Attach the white belt to the eye bolt using the belt clamps to install onto the belt bracket Install the eye bolt into one belt bracket stretch white belt the length of...

Page 16: ...ag X5 Clamp the white belt brackets onto the each end of the frame using the provided long screws Level the belt and brackets with the pulley on motor box 1 Release the belt lock lever and run the bel...

Page 17: ...elt the length of the frame belt teeth facing up Attach the other end of the white belt to the remaining eye bolt and install onto opposite belt bracket Use the belt clamp to eliminate excess belt len...

Page 18: ...16 Install Display Bag D5 Remove the 3 screws holding the handle to the machine Then line up the display bracket with the three holes 1 Use the three M6 x 45mm bolts to attach the display to the machi...

Page 19: ...Page 17 Note For some display models the tab will need to sit in front of the HQ display 3 For standard displays use the provided screws to attach the display to the bracket 4...

Page 20: ...age 18 Connect Cables Attach one end of the network cable to the Remote port on the Motor box 1 Run the cable around the back of the machine up to the display 2 Image not representative of machine typ...

Page 21: ...nto the RJ45 network connection on the hub on the back of the tablet Standard displays will plug into the slot on the bottom of the display 3 Plug the phone style RJ12 side of the handlebar cable into...

Page 22: ...dle of the frame The white belt should have between 1 and 1 5 of play in the belt The black belt should have approximately 1 4 of play 1 Avante Remove the handlebar wires from the machine Plug the han...

Page 23: ...t The belt clamps may need to be readjusted 2 Adjust the tensioner bracket on the rear idler pulley to adjust the tension of the black belt Loosen the screw on the pulley adjust the tension then tight...

Page 24: ...machines may need to be set to Juki 1 Standard Display Android Tablet Power on the display go to Settings Machine and set the machine type to HQ Babylock Some older HQ machines may need to be set to J...

Page 25: ...Page 23 Using a Phillips screwdriver insert each screw on opposite sides of the clamps and tighten halfway 1 A belt clamp consists of two clamps and two screws Appendix A How to use Belt Clamps...

Page 26: ...Page 24 Thread the belt between the clamps loop it around and reinsert it between the clamps 3 Align the belt teeth then finish tightening the clamps 2...

Page 27: ...e free mo tion with the butler con nected the belts will need to be disengaged To disengage the x belt move the locking lever away from the edge of the motor box To disengage the y belt loosen the win...

Page 28: ...Still need help Visit support quiltez com for tutorial videos and additional help documentation...

Reviews: