


Page 38 of 69
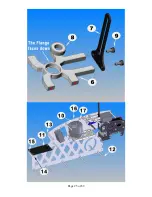
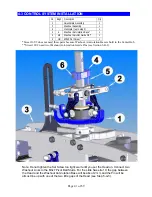
3-4 INSTALLATION OF THE TAIL
No. Bag# Description
Qty No. Bag# Description
Qty
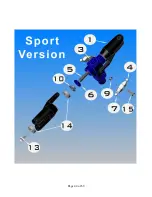
1 Tail Assembly
1
5
HB
M3x10 Cap Head Bolt
2
2 In
Box
Boom Support
2
6 HB
M3
Locknut
2
3
3
Boom Support End
4
7*****
CA Glue
1
4
HB
M3x8 Cap Head Bolt
2
•
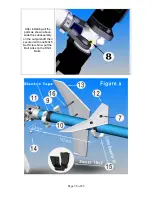
Note for installing the timing belt: Turn the Tail assembly so that the Tail Output
Shaft pointing upward put the belt onto the Transmission, then twist the Tail
Assembly 90
o
to the right. Make sure the belt not too tight or loose. Tighten four
locknuts.
•
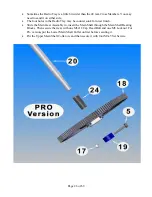
Measure the Boom Support carefully before cutting. It is a good idea if you
install one end of the rod first, then make the measure then cut it. Remember
apply CA Glue for the rods when installing into the Support Ends.
Summary of Contents for Little Sweetie 10 Pro
Page 1: ...Page 1 of 69...
Page 7: ...Page 7 of 69 REQUIRED TOOLS Dremel Tools and Sandpapers would be helpful for building...
Page 13: ...Page 13 of 69 ASSEMBLY SECTION 1 REAR FRAMES Bag 1...
Page 17: ...Page 17 of 69 SECTION 2 MAIN FRAMES Bag 2...
Page 25: ...Page 25 of 69...
Page 27: ...Page 27 of 69...
Page 28: ...Page 28 of 69...
Page 37: ...Page 37 of 69...
Page 42: ...SECTION 5 A ROTOR HEAD for Little Quickie 10 Bag 5 Page 42 of 69...
Page 44: ...Page 44 of 69...
Page 53: ...Page 53 of 69...
Page 54: ...Page 54 of 69...
Page 55: ...Page 55 of 69...