background image

45

Ita

lia

no

Deut

sch

Engl

ish

since 1945

2045

-

Handbuch für Fachtechniker 

und Service

-

PROFESSIONAL HOME COFFEE MACHINES

Summary of Contents for Luna 2045

Page 1: ...1 Italiano Deutsch English since 1945 2045 Manuale per Utente e Manutentore PROFESSIONAL HOME COFFEE MACHINES...

Page 2: ...glia di leggere attentamente questo manuale per avere le necessarie informazioni per un corretto utilizzo del prodotto Per eventuali altre domande rivolgetevi al vostro rivenditore di fiducia o alla n...

Page 3: ...to potrebbero causare danneggiamenti Non utilizzare la macchina se presenta danni al cavo alla spina a qualsiasi altra parte o non funziona correttamente Rispedire la macchina al Costruttore La macchi...

Page 4: ...eve essere utilizzata da persone compresi i bambini con ridotte capacit fisiche sensoriali o mentali o mancanza di esperienza e conoscenza a meno che non siano state sottoposte a supervisione o istruz...

Page 5: ...e elettrica sono interni alla pannellatura della macchina Istruzioni specifiche per il personale di manutenzione In caso di stoccaggio prolungato a temperature inferiori ai 2 C il circuito idraulico d...

Page 6: ...he 12 3 ACCESSORI 14 4 TRASPORTO 15 Imballo 15 Rimozione dell imballaggio 15 5 INSTALLAZIONE 16 6 FUNZIONAMENTO 17 Messa in funzione 17 7 COMANDI MANUALI 18 Erogazione caff 18 Erogazione acqua e vapor...

Page 7: ...1 Erogazione del caff 31 Regolazione valvola espansione pressione pompa 32 Erogazione vapore 33 Erogazione acqua calda 34 10 PULIZIA DELLA MACCHINA 35 Pulizia giornaliera 35 Periodica o dopo l uso int...

Page 8: ...eventuali danni in caso di Impieghi non conformi agli scopi previsti Alterazione del cavo di alimentazione x Alterazione di qualsiasi parte componente la macchina Utilizzo di componenti o accessori no...

Page 9: ...alificato l impianto di alimentazione elettrica che deve rispondere ai requisiti disposti dalle normative di sicurezza vigenti fra i quali 1 Efficace messa a terra 2 Sezione dei conduttori sufficiente...

Page 10: ...a o per applicazioni simili quali 1 In negozi uffici ed altri ambienti di lavoro 2 Agriturismi 3 Strutture ricettive come Hotel ed ambienti residenziali 4 Bed Breakfast Ogni altro uso da considerarsi...

Page 11: ...un addolcitore se l acqua locale ad alto contenuto minerale Un accumulo di minerali pu ostruire i sistemi idraulici e causare danni alla macchina nonch all operatore che la utilizza Vibrazioni La macc...

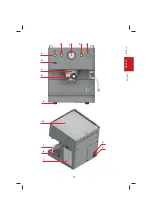
Page 12: ...ento dell acqua e del vapore e lo scambiatore per il caff Di seguito vengono descritte le parti che compongono la macchina Legenda a Piedini di appoggio b Porta filtro c Gruppo erogazione caff d Displ...

Page 13: ...13 Italiano Deutsch English a d e f g h i j k l m n o b c...

Page 14: ...14 Italiano Deutsch English 3 ACCESSORI Legenda a Filtro due dosi b Filtro una dose c Portafiltro doppio d Spazzolino di pulizia e Pressino in legno...

Page 15: ...i e sfilare la macchina dall involucro x Conservare l imballo per eventuali futuri trasporti x Controllare l integrit della macchina degli accessori del cavo di alimentazione e della spina In caso di...

Page 16: ...rra dell apparecchio Il costruttore declina ogni responsabilit qualora questa norma antinfortunistica non venga rispettata Fare attenzione a non danneggiare il cavo di alimentazione con piegature schi...

Page 17: ...l uso della lancia vapore acqua prestare molta attenzione a non mettere le mani sotto e non toccarla subito dopo l uso Messa in funzione x Riempire la tanica d acqua x Per accendere la macchina azion...

Page 18: ...hanno le seguenti funzioni 1 Erogazione caff singolo e spostamento nel men durante le operazioni di settaggio macchina Durante l erogazione del caff solo il led interno di questo pulsante resta acces...

Page 19: ...a acceso 4 Erogazione vapore e spostamento in alto durante le operazioni di settaggio macchina Durante l erogazione del vapore solo il led interno di questo pulsante resta acceso Esclusione acqua e va...

Page 20: ...are la temperatura del caff 0 08 87 7 Videata erogazione caff Premendo il pulsante di erogazione caff singolo 1 o doppio 2 sul display appaiono i secondi relativi alla durata dell erogazione 4 4 7 Due...

Page 21: ...ulsante di erogazione caff doppio 1 possibile accedere al men La prima videata la seguente C C F F Premendo ripetutamente il pulsante di erogazione caff singolo 2 si accede ai successivi parametri Dop...

Page 22: ...remendo il pulsante di erogazione caff doppio 1 possibile accedere alla videata dedicata all unit di misura della temperatura del caff C CEL oppure F FAh Scegliere i gradi Celsius o Fahrenheit attrave...

Page 23: ...e di erogazione caff singolo 1 e poi quello di erogazione caff doppio 2 possibile accedere alla videata di impostazione della temperatura del caff t t Impostare la temperatura attraverso le frecce 3 4...

Page 24: ...lsante di erogazione caff singolo 1 e poi quello di erogazione caff doppio 2 possibile accedere alla videata di impostazione dell offset o oFS Impostare l offset DWWUDYHUVR OH IUHFFH 3 4 e premere per...

Page 25: ...resso in secondi del caff singolo P Pr1 Premere il pulsante di erogazione caff doppio 2 per modificare i tempi di attivazione della pompa dell acqua da 0 a 9 secondi o on1 Aumentare o diminuire con le...

Page 26: ...ente videata P Pr1 Videata di configurazione impostazione tempo di preinfusione caff doppio Premendo il pulsante di erogazione caff singolo 1 e poi quello di erogazione caff doppio 2 possibile acceder...

Page 27: ...rogazione caff singolo 1 e poi quello di erogazione caff doppio 2 per modificare i tempi di riposo della pompa dell acqua da 0 a 9 secondi o oF2 Aumentare o diminuire con le IUHFFH 3 4 e premere per d...

Page 28: ...tandby S Stb Impostare il tempo dopo cui la macchina va in standby attraverso le IUHFFH 3 4 e premere per due secondi il pulsante di erogazione caff doppio 2 per confermare Le frecce consentono di imp...

Page 29: ...ndi il pulsante di erogazione acqua 1 si accede alla modalit programmazione dosi e tutti i pulsanti iniziano a lampeggiare d doS Premere l erogazione che si vuole programmare Inizia cos l erogazione c...

Page 30: ...na Tenendo premuto il pulsante di erogazione caff singolo 1 per 4 secondi la macchina si spegne e sul display appare la seguente videata o oFF sufficiente premere nuovamente il pulsante per 4 secondi...

Page 31: ...po di erogazione 2 ruotandolo in senso antiorario x Posizionare le tazze in corrispondenza dei fori di uscita posti sotto il portafiltro x Premere l interruttore di erogazione caff singolo 3 oppure ca...

Page 32: ...rocedere nel seguente modo x Inserire nel portafiltro il caff con grado di macinatura e quantit corretti x Agganciare il porta filtro e attivare l erogazione caff x Attendere che il manometro visualiz...

Page 33: ...lsante di erogazione vapore 1 il vapore uscendo scalda il liquido fino alla temperatura voluta Riprese il pulsante per arrestare l erogazione x Terminato di riscaldare la bevanda scaricare un po di va...

Page 34: ...to a raccogliere l acqua sotto la lancia vapore acqua 1 x Premere il pulsante di erogazione acqua calda 2 per iniziare il dosaggio x L erogazione terminer automaticamente una volta raggiunta la quanti...

Page 35: ...o e lavarlo con acqua pulita Questa operazione viene meglio se si usa anche una spazzola Almeno una volta a settimana anche se il caff esce normalmente deve essere pulita la guarnizione del gruppo usa...

Page 36: ...ia inserito 3 Controllare le condizioni della spina e del cavo di alimentazione se sono danneggiati farli sostituire da personale qualificato Non eroga caff 1 Mancanza acqua nel serbatoio ripristinare...

Page 37: ...e di lasciarla alla portata di minori o incapaci Definitiva Oltre alle operazioni della messa fuori servizio temporanea provvedere a Tagliare il cavo di alimentazione Imballare la macchina con cartone...

Page 38: ...ive ma anche alcune negative e rimanendo troppo tempo a contatto con il caff lo brucerebbe Il risultato sarebbe un caff dal sapore amaro e bruciato con una crema sottile e molto scura magari con una m...

Page 39: ...uratamente liberato da ogni residuo a mano ogni volta Il primo e il secondo passaggio possono essere invertiti quello che conta che entrambe le operazioni avvengano prima dell estrazione 3 LA MACINATU...

Page 40: ...esso rischia anche di rovinare le guarnizioni di gomma presenti all interno della macchina 6 LA PULIZIA DEI BECCUCCI Dopo aver pulito i bordi del portafiltro si passa ai beccucci le due estremit forat...

Page 41: ...acqua contenuta in essa 5 Prima di erogare il vapore immergere la lancia nel latte per un paio di centimetri e avendo cura di avvicinare lo spruzzatore alla parete della lattiera 6 Durante il riscald...

Page 42: ...il caff sono ben mescolati e la tazza mezza piena aumentare la velocit della mano avvicinando il beccuccio della lattiera alla tazza ed aumentando l angolo di dosaggio 3 Avvicinare la lattiera al bor...

Page 43: ...0 ml espresso x Bicchiere da 100 ml x 20 ml espresso x 80 ml latte caldo poca crema AMERICANO CAPPUCCINO x Tazza da 150 ml x 80 ml acqua calda x 40 ml espresso x Tazza da 150 ml x 40 ml espresso x 11...

Page 44: ...____________________________________________ _______________________________________________ _______________________________________________ _______________________________________________ ___________...

Page 45: ...45 Italiano Deutsch English since 1945 2045 Handbuch f r Fachtechniker und Service PROFESSIONAL HOME COFFEE MACHINES...

Page 46: ...sam zu lesen um alle n tigen Informationen zur korrekten Anwendung des Produktes zu erhalten F r eventuelle weitere Fragen wenden Sie sich bitte an Ihren Fachh ndler oder an unsere B ros Die Firma QUI...

Page 47: ...ker oder an einem sonstigen Teil oder bei Funktionsst rungen darf die Maschine nicht verwendet werden Senden Sie in diesem Fall die Maschine an den Hersteller Quick Mill zur ck Die in dieser Anweisung...

Page 48: ...t ausgef hrt werden Punkt 9 zum WELTWEITEN MARKT Die Maschine darf nicht von Menschen einschlie lich Kindern mit eingeschr nkten k rperlichen sensorischen oder geistigen F higkeiten oder mit mangelnde...

Page 49: ...t einem W rmeschutzger t ausgestattet das das Heizen im Schadensfall oder bei berhitzung unterbricht Alle mit Strom betriebenen Heizungsbauteile befinden sich innerhalb des Geh uses der Maschine Spezi...

Page 50: ...EISE 56 Merkmale 56 3 ZUBEH R 58 4 TRANSPORT 59 Verpackung 59 Auspacken 59 5 INSTALLATION 60 6 FUNKTIONSWEISE 61 Inbetriebnahme 61 7 MANUELLE BEDIENUNG 62 Kaffeeausgabe 62 Wasser und Dampfausgabe 63 W...

Page 51: ...ine 74 9 AUSGABEN 75 Kaffeeausgabe 75 Regulierung des Drosselventils Pumpendruck 76 Dampfausgabe 77 Hei wasserausgabe 78 10 REINIGUNG DER MASCHINE 79 T gliche Reinigung 79 Regelm ig oder nach intensiv...

Page 52: ...eine Haftung f r Sch den in folgenden F llen x Unsachgem er Gebrauch x nderung des Stromkabels x nderung beliebiger Ger tekomponenten x Verwendung von nicht originalen Komponenten oder Zubeh r x Repar...

Page 53: ...rsonal pr fen ob die Stromversorgungsanlage den Anforderungen der einschl gigen Sicherheitsbestimmungen entspricht darunter 1 Leistungsf hige Erdung 2 F r die Stromaufnahme ausreichende Leiterquerschn...

Page 54: ...e oder in Umgebungen wie 1 Gesch ften B ros und anderen Arbeitsr umen 2 L ndlichen Tourismusbetrieben 3 Beherbergungsbetrieben wie Hotels und Ferienwohnungen oder Garnis bestimmt Jede andere Verwendun...

Page 55: ...gem Wasser ist ein Enth rter zu benutzen Die Hydrauliksysteme k nnen durch Kalkansammlungen verstopft werden Dadurch k nnen Personen und Sachsch den verursacht werden Vibrationen Die Maschine ist mit...

Page 56: ...den sich der W rmetauscher zum Erhitzen von Wasser und Dampf und der W rmetauscher f r den Kaffee Die diversen Ger teteile werden im Folgenden beschrieben Legende a Aufstellf chen b Siebtr ger c Br hg...

Page 57: ...57 Italiano Deutsch English a d e f g h i j k l m n o b c...

Page 58: ...58 Italiano Deutsch English 3 ZUBEH R Legende a Siebeinsatz 2 Tassen b Siebeinsatz 1 Tasse c Siebtr ger mit 2 Ausl ufen d Reinigungsb rste e Holztamper...

Page 59: ...hmen Sie das Zubeh r und nehmen Sie das Ger t aus der Verpackung Bewahren Sie die Verpackung f r einen eventuellen zuk nftigen Transport auf berpr fen Sie die Unversehrtheit von Ger t Zubeh r Netzkabe...

Page 60: ...g ab wenn diese Sicherheitsvorschrift nicht beachtet wird Es ist darauf zu achten dass das Stromversorgungskabel nicht durch Biegen Quetschen oder sonstige Beanspruchung besch digt wird Ziehen Sie den...

Page 61: ...anze mit gro er Vorsicht greifen Sie mit den H nden niemals darunter und ber hren Sie die Dampf Wasserlanze nicht sofort nach der Verwendung Inbetriebnahme x F llen Sie den Wassertank x Zum Einschalte...

Page 62: ...Tasten f r die Kaffeeausgabe haben folgende Funktionen 1 Kaffeeausgabe f r eine Tasse und bergang im Men f r die Maschineneinstellung W hrend der Kaffeeausgabe leuchtet nur die interne LED dieser Tast...

Page 63: ...mpfausgabe und nach oben scrollen innerhalb der Displayanzeige w hrend der Ger teeinstellungen W hrend der Dampfausgabe leuchtet nur die interne LED dieser Taste Wasser und Dampf ausschlie en Wenn Sie...

Page 64: ...gt das Display die Kaffeetemperatur an 0 087 Anzeige der Kaffeeausgabe Bei Bet tigung der Taste f r die einzelne 1 oder die doppelte 2 Ausgabe zeigt das Display die Ausgabedauer in Sekunden an 4 4 7 Z...

Page 65: ...e Kaffeeausgabe 1 gedr ckt gehalten wird erh lt man Zugang zum Men Zuerst wird Folgendes angezeigt C C F F Bei wiederholtem Dr cken der Taste f r die einzelne Kaffeeausgabe 2 geht man auf die n chsten...

Page 66: ...te f r die doppelte Kaffeeausgabe 1 gedr ckt wird erscheint die Anzeige der Ma einheit f r die Kaffeetemperatur C CEL oder F FAh Mit den Pfeilen 3 Celsius oder Fahrenheit w hlen und die Taste f r die...

Page 67: ...e Kaffeeausgabe 1 und dann die Taste f r die doppelte Kaffeeausgabe 2 gedr ckt wird erscheint die Eingabeseite f r die Kaffeetemperatur t t Die Temperatur mit den Pfeilen 4 einstellen und die Taste f...

Page 68: ...ne Kaffeeausgabe 1 und dann die Taste f r die doppelte Kaffeeausgabe 2 gedr ckt wird erscheint die Seite f r die Offset Einstellung o oFS Offset mit den Pfeilen einstellen und die Taste f r die doppel...

Page 69: ...einzelnen Kaffee P Pr1 Die Taste f r die doppelte Kaffeeausgabe 2 dr cken um die Aktivierungszeit der Wasserpumpe zwischen 0 und 9 Sekunden zu ndern o on1 Die Zeit mit den Pfeilen verl ngern oder verk...

Page 70: ...lgenden Anzeige zur ckzukehren P Pr1 Konfigurationsseite f r die Eingabe der Vorinfusionszeit f r doppelten Kaffee Wenn zuerst die Taste f r die einzelne Kaffeeausgabe 1 und dann die Taste f r die dop...

Page 71: ...abe 1 und dann die Taste f r die doppelte Kaffeeausgabe 2 dr cken um die Stillstandzeit der Wasserpumpe zwischen 0 und 9 Sekunden zu ndern o oF2 Die Zeit mit den Pfeilen verl ngern oder verk rzen und...

Page 72: ...tb Die Zeit f r Standby der Maschine mit den Pfeilen 4 einstellen und die Taste f r die doppelte Kaffeeausgabe 2 zwei Sekunden lang dr cken um die Auswahl zu best tigen Mit den Pfeilen kann diese Funk...

Page 73: ...gabe 1 4 Sekunden lang gedr ckt wird geht man auf die Dosisprogrammierung ber und alle Tasten beginnen zu blinken d doS Auf die zu programmierende Ausgabe dr cken Es beginnt somit die dauernde Ausgabe...

Page 74: ...ie Taste f r die einzelne Kaffeeausgabe 1 4 Sekunden lang gedr ckt wird schaltet sich die Maschine aus und am Display erscheint die folgende Anzeige o oFF Zum Einschalten der Maschine und zum Starten...

Page 75: ...e ihn durch Drehen gegen den Uhrzeigersinn fest x Stellen Sie die Tassen entsprechend der Ausl ufe unter den Siebtr ger x Dr cken Sie die Taste f r die einzelne 3 oder die doppelte 4 Kaffeeausgabe Nac...

Page 76: ...rung wie folgt vorgehen x Korrekt gemahlenes Kaffeemehl in angemessener Menge in den Siebtr ger einf llen x Siebtr ger einspannen und Espressoabgabe starten x Abwarten bis die Maschine einen stabilen...

Page 77: ...e Dampfausgabe 1 Durch den austretenden Dampf wird die Fl ssigkeit auf die gew nschte Temperatur erw rmt Dr cken Sie die Taste erneut um die Ausgabe zu beenden x Sobald das Getr nk gen gend hei ist la...

Page 78: ...en Wasserbeh lter unter die Dampf Wasserlanze 1 x Dr cken Sie die Taste f r die Hei wasserausgabe 2 f r den Beginn der Dosierung x Die Ausgabe wird automatisch beendet wenn die eingestellte Menge erre...

Page 79: ...n Siebeinsatz reinigen und mit sauberem Wasser aussp len Hilfreich ist die Verwendung einer B rste Mindestens einmal pro Woche auch wenn der Kaffee ganz normal ausl uft muss die Dichtung der Gruppe mi...

Page 80: ...halter eingeschaltet ist 3 berpr fen Sie den Zustand des Steckers und des Netzkabels lassen Sie diese bei Besch digung durch qualifiziertes Personal austauschen Kaffee wird nicht ausgegeben 1 Zu wenig...

Page 81: ...F r immer Zus tzlich zu den Verfahren f r die vor bergehende Au erbetriebsetzung sind folgende Ma nahmen zu ergreifen Schneiden Sie das Netzkabel durch Verpacken Sie das Ger t mit Pappe oder anderen...

Page 82: ...fe aber auch einige negative mitgenommen Bei zu langem Kontakt mit dem Kaffee wird dieser verbrannt Dadurch erh lt der Kaffee einen bitteren verbrannten Geschmack und eine d nne sehr dunkle Creme even...

Page 83: ...iebene alte Kaffeereste entsteht Der Siebtr ger muss jedes Mal sorgf ltig von Hand gereinigt werden Punkt 1 und 2 k nnen in umgekehrter Reihenfolge ausgef hrt werden Wichtig ist dass beide Ma nahmen v...

Page 84: ...Fall auch das Risiko dass die Gummidichtungen in der Maschine besch digt werden 6 REINIGUNG DER AUSL UFE Nach der Reinigung des Siebtr gerrands m ssen auch die Ausl ufe gereinigt werden das sind die b...

Page 85: ...nswasser abzulassen 5 Tauchen Sie vor der Dampfausgabe die Dampflanze ein paar Zentimeter in die Milch ein und achten Sie darauf dass der Spr hkopf nahe an der Wand der Milchkanne ist 6 Beim Erhitzen...

Page 86: ...ut vermischt sind und die Tasse halb voll ist gie en Sie schneller ein bringen Sie dazu den Ausguss der Milchkanne n her zur Tasse und erh hen Sie den Einlaufwinkel 3 Bringen Sie die Milchkanne an den...

Page 87: ...er x 40 ml Espresso x 100 ml Glas x 20 ml Espresso x 80 ml hei e Milch wenig Schaum AMERIKANISCHER KAFFEE CAPPUCCINO x 150 ml Tasse x 80 ml Hei wasser x 40 ml Espresso x 150 ml Tasse x 40 ml Espresso...

Page 88: ..._______________________________________________ _______________________________________________ _______________________________________________ _______________________________________________ ________...

Page 89: ...89 Italiano Deutsch English since 1945 2045 User and Maintenance Manual PROFESSIONAL HOME COFFEE MACHINES...

Page 90: ...we suggest you carefully read this manual to obtain the necessary information for correctly using and servicing the product If you have any questions please contact your retailer or our offices QUICK...

Page 91: ...NFORMATION We do not recommend the use of accessory attachments such as adaptors multiboards or extension cords that are not recommended by the appliance manufacturer as they may cause injury Do not u...

Page 92: ...arried out by the user and not by children over eight without supervision Item 9 on WORLD MARKET The machine is not to be used by persons including children with reduced physical sensorial or mental c...

Page 93: ...ng All parts for heating and with electrical voltage are located inside the machine panelling Specific instructions for maintenance staff Access to maintenance areas is only permitted using the access...

Page 94: ...2 4 TRANSPORT 103 Packaging 103 Removal of packaging 103 5 INSTALLATION 104 6 FUNCTIONING 105 Putting into service 105 7 MANUAL COMMANDS 106 Coffee brewing 106 Water and steam supply 107 Excluding wat...

Page 95: ...valve adjustment pump pressure 120 Steam supply 121 Hot water supply 122 10 MACHINE CLEANING 123 Daily cleaning 123 Periodic or after intensive use of the machine 123 Possible drawbacks 124 11 DECOMM...

Page 96: ...r any damages in the event of x Uses not in accordance with the intended purposes x Alterations made to the power cable x Alterations made to any component part of the machine x Use of non original co...

Page 97: ...isions required by the current safety regulations including 1 Proper heating 2 Conductor section is suitable for the absorption capacity 3 Efficient circuit breaker device Position the machine on a hy...

Page 98: ...cations such as 1 Shops offices and other working environments 2 Farm houses 3 By customers in hotels motels and other residential type environments 4 Bed Breakfast The operator is to always follow th...

Page 99: ...al content use a water softener A build up of mineral deposit may restrict the flow of water within the hydraulic systems causing damage to the machine and risking personal injury Vibrations The machi...

Page 100: ...nger is located for heating water and steam and the exchanger for coffee The parts that make up the machine are described below Legend a Support feet b Filter holder c Coffee delivery group d Display...

Page 101: ...101 Italiano Deutsch English a d e f g h i j k l m n o b c...

Page 102: ...102 Italiano Deutsch English 3 ACCESSORIES Legend a Filter two doses b One dose filter c Double filter holder d Cleaning toothbrush e Wooden presser...

Page 103: ...packaging remove the accessories and remove the machine from the casing Keep packaging for future transport Check the integrity of the machine accessories power cord and plug In case of damage notify...

Page 104: ...ection to ground is obligatory The manufacturer shall not be held in any way liable if this accident prevention regulation is not observed Take care not to damage the power supply cable by bending cru...

Page 105: ...ter When using the steam lance water be very careful not to place the hands underneath and do not touch it immediately after use Putting into service x Fill the tank with water x To turn the machine o...

Page 106: ...uttons have the following functions 1 Single coffee dispensing and moving in the menu during machine setting operations During the coffee supply only the LED inside this button remains alight 2 Double...

Page 107: ...button remains alight 4 Steam supply and high displacement during machine setting operations During the steam supply only the LED inside this button remains alight Excluding water and steam Holding do...

Page 108: ...ay shows the temperature of the coffee 0 08 87 7 Coffee distribution display Pressing the single 1 or double 2 coffee delivery the seconds are shown on the display relating to the delivery time 4 4 7...

Page 109: ...offee delivery button 1 pressed the menu can be accessed The first display is the following C C F F Pressing repeatably the single coffee delivery button 2 gives access to the following parameters Aft...

Page 110: ...ering the menu and pressing the double coffee delivery button 1 the page can be accessed related to the coffee temperature measurement unit C CEL or F FAh Choose Celsius or Fahrenheit degrees through...

Page 111: ...ation page Press the single coffee delivery button 1 then that for double coffee 2 to access the page to set the coffee temperature t t Set the temperature with the arrows 3 4 and press the double cof...

Page 112: ...guration page Press the single coffee delivery button 1 then that for double coffee 2 to access the offset setting page o oFS Set the offset with the arrows 3 4 and press the double coffee delivery bu...

Page 113: ...y button 2 to modify the activation times of the water pump from 0 to 9 seconds o on1 Increase or decrease with the DUURZV 3 4 and press the double coffee delivery button 2 for two seconds to confirm...

Page 114: ...Double coffee pre brewing time setting configuration page Press the single coffee delivery button 1 then that for double coffee 2 to access the double coffee pre brewing time setting page in seconds P...

Page 115: ...s the single coffee delivery button 1 then that for double coffee 2 to modify the water pump standby times from 0 to 9 seconds o oF2 Increase or decrease with the arrows 3 4 and press the double coffe...

Page 116: ...Set the time after which the machine goes into standby with the arrows 3 4 and press the double coffee delivery button 2 for two seconds to confirm With the arrows the function can be set on 30 60 90...

Page 117: ...ess the water delivery button 1 for 4 seconds to access the doses programming page and all the buttons start to flash d doS Press the delivery to be programmed This starts the continuous delivery When...

Page 118: ...t down page Keeping the single coffee delivery button 1 pressed for 4 seconds the machine switches off and the following page is shown on the display o oFF Press the button again for 4 seconds to acce...

Page 119: ...ter holder in the dispensing group 2 by turning it counterclockwise x Place the cups at the exit holes under the filter holder x Press the single coffee dispense switch 3 or double coffee 4 After a fe...

Page 120: ...llowing x Fill the filter holder with the correct grade and quantity of ground coffee x Reattach the filter holder and start coffee delivery x Wait for the pressure gauge to display a stable pressure...

Page 121: ...etc and press the steam delivery button 1 the steam coming out heats the liquid up to the desired temperature Release the button to stop the delivery x Finish heating the beverage drain some steam to...

Page 122: ...he receptacle suitable for collecting water under the steam water lance 1 x Press the hot water supply button 2 to begin dosing x The dispensing will automatically end once the set quantity is reached...

Page 123: ...e it Clean the filter and wash it with clean water This is best if you also use a brush At least once a week even if the coffee comes out normally the gasket of the group must be cleaned using the app...

Page 124: ...er or the master switch is inserted 3 Check the condition of the plug and power cord if they are damaged to have them replaced by qualified personnel Does not deliver coffee 1 Lack of water in the tan...

Page 125: ...he reach of minors or incapacitated Definitive In addition to the operations of temporary release from service provide for Cut the power cord Pack the machine with cardboard or other and deliver it to...

Page 126: ...substances but also some negative ones and remaining too long in contact with the coffee would burn it The result would be a coffee with a bitter and burnt taste with a thin and very dark cream perhap...

Page 127: ...sted coffee The filter holder carefully freed from any residue by hand every time The first and second passage can be reversed what matters is that both operations take place before the extraction 3 G...

Page 128: ...cess dust also risks ruining the rubber seals inside the machine 6 CLEANING THE SPOUTS After cleaning the edges of the filter holder go to the spouts the two perforated ends from which the drink comes...

Page 129: ...possible condensation of water contained in it 5 Before releasing the steam immerse the lance in the milk for a couple of centimetres and taking care to approach the sprayer to the wall of the milk ju...

Page 130: ...milk and coffee are well mixed and the cup is half full increase the speed of the hand by bringing the milk jug close to the cup and increasing the dosage angle 3 Bring the milk to the edge of the cup...

Page 131: ...40 ml espresso x Glass of 100 ml x 20 ml espresso x 80 ml hot milk little cream AMERICANO CAPPUCCINO x Cup of 150 ml x 80 ml hot water x 40 ml espresso x Cup of 150 ml x 40 ml espresso x 11 ml cream...

Page 132: ...i Uniti D America 6 8 20030 Senago MI Ph 02 9986106 Fax 02 99010947 Reg delle Imprese di Milano MI 1999 193954 Cap Soc 52 000 00i v R E A Milano 1593567 C F P IVA 12859930153 N Mecc MI 300877 Http www...

Reviews: