background image


  Smart  LTE  Module  Series 

                                                                                                                                Smart  EVB  G2  User  Guide


Smart_EVB_G2_User_Guide                                                                                                                    9 / 59 


 Safety Information   

1.1.


The following safety precautions must be observed during all phases of operation, such as usage, service 

or  repair  of  any  cellular  terminal  or  mobile  incorporating  SC60  module.  Manufacturers  of  the  cellular 

terminal  should  send  the  following  safety  information  to  users  and  operating  personnel,  and  incorporate 

these  guidelines  into  all  manuals  supplied  with  the  product.  If  not  so,  Quectel  assumes  no  liability  for 

customer

s’ failure to comply with these precautions. 


Full attention must be given to driving at all times in order to reduce the risk of an 

accident.  Using  a  mobile  while  driving  (even  with  a  handsfree  kit)  causes 

distraction and can lead to an accident. You must comply with laws and regulations 

restricting the use of wireless devices while driving.


Switch off the cellular terminal or mobile before boarding an aircraft. Make sure it is 

switched off. The operation of wireless appliances in an aircraft is forbidden, so as 

to prevent interference with communication systems. Consult the airline staff about 

the  use  of  wireless  devices  on  boarding  the  aircraft,  if  your  device  offers  an 

Airplane Mode which must be enabled prior to boarding an aircraft. 


Switch  off  your  wireless  device  when  in  hospitals,  clinics  or  other  health  care 

facilities.  These  requests  are  designed  to  prevent  possible  interference  with 

sensitive medical equipment.   


Cellular  terminals  or  mobiles  operating  over  radio  frequency  signal  and  cellular 

network cannot be guaranteed to connect in all conditions, for example no mobile 

fee  or  with  an  invalid  (U)SIM  card.  While  you  are  in  this  condition  and  need 

emergent  help,  please  remember  using  emergency  call.  In  order  to  make  or 

receive a call, the cellular terminal or mobile must be switched on and in a service 

area with adequate cellular signal strength. 


Your cellular terminal or mobile contains a transmitter and receiver. When it is ON, 

it receives and transmits radio frequency energy. RF interference can occur if it is 

used close to TV set, radio, computer or other electric equipment. 


In locations with potentially explosive atmospheres, obey all posted signs to  turn 

off  wireless  devices  such  as  your  phone  or  other  cellular  terminals.  Areas  with 

potentially  explosive  atmospheres  include  fuelling  areas,  below  decks  on  boats, 

fuel  or  chemical  transfer  or  storage  facilities,  areas  where  the  air  contains 

chemicals or particles such as grain, dust or metal powders, etc.   


Summary of Contents for Smart EVB G2

Page 1: ...Smart EVB G2 User Guide Smart LTE Module Series Rev Smart_EVB_G2_User_Guide_V1 1 Date 2018 06 05 Status Released www quectel com ...

Page 2: ...N PROVIDED IS BASED UPON CUSTOMERS REQUIREMENTS QUECTEL MAKES EVERY EFFORT TO ENSURE THE QUALITY OF THE INFORMATION IT MAKES AVAILABLE QUECTEL DOES NOT MAKE ANY WARRANTY AS TO THE INFORMATION CONTAINED HEREIN AND DOES NOT ACCEPT ANY LIABILITY FOR ANY INJURY LOSS OR DAMAGE OF ANY KIND INCURRED BY USE OF OR RELIANCE UPON THE INFORMATION ALL INFORMATION SUPPLIED HEREIN IS SUBJECT TO CHANGE WITHOUT PR...

Page 3: ...e description of U SIM Interfaces in Table 1 2 Updated the description of camera interface 3 Added the reserved MIPI SPI I2S Interface 4 Updated the size of the EVB into 26 5cm 19 0cm 5 Updated the description of USB interface added a Micro USB interface and USB switch S0601 6 Updated power supply design and the description of battery interface in Chapter 4 1 7 Updated screen prints for some compo...

Page 4: ...Interface 21 4 1 2 Battery Interface 22 4 1 3 Switches for Power Supply 23 Smart TE A Interface 24 4 2 LCM Interfaces 30 4 3 4 3 1 Main LCM Interface 30 4 3 2 Secondary LCM Interface 31 4 3 3 Backlight Driver for Secondary LCM Interface 32 Touch Panel Interfaces 33 4 4 Camera Interfaces 34 4 5 USB Interfaces 36 4 6 Audio Interfaces 38 4 7 4 7 1 Loudspeaker Interface 38 4 7 2 Headset Interface 38 4...

Page 5: ... Operation Procedures Illustration 52 Power ON Smart Modules 52 5 1 Communication Via USB or UART Interface 53 5 2 5 2 1 Communication via USB Interface 53 5 2 2 Communication via UART Interface 54 Firmware Upgrade 55 5 3 Power OFF Smart Modules 56 5 4 6 Appendix A References 58 ...

Page 6: ... 5 DESCRIPTION OF POWER SUPPLY SWITCHES 24 TABLE 6 PIN DEFINITION OF B2B CONNECTORS 25 TABLE 7 PIN DEFINITION OF TOUCH PANEL INTERFACES 34 TABLE 8 PIN DEFINITION OF HEADSET INTERFACE 40 TABLE 9 PIN DEFINITION OF U SIM1 CARD CONNECTOR 43 TABLE 10 PIN DEFINITION OF MAIN UART PORT 44 TABLE 11 DESCRIPTION OF BUTTONS 50 TABLE 12 DESCRIPTION OF STATUS INDICATION LEDS 51 TABLE 13 RELATED DOCUMENTS 58 TAB...

Page 7: ...IGHT DRIVER 32 FIGURE 20 REFERENCE DESIGN FOR TOUCH PANEL INTERFACES 33 FIGURE 21 PIN ASSIGNMENTS OF TOUCH PANEL INTERFACES 33 FIGURE 22 REFERENCE DESIGN FOR CAMERA INTERFACES 35 FIGURE 23 CAMERA INTERFACES WITH CAMERAS ASSEMBLED 36 FIGURE 24 REFERENCE DESIGN FOR USB INTERFACES 37 FIGURE 25 USB INTERFACES AND S0601 SWITCH 37 FIGURE 26 REFERENCE DESIGN FOR LOUDSPEAKER INTERFACE 38 FIGURE 27 REFEREN...

Page 8: ...H 48 FIGURE 44 REFERENCE DESIGN FOR VIBRATOR 49 FIGURE 45 ERM TYPE VIBRATOR 49 FIGURE 46 BUTTONS 50 FIGURE 47 STATUS INDICATION LEDS 51 FIGURE 48 LCD DISPLAY INDICATING MODULE S POWER ON 52 FIGURE 49 USB COM PORTS 53 FIGURE 50 ADB SHELL COMMAND 54 FIGURE 51 USB SERIAL PORT 54 FIGURE 52 QCOM CONFIGURATION WHEN CONNECTING USB SERIAL PORT 55 FIGURE 53 FIRMWARE UPGRADE STEPS 56 ...

Page 9: ... G2 User Guide Smart_EVB_G2_User_Guide 8 59 1 Introduction This document describes the evaluation board Smart EVB G2 for Quectel Smart module SC60 The smart evaluation board is an assistant tool to develop and test Quectel SC60 modules ...

Page 10: ...boarding the aircraft if your device offers an Airplane Mode which must be enabled prior to boarding an aircraft Switch off your wireless device when in hospitals clinics or other health care facilities These requests are designed to prevent possible interference with sensitive medical equipment Cellular terminals or mobiles operating over radio frequency signal and cellular network cannot be guar...

Page 11: ... Panel Interfaces Two capacitive touch panels Camera Interfaces Support two cameras Rear camera supports 16M pixels with 4 lane CSI interface Front camera supports 8M pixels with 2 lane CSI interface USB Interface USB type C interface Compliant with USB 3 0 and 2 0 specifications with transmission rates up to 5Gbps on USB 3 0 and 480Mbps on USB 2 0 Support USB OTG Used for AT command communication...

Page 12: ...h hot plug detection MIPI SPI I2S Interface Reserved Flashlights Support 2 flashlight LEDs for testing the module s flashlight interfaces Sensors Support three sensors including ALS PS accelerometer gyroscope and compass Vibrator A vibrator for testing the motor drive interface of the module Switches and Buttons 4 switches including two power supply switches one emergency download switch and one U...

Page 13: ...Interface Overview Top J0401 Vibrator S0201 J0402 J0902 J1202 BAT0201 J0101 J0102 Speaker Earphone S0601 J0601 S0502 S0503 S0505 S0504 J1302 MICs LEDs J1301 Main LCM Sub LCM J0201 S0202 J0202 J0602 Sensors S0501 MEM ECM Level Shifter RS 232 Transceivers J1101 J1001 D0302 J0803 J1002 J0804 D0301 J0801 J0802 U0301 U0302 U0304 ...

Page 14: ... Description VBAT J0201 The power jack on the EVB Typical power supply 5 0V J0202 Li polymer battery connector Power Supply Switches S0201 Used to select DC power supply or battery power supply S0202 Used to power on off the module PWRKEY S0502 Power key push button Used to turn on off the module RESET S0503 Reserved USB_BOOT S0501 Emergency download switch EARPHONE SPEAKER BATTERY PACK ...

Page 15: ... SIM2 card connector UART J1301 Main UART port J1302 Debug UART port SD J1101 SD card connector LEDs D0501 D0502 D0503 D0501 indicates the power supply of the module D0502 indicates the charge status of the module D0503 indicates the operation status of the module TE A J0101 J0102 Connectors for connecting Smart TE A and Smart EVB G2 Cameras J0401 Rear camera connector support 16M CMOS sensor J040...

Page 16: ...tom Views of Smart EVB G2 2 3 Figure 3 Smart EVB G2 Top View J0802 ZIF connector for secondary touch panel Sensors U0301 Accelerometer and gyroscope sensor U0302 Compass sensor U0304 Ambient light sensor and proximity sensor Coin Cell BAT0201 Coin cell battery for RTC power supply MIPI SPI I2S J0902 Reserved NOTE ...

Page 17: ...EVB G2 User Guide Smart_EVB_G2_User_Guide 16 59 Figure 4 Smart EVB G2 Bottom View Smart EVB G2 Kit Accessories 2 4 All accessories of the Smart EVB G2 kit are listed as below Please contact the supplier if there is something missing ...

Page 18: ... Wi Fi BT antenna Main antennas USB Type C cable Bolts and coupling nuts GNSS antenna RF cables 5V DC adapter Figure 5 Smart EVB G2 Kit Accessories Table 3 Accessories List Items Description Quantity Cables USB to RS232 converter cable 1 USB Type C cable 1 RF cables 4 Antennas Main antennas 2 Wi Fi BT antenna 1 GNSS antenna passive 1 Audio Earphone 1 ...

Page 19: ...Guide 18 59 The main antenna can also be used for diversity reception USB Flash Drive Including USB 2 0 to RS232 driver USB driver etc 1 Battery Li polymer battery 1 Adapter 5 0V DC power supply 1 Others Bolts and coupling nuts for fixing Smart EVB G2 4 for each NOTE ...

Page 20: ...Smart LTE Module Series Smart EVB G2 User Guide Smart_EVB_G2_User_Guide 19 59 3 Smart EVB G2 Kit Accessories Assembly Figure 6 Smart EVB G2 Kit Accessories Assembly ...

Page 21: ... about flashlights sensors vibrator buttons status indication LEDs and test points to help customers use the Smart EVB G2 Power Supply Interfaces J0201 J0202 4 1 The Smart EVB G2 can be powered by an external 5 0V DC power adapter Connect the DC power adapter to the power jack J0201 and then the step down converter DC to DC converter which is used to regulate the 5 0V DC power supply voltage to 4 ...

Page 22: ... 4 2V Figure 7 Simplified Power Supply Block Diagram of Smart EVB G2 4 1 1 Adapter Interface The following figure shows the DC power jack of the Smart EVB G2 Figure 8 5V DC Power Jack Before connecting the power supply customers have to select a proper 5V DC power adapter to supply power for the Smart EVB G2 and the power plug design of the adapter is shown as below Inner contact Outer contact Fig...

Page 23: ...g figure shows the pin assignment of battery interface and the following table shows the pin definition of battery connector Figure 11 Pin Assignment of Battery Interface Table 4 Pin Definition of Battery Interface Pin No Pin Name Description 1 2 GND Ground pins Connected to the negative pole of the battery 3 THERM Used for battery temperature detection A 47K thermistor is used for the battery pro...

Page 24: ...or Power Supply The switches for power supply are shown in following figure S0201 is used to switch between DC power supply and battery power supply S0202 is used to switch on off the power supply Figure 13 Power Supply Switches 5 6 VBAT Power input pins Connect to the positive pole of the battery ON OFF DC POWER BATTERY ...

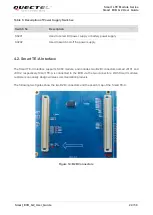
Page 25: ...and J0102 respectively Smart TE A is connected to the EVB via the two connectors With Smart modules customers can easily design wireless communication products The following two figures show the two B2B connectors and the sketch map of the Smart TE A Figure 14 B2B Connectors Switch No Description S0201 Used to select DC power supply or battery power supply S0202 Used to switch on off the power sup...

Page 26: ...n of B2B Connectors Pin No of J0101 Pin Name of J0101 Pin No of J0102 Pin Name of J0102 1 11 37 71 83 90 94 101 103 104 109 111 116 122 127 129 134 139 140 GND 1 USIM1_VDD 2 LCD_RST1 2 8 14 20 21 23 26 29 32 35 41 47 53 59 65 73 79 85 90 91 94 97 98 102 103 109 114 115 120 121 126 132 139 GND 3 UART1_CTS 3 USIM1_DET 4 GPIO5 4 DSI1_LN3_P 5 UART1_RXD 5 USIM1_RST 6 INT_CC 6 DSI1_LN3_N 7 UART1_RTS 7 U...

Page 27: ...RT2_RTS 16 DSI1_LN1_N 18 GPIO_1 17 USIM2_CLK 19 UART2_TXD 18 DSI1_LN1_P 20 GPIO2 19 USIM2_DATA 22 GPIO3 22 DSI1_LN0_N 24 GPIO4 24 DSI1_LN0_P 28 TP0101 25 NC 30 TP0102 27 NC 34 CC1 28 DSI1_CLK_N 36 CC2 30 DSI1_CLK_P 38 105 107 USB_VBUS 31 NC 40 56 SEL_SW 33 NC 45 SD_LDO12 34 TP_RST 49 LDO2_1V1 36 TP_INT 50 I2S_MCLK LCD_TE1 37 DSI0_LN3_P 52 TP2_CC_HDMI_I2C_SDA 38 TP_I2C_SCL TP2_C C_HDMI_I2C_SCL 53 C...

Page 28: ...PIO_8 50 CTP_EN 72 CAM_1V2_EN 51 DSI0_LN1_N 73 HAP_P 52 SPI_CLK_I2S_CLK 74 SENSOR_I2C_SCL 54 SPI_MISO_I2S_D1 75 HAP_N 55 DSI0_LN0_P 76 SENSOR_I2C_SDA 56 SPI_MOSI_I2S_D0 77 LCD_BL_A 57 DSI0_LN0_N 78 GYROSCOPIC_INT 58 SPI_CS_I2S_WS 79 LCD_BL_K1 60 GPIO1_EXT 80 FSYNC 61 DSI0_CLK_P 81 LCD_BL_K2 62 GPIO2_EXT 82 ALPS_INT 63 DSI0_CLK_N 84 GPIO_7 67 PWRKEY 85 LDO23_1V2 68 EN_AVDD_CAM 86 LCD_BL_K3 69 RESET...

Page 29: ...M_I2C_SDA 102 HS_DET 83 CSI1_LN0_N 106 SPK_P 84 CAM_I2C_SCL 108 SPK_N 86 MCAM_PWDN 112 EAR_P 87 CSI1_CLK_P 113 115 117 119 121 123 125 VBAT 88 MCAM_RST 114 EAR_N 89 CSI1_CLK_N 120 MIC_BIAS1 92 NC 124 MIC_GND 93 CSI0_LN3_P 126 MIC3_P 95 CSI0_LN3_N 131 BATT_MINUS 96 SCAM_MCLK 132 MIC2_P 99 CSI0_LN2_P 133 BATT_PLUS 100 MCAM_MCLK 135 VBAT_SNS 101 CSI0_LN2_N 136 MIC1_N 104 FLASH_LED1 137 BAT_THERM 105 ...

Page 30: ...D 110 GPIO_6 111 CSI0_LN0_P 112 USB_OTG_PWR_EN 113 CSI0_LN0_N 116 DM 117 CSI0_CLK_P 118 DP 119 CSI0_CLK_N 122 TX_M 123 SD_LDO11 124 TX_P 125 SD_CMD 127 SD_DET 128 RX_M 129 SD_CLK 130 RX_P 131 SD_DATA0 133 SD_DATA1 135 SD_DATA2 136 KEY_VOL_DOWN 137 SD_DATA3 138 KEY_VOL_UP 64 66 134 140 NC ...

Page 31: ... NC SCL TP NC RST TP NC EINT TP GND VCC28 GND MIPI_TDP3 MIPI_TDN3 GND MIPI_TDP2 MIPI_TDN2 GND MIPI_TDP1 MIPI_TDN1 GND LDO17_2V85 LDO6_1V8 LCD_BL_A LCD_BL_K1 1 2 3 4 5 6 7 8 9 10 12 13 14 15 16 17 18 19 20 21 22 23 24 25 26 27 MIPI_TDP0 MIPI_TDN0 GND MIPI_TCP MIPI_TCN 29 28 30 3 4 5 6 3 4 5 6 3 4 5 6 3 4 5 6 DSI0_LN1_N DSI0_LN1_P DSI0_LN0_N DSI0_LN0_P 1 2 3 4 5 6 11 1 2 1 2 1 2 1 2 100nF 4 7uF 1uF ...

Page 32: ...GND VCC28 GND MIPI_TDP3 MIPI_TDN3 GND MIPI_TDP2 MIPI_TDN2 GND MIPI_TDP1 MIPI_TDN1 GND LDO17_2V85 LDO6_1V8 LCM1_LED 1 2 3 4 5 6 7 8 9 10 12 13 14 15 16 17 18 19 20 21 22 23 24 25 26 27 MIPI_TDP0 MIPI_TDN0 GND MIPI_TCP MIPI_TCN 29 28 30 3 4 5 6 3 4 5 6 3 4 5 6 3 4 5 6 DSI1_LN1_N DSI1_LN1_P DSI1_LN0_N DSI1_LN0_P 1 2 3 4 5 6 11 1 2 1 2 1 2 1 2 100nF 4 7uF 1uF Module LCM FL1 FL2 FL3 FL4 FL5 EMI filter ...

Page 33: ... of LCM Interfaces 4 3 3 Backlight Driver for Secondary LCM Interface The Smart EVB G2 uses a PWM dimming step up LED driver for the WLED backlighting of secondary LCM interface The following figure shows a reference circuit design for the backlight driver Figure 19 Reference Design for Backlight Driver ...

Page 34: ...ndary LCM and EVB The following figure shows a reference design for touch panel interfaces TP_ RST TP_I2C_ SCL TP_I2C_ SDA TP_ INT 1 2 3 4 5 6 2 2K 2 2K LDO 6_1V8 4 7uF100nF Module TP_RST TP_SCL TP_SDA TP_INT GND VDD TP R2 R1 C1 C2 D1 D2 D3 D4 D5 LDO10_2V8 Figure 20 Reference Design for Touch Panel Interfaces The following figure shows the pin assignments of touch panel interfaces and the followin...

Page 35: ... a 16M pixels digital CMOS sensor with auto focusing function The front camera uses an 8M pixels CMOS sensor with auto focusing function The following figure shows a reference design for camera interfaces Pin No Pin Name Description Comment 1 TP_SDA I2C data signal of touch panel 2 TP_SCL I2C clock signal of touch panel 3 TP_RST Reset signal of touch panel Active low 4 TP_INT Interrupt signal of t...

Page 36: ...nt camera connector 4 7uF 1uF 1uF MCAM_RST EMI EMI EMI EMI EMI EMI EMI EMI EMI EMI LDO17_2P85 AVDD AF_VDD DVDD DOVDD 1uF CSI0_LN0_P CSI0_LN0_N CSI0_LN1_P CSI0_LN1_N CSI0_LN2_P CSI0_LN2_N CSI0_LN3_P CSI0_LN3_N CSI2_LN0_P CSI2_LN0_N CSI2_LN1_P CSI2_LN1_N CSI2_LN2_P CSI2_LN2_N CSI2_LN3_P CSI2_LN3_N LDO23_1P2 DVDD 1uF 4 7uF 4 7uF AVDD DOVDD Figure 22 Reference Design for Camera Interfaces The followin...

Page 37: ...er speed 5Gbps on USB 3 0 high speed 480 Mbps on USB 2 0 and full speed 12 Mbps modes The Micro USB interface complies with the USB 2 0 specifications and supports high speed 480 Mbps on USB 2 0 and full speed 12 Mbps modes Both USB interfaces support USB OTG function and are used for AT command communication data transmission software debugging and firmware upgrade Switch S0601 is used to switch ...

Page 38: ...USB Type C C6 C7 C8 C9 C10 C11 C12 13 VDD SEL USB_SS_TX_P USB_SS_TX_M USB_SS_RX_P USB_SS_RX_M SLE_SW VCC S D D GND R2 V1 V2 HSD2 HSD2 HSD1 HSD1 USB_DM USB DP V_BUS V_BUS V_BUS USB_DP USB_DM Micro USB SGM7227 P13DBS Module Figure 24 Reference Design for USB Interfaces The following figure shows the USB interfaces and S0601 switch Figure 25 USB Interfaces and S0601 Switch TYPE C MICRO USB S0601 ...

Page 39: ...is used for headset interface One single ended and one differential microphone inputs are used for microphone interfaces 4 7 1 Loudspeaker Interface Smart EVB G2 provides one loudspeaker interface and the loudspeaker is soldered onto the Smart EVB G2 via test point J1203 The following figure shows a reference circuit design for loudspeaker interface SPK_P SPK_N 1 0nF Close to speaker ESD ESD FB FB...

Page 40: ...REF 33pF Module R1 0R 6 3 4 5 2 1 33pF 33pF C3 C4 C5 F3 F2 F1 D1 D2 D3 D4 F4 R2 R3 0R Figure 27 Reference Design for Headset Interface The following figure shows the pin assignment of headset interface Figure 28 Pin Assignment of Headset Interface The following table shows the pin definition of headset interface 6 5 4 3 2 1 ...

Page 41: ...rphone Interface Smart EVB G2 provides one earphone interface and the earphone is soldered onto the Smart EVB G2 via test point J1204 The following figure shows a reference circuit design for earphone interface ESD ESD 100pF EAR_P EAR_N FB Smart EVB G2 Earphone 33pF 33pF J1204 Figure 30 Reference Design for Earphone Interface Pin No Pin Name Function 1 MIC Positive microphone input 2 GND Dedicated...

Page 42: ...nputs for microphone interfaces The single ended microphone input is for MEMS Type microphone and the differential microphone input is for ECM Type microphone The following figures show a reference circuit design for microphone interfaces and the two microphones Figure 31 Reference Design for Microphone Interfaces Figure 32 MEMS Type and ECM Type Microphones MEMS Type ECM Type ...

Page 43: ...1 USIM_VDD USIM_RST USIM_CLK USIM_ DATA USIM_DET 22R LD05_1P8 100K 100nF U SIM Card Connector ESD 22pF VCC RST CLK IO VPP GND USIM_VDD 10K Module R1 R2 C1 22pF 22pF C2 C3 C4 D1 22R 22R R3 R4 R5 GND GND C2 C1 C3 CD2 C5 C6 C7 CD1 Figure 33 Simplified Interface Schematic for U SIM Card Connector J1001 The following figure shows the pin assignment of U SIM1 card connector J1001 Figure 34 Pin Assignmen...

Page 44: ...T interface can be used for data transmission and AT command communication And the debug UART interface is used for debugging The following figure shows the block diagram of UART on Smart EVB G2 No Pin Name I O Function C1 USIM_VDD O U SIM1 card power supply C2 USIM_RST O U SIM1 card reset signal C3 USIM_CLK O U SIM1 card clock signal C5 GND Ground C6 VPP Not connected C7 USIM_DATA I O U SIM1 card...

Page 45: ... DOUT4 DOUT5 RIN3 RIN2 RIN1 VCC GND OE SN65C3238 RTS TXD CTS RXD GND UART_TXD UART_RTS UART_RXD UART_CTS DB 9 INVALID FORCEOFF TXD_1 8V RTS_1 8V RTS_3 3V Figure 35 RS232 Level Match Circuit The following figure shows the pin assignment of main UART port J1301 Figure 36 Pin Assignment of Main UART Port Table 10 Pin Definition of Main UART Port J1401 Pin Name I O Description 2 RS232_TXD O Transmit d...

Page 46: ...D card interface on Smart EVB G2 SD_CMD 120K NM_51K SD_DATA3 SD_DATA2 LDO5_1P8 SD_CLK SD_DATA0 SD_DET SD_DATA1 P1 DAT2 P2 CD DAT3 P3 CMD P4 VDD P5 CLK P8 DAT1 GND P6 VSS P7 DAT0 DETECTIVE GND GND GND 1 2 3 4 5 6 7 8 9 10 11 12 13 SD_LDO11 33R 33R 33R 33R 33R 33R 1K 33pF 4 7uF SD_LDO12 Module R1 R2 R3 R4 R5 R6 NM_51K NM_10K NM_51K NM_51K R7 R8 R9 R10 R11 R12 R13 D1 D2 D3 D4 D5 D6 D7 D8 C1 C2 SD Car...

Page 47: ...s 4 11 Smart EVB G2 provides two flashlight LEDs D0301 and D0302 for testing the module s flashlight interfaces which support flash mode and torch mode The following figures show a reference circuit design for flashlights and their locations on Smart EVB G2 Figure 39 Reference Circuit Design for Flashlight Interfaces 1 3 4 5 2 9 8 7 6 ...

Page 48: ...art EVB G2 User Guide Smart_EVB_G2_User_Guide 47 59 Figure 40 Flashlights Sensors 4 12 Smart EVB G2 provides three sensors for testing purpose as shown in the figure below Figure 41 Sensors D0301 D0302 Acce Gyros Compass ALS PS ...

Page 49: ...OOT to force the module enter into download mode Pull up USB_BOOT pin to 1 8V before powering on the module when the function is used The following figures show a reference circuit design for the emergency download interface and its switch LDO5_1P8 S1 Module USB_BOOT R1 10K Figure 42 Reference Design for Emergency Download Interface Figure 43 Emergency Download Switch ...

Page 50: ... modules The following figures show a reference circuit design and the vibrator on the board HAP_N 33pF Module VIB Motor VIB C2 33pF C1 HAP_P Figure 44 Reference Design for Vibrator Figure 45 ERM Type Vibrator Buttons 4 15 Smart EVB G2 provides four buttons S0502 S0503 S0505 and S0504 including RESET reserved PWRKEY VOL_UP and VOL_DOWN which are shown in the following figure ERM Type VIB VIB ...

Page 51: ...dication LEDs 4 16 There are several status indication lights D0501 D0502 and D0503 for signal indication on Smart EVB G2 shown as below Reference No Items Description S0502 PWRKEY Power key push button Used to turn on off the module S0503 RESET Reserved S0505 VOL_UP Used to turn the volume up S0504 VOL_DOWN Used to turn the volume down ...

Page 52: ...LEDs means under development Reference No Items Description D0501 POWER Indicate the power supply status of Smart modules Bright VBAT ON Extinct VBAT OFF D0502 STATUS Indicate the operation status of Smart modules D0503 CHARGE Indicate the charge status of Smart modules Bright module is charging Extinct module charge is stopped NOTE CHARGE STATUS POWER ...

Page 53: ...Smart TE A to the connectors J0101 and J0102 on Smart EVB G2 2 If battery power supply mode is selected install a Li polymer battery on J0202 and then switch S0201 to BATTERY state If 5 0V DC power supply mode is selected switch S0201 to DC POWER state 3 Switch S0202 to ON state and then D0501 will be lighted 4 Press D0501 PWRKEY for at least 2s to turn on the module When the following interface i...

Page 54: ...g to the procedures mentioned in Chapter 5 1 2 Connect Smart EVB G2 and the PC with USB cable through USB interface and then run the USB flash drive on PC to install the USB driver and ADB driver The USB port numbers can be viewed through the PC s Device Manager shown as below Figure 49 USB COM Ports 3 Open CMD tool START All Programs Accessory Command Prompt 4 Use the adb shell command to make th...

Page 55: ...ferent among different modules 5 2 2 Communication via UART Interface 1 Run the driver disk on PC to install the USB to RS232 driver 2 Connect the UART interface main UART or debug UART to the PC with USB to RS232 converter cable and then power on the module according to the procedures mentioned in Chapter 5 1 After that the USB serial port number can be viewed through the PC Device Manager shown ...

Page 56: ...ng USB Serial Port Firmware Upgrade 5 3 Quectel Smart modules upgrade firmware via USB port by default Please follow the procedures below to upgrade firmware 1 Install and open the firmware upgrade tool QFIL on PC and then power on the smart module according to the procedures mentioned in Chapter 5 1 2 Click the SelectPort and select the USB port Qualcomm HS USB Diagnostics Modem 9091 COM24 3 Sele...

Page 57: ...Upgrade Steps Power OFF Smart Modules 5 4 There are two methods to power off the module The steps for the first method are as follows 1 Press D0501 PWRKEY for at least 1s under the power on state of the module and then LCD will display a menu for selection shown as the following figure 1 2 5 4 3 6 ...

Page 58: ...e Smart_EVB_G2_User_Guide 57 59 Figure 54 LCD Menu Display for Powering off Module 2 Choose Power off option 3 The module will be powered off normally The other method is to press down PWRKEY for at least 8s until the module is shut down completely ...

Page 59: ...uectel_SC60_R1 1 R2 1_Hardware_Design SC60 R1 1 R2 1 hardware design 4 Quectel_SC60_R1 1 R2 1_Reference_Design SC60 R1 1 R2 1 reference design 5 Quectel_QCOM_User_Guide User guide for QCOM tool Abbreviation Description ALS Ambient Light Sensor CMOS Complementary Metal Oxide Semiconductor ECM Electret Microphone Smart EVB G2 Smart Evaluation Board 2nd Generation LCM LCD Module LED Light Emitting Di...

Page 60: ...t EVB G2 User Guide Smart_EVB_G2_User_Guide 59 59 PWM Pulse Width Modulation UART Universal Asynchronous Receiver Transmitter USB Universal Serial Bus U SIM Universal Subscriber Identity Module WLED White LED ZIF Zero Insert Force ...

Reviews: