background image

Chapter 4  Power Supply

Removing a Power Supply

2U Rackmount Component Replacement Guide

33

6

Disconnect the tape drive power cable assembly from the rear panel 

of all tape drives installed in the 2U Rackmount as follows:

a

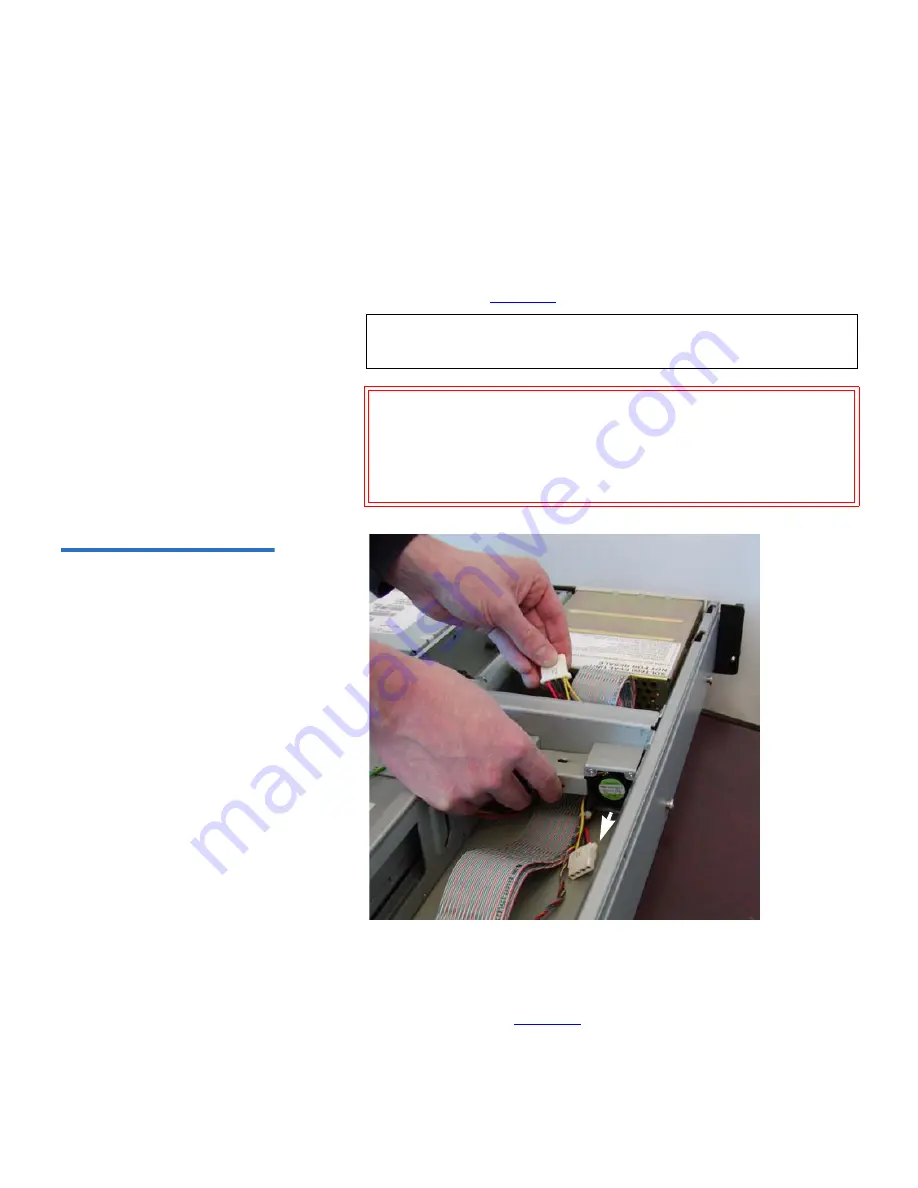
Gently lift the fan module upward just a little.

b

While holding the fan module up, pull the tape drive power cable 

assembly through a slot in the fan mounting wall and under the 

fan module (see 

figure 25

).    

Figure 25  Tape Drive Power 
Cable Assembly under Fan 
Module

c

Allow the fan module to return to its original position. 

d

Pull the tape drive power cable assembly through the opening in 

the power supply compartment wall (the opening is near the fan 

mounting wall (see 

figure 26

).

Note:

Be sure to align the power cable connector so that it 

passes through the slot easily.

Caution:

The fan mounting flange is sharp. To avoid 

personal injury or damaging the power cable 

assembly or connector, apply only light pressure 

when pulling the cable through the fan mounting 

wall.

Summary of Contents for DLT-S4

Page 1: ... 8 5DFNPRXQW 8 5DFNPRXQW RPSRQHQW 5HSODFHPHQW XLGH RPSRQHQW 5HSODFHPHQW XLGH RPSRQHQW 5HSODFHPHQW XLGH ...

Page 2: ... Quantum Corporation All rights reserved Your right to copy this manual is limited by copyright law Making copies or adaptations without prior written authorization of Quantum Corporation is prohibited by law and constitutes a punishable violation of the law TRADEMARK STATEMENT Quantum the Quantum logo DLT DLTtape and the DLTtape logo are registered trademarks of Quantum Corporation in the U S A a...

Page 3: ...r 2 Connecting Power 3 Sliding the 2U Rackmount Into and Out Of the Equipment Rack 4 Sliding the 2U Rackmount Out of the Equipment Rack 4 Sliding the 2U Rackmount Into the Equipment Rack 4 Removing and Replacing the 2U Rackmount Cover 5 Removing the Cover 5 Replacing the Cover 5 Chapter 2 Tape Drive 6 Removing a Tape Drive 7 Installing a Tape Drive 10 ...

Page 4: ...y 32 Installing a Power Supply 37 Chapter 5 Front Bezel 39 Removing the Front Bezel 40 Installing the Front Bezel 42 Chapter 6 PCBA 43 Removing the PCBA 44 Installing a PCBA 46 Chapter 7 SCSI Cable Assembly 47 Removing a SCSI Cable Assembly 48 Installing a SCSI Cable Assembly 52 Chapter 8 Rear Panel CAT 6 Cable Connector Plate 55 Removing a CAT 6 Cable Connector Plate 56 Installing a CAT 6 Cable C...

Page 5: ...62 Installing an Ethernet Cable 65 Chapter 10 LED Cable Assembly 67 Removing the LED Cable Assembly 68 Installing an LED Cable Assembly 71 Appendix A SCSI ID and Connections 72 Setting the SCSI ID 72 Making a Single SCSI Connection 73 Making SCSI Connections in a Daisy Chain 74 Appendix B Troubleshooting 76 ...

Page 6: ...8 Figure 6 Tape Drive Cables Top Picture Shows SCSI Tape Drives Bottom Picture Shows GigE Tape Drives SDLT 600A 9 Figure 7 General Thumbscrew Locations 11 Figure 8 Specific Thumbscrew Locations Types 12 Figure 9 DLT S4 Cable Connections 13 Figure 10 SDLT 600 Cable Connections 14 Figure 11 SDLT 600A Cable Connections 15 Figure 12 LTO 3 Cable Connections 16 Figure 13 SDLT 320 Cable Connections 17 Fi...

Page 7: ...ly under Fan Module 33 Figure 26 Tape Drive Power Cable Assembly to Power Supply Compartment 34 Figure 27 Power Supply Retaining Brackets and Ground Wire 35 Figure 28 Power Supply Connector in PCBA 36 Figure 29 Power Supply Above Unit 37 Figure 30 Bezel Location 40 Figure 31 Bezel Tabs Direction of Motion 41 Figure 32 PCBA and Fan Mounting Wall 44 Figure 33 PCBA with Cables Disconnected 45 Figure ...

Page 8: ...ide the 2U Rackmount 60 Figure 48 Ethernet Cable and Related Components 62 Figure 49 Thumbscrews Securing Tape Drive to Unit 63 Figure 50 Tape Drive Cable Connections 63 Figure 51 Fan Module Thumbscrew 64 Figure 52 Ethernet Cable in Ethernet Connector Assembly on Inside of 2U Rackmount 65 Figure 53 Ethernet Cable Through Fan Mounting Wall Fan Module Thumbscrew 66 Figure 54 LED Cable Assembly and P...

Page 9: ...eral Procedures describes general procedures you need to follow to replace any components in the 2U Rackmount Chapter 2 Tape Drive describes how to replace a tape drive Chapter 3 Fans describes how to determine which fan module has failed and how to replace a fan module Chapter 4 Power Supply describes how to replace the power supply Chapter 5 Front Bezel tells how the front bezel becomes damaged ...

Page 10: ...ice and as a daisy chain Appendix B Troubleshooting describes how to troubleshoot basic 2U Rackmount issues Notational Conventions This manual uses the following conventions This manual uses the following Right side Refers to the right side as you face the component being described Left side Refers to the left side as you face the component being described Note Notes emphasize important informatio...

Page 11: ... may be obtained from Global Engineering Documents 15 Inverness Way East Englewood CO 80112 800 854 7179 or 303 397 2740 Document No Document Title Document Description 81 81235 xx 2U Rackmount Quick Start Guide Describes how to set up a 2U Rackmount in an equipment rack and how to install tape drives into the 2U Rackmount 81 81209 xx 2U Rackmount Rail Installation Guide Describes how to install r...

Page 12: ...etting More Information or Help More information about this product is available on the Service and Support website at www quantum com support The Service and Support Website contains a collection of information including answers to frequently asked questions FAQs You can also access software firmware and drivers through this site For further assistance or if training is desired contact Quantum Qu...

Page 13: ...e 2U Rackmount you must know how to perform the following procedures that are part of all other procedures Disconnecting and Connecting Power Sliding the 2U Rackmount Into and Out Of the Equipment Rack Sliding the 2U Rackmount Into and Out Of the Equipment Rack This chapter describes how to perform these tasks ...

Page 14: ...ing the power button on the front panel for three seconds see figure 1 Figure 1 Power Button Location on Front Panel 2 Disconnect the 2U Rackmount power cable at the rear panel see figure 2 Warning Electric Shock Hazard Voltage or current sufficient to cause shock burn or death may be present To reduce exposure to electric shock follow these precautions Disconnect power from the 2U Rackmount befor...

Page 15: ... 2U Rackmount Follow these steps 1 Connect the 2U Rackmount power cable at the rear panel see figure 2 2 Turn on power to the 2U Rackmount by pressing and holding the power button on the front panel for one second see figure 1 The power LED unit fans and power supply fans turn on Note An illuminated fan failure LED the left LED on the front panel indicates a fan failure see figure 1 If you have a ...

Page 16: ...ckmount stops This is the service position Make sure that the lock in the slide engages When the 2U Rackmount stops sliding it should be far enough from the equipment rack to allow easy access to the 2U Rackmount rear panel Sliding the 2U Rackmount Into the Equipment Rack 1 An extended unit poses a safety hazard When you have completed service on the 2U Rackmount follow these steps to return it to...

Page 17: ...ete any service procedure you must replace the 2U Rackmount cover Removing the Cover 1 To remove the cover 1 Loosen the two captive thumbscrews that secure the top cover see figure 3 Figure 3 Thumbscrews that Secure the Unit Cover 2 Slide the cover forward then upward to remove it Set the cover aside for re use Replacing the Cover 1 To replace the cover 1 Slide the top cover into place 2 Tighten t...

Page 18: ...he 2U Rackmount or you may need to replace a tape drive in the unit This chapter describes how to perform the following tasks Removing a Tape Drive Installing a Tape Drive Figure 4 shows the tape drive locations in the 2U Rackmount It also shows the location of other 2U Rackmount components mentioned in the procedure ...

Page 19: ...ckmount 1 Turn off the host computer and all peripheral devices 2 Turn off and disconnect power to the 2U Rackmount see Disconnecting Power on page 2 3 Slide the 2U Rackmount out of the equipment rack and into the service position see Sliding the 2U Rackmount Out of the Equipment Rack on page 4 4 Remove the 2U Rackmount cover see Removing the Cover on page 5 Tape Drives Tape Drive Retaining Walls ...

Page 20: ...e 2U Rackmount 6 Pull the tape drive forward slightly and then lift the tape drive out of the 2U Rackmount Place the tape drive on the top of the 2U Rackmount 7 Disconnect the all the cables from the rear panel of the tape drive Figure 6 shows examples your tape drive may have these cables in slightly different locations See the following figures for specific cable locations for each drive type DL...

Page 21: ... Picture Shows GigE Tape Drives SDLT 600A 8 Remove the two thumbscrews from the side of the tape drive that was closest to the outside of the 2U Rackmount see figure 7 and figure 8 Set the two thumbscrews aside for re use when installing a replacement tape drive Note These two thumbscrews are used as standoffs They do not attach the drive to the chassis ...

Page 22: ...t Out of the Equipment Rack on page 4 4 Remove the 2U Rackmount cover see Removing the Cover on page 5 5 Install two thumbscrews into the side of the tape drive that will be located next to the outer wall of the 2U Rackmount see figure 7 and figure 8 Hand tighten the thumbscrews Caution To ensure proper tape drive operation make sure its SCSI ID is unique see Setting the SCSI ID on page 72 Note Ex...

Page 23: ...Chapter 2 Tape Drive Installing a Tape Drive 2U Rackmount Component Replacement Guide 11 Figure 7 General Thumbscrew Locations Extra thumbscrews ...

Page 24: ...U Rackmount unit Connect the tape drive power and interface cables to the tape drive rear panel Follow the specific instructions for making these connections for each drive type as illustrated in the following figures DLT S4 see figure 9 SDLT 600 see figure 10 SDLT 600A see figure 11 LTO 3 see figure 12 SDLT 320 see figure 13 LTO 3 M3 SDLT 320 6 32 SDLT 600 600A M3 DLT S4 M3 ...

Page 25: ...ape drive Place the TERMPWR jumper on the two left most SCSI ID pins Place the SCSI ID Enable jumper on the two pins just to the right of the TERMPWR jumper Attach the unlabeled 8 pin SCSI ID cable with six multi colored wires to the eight right most pins on the tape drive Ensure that the brown wire is connected to the upper right pin TERMPWR Jumper SCSI ID Enable Jumper Brown wire location ...

Page 26: ... 600 Remove all jumpers from the SCSI ID pins on the back of the tape drive Place a jumper on the two left most SCSI ID pins Attach the unlabeled 8 pin SCSI ID cable with six multi colored wires to the eight right most pins on the tape drive Ensure that the brown wire is connected to the upper right pin Jumper Brown wire location ...

Page 27: ...rive Installing a Tape Drive 2U Rackmount Component Replacement Guide 15 Figure 11 SDLT 600A Cable Connections SDLT 600A Connect the Ethernet cable into the Gigabit Ethernet GigE connector on the back of the tape drive ...

Page 28: ...nent Replacement Guide 16 Figure 12 LTO 3 Cable Connections LTO 3 Remove all jumpers from the SCSI ID pins on the back of the tape drive Connect the SCSI ID cable labeled LTO1 LTO2 L LTO3 so that the brown wire is connected to the upper left pin Brown wire location ...

Page 29: ... 320 Remove all jumpers from the SCSI ID pins on the back of the tape drive Place a jumper on the two left most SCSI ID pins Attach the unlabeled 8 pin SCSI ID cable with six multi colored wires to the eight right most pins on the tape drive Ensure that the brown wire is connected to the upper right pin Brown wire location Jumper ...

Page 30: ...uide 18 7 Lower the tape drive into the slot in the 2U Rackmount sliding the thumbscrews into the openings in the outer wall of the 2U Rackmount see figure 14 Slide the tape drive all the way into the 2U Rackmount until it stops Figure 14 Sliding the Tape Drive Into the 2U Rackmount ...

Page 31: ...ws Figure 15 Thumbscrews Securing Tape Drive to Unit 9 Replace the 2U Rackmount cover see Replacing the Cover on page 5 10 Slide the 2U Rackmount back into the equipment rack and secure it to the rack see Sliding the 2U Rackmount Into the Equipment Rack on page 4 11 Connect the 2U Rackmount power cable at the rear panel see Connecting Power on page 3 12 Turn on power to the 2U Rackmount by pressin...

Page 32: ...pter describes how to perform the folliwing tasks Determining Which Fans Have Failed Removing a Failed Fan Module Installing a Fan Module Figure 16 shows the fan module locations in the unit It also shows the location of other unit components mentioned in the procedure ...

Page 33: ...n the front panel turns on one or both of the fan modules in the 2U Rackmount has failed However the LED does not indicate which fan module has failed or if both fan modules have failed To determine which fan module has failed follow these steps 1 Turn off the host computer and all peripheral devices 2 Turn off and disconnect power to the 2U Rackmount see Disconnecting Power on page 2 Tape Drives ...

Page 34: ...l 6 Turn on power to the 2U Rackmount 7 Place your hand immediately behind each fan module If there is no air flow the fan module has failed and should be replaced Removing a Failed Fan Module To remove a fan module from the 2U Rackmount unit follow these steps 1 Turn off and disconnect power to the 2U Rackmount see Disconnecting Power on page 2 2 Slide the 2U Rackmount out of the equipment rack a...

Page 35: ...humbscrew aside for re use Figure 17 Fan Module Thumbscrew 5 Disconnect the tape drive power cable assembly from the rear panel of the tape drive that sits in front of the failed fan module Note If you have an SDLT 600A the SCSI cable shown in many of the following pictures will not be present Instead there will be an Ethernet cable Above SCSI drives Left Ethernet drives ...

Page 36: ...18 Figure 18 Tape Drive Power Cable Assembly under Fan Module c Allow the fan module to return to its original position d Pull the tape drive power cable assembly through the opening in the power supply compartment wall the opening is near the fan mounting wall see figure 19 Note Be sure to align the power cable connector so that it passes through the slot easily Caution The fan mounting flange is...

Page 37: ...r Supply Compartment e Lay the tape drive power cable assembly on top of the power supply 7 Disconnect the fan module cabling from the PCBA see figure 20 8 Pull the fan module cabling front to back through the fan mounting wall and through the power supply retaining wall see figure 20 Lay the cable in the open area behind the fan module ...

Page 38: ...apter 3 Fans Removing a Failed Fan Module 2U Rackmount Component Replacement Guide 26 Figure 20 Disconnecting the Fan Module Cabling from the PCBA 9 Lift the fan module vertically out of the 2U Rackmount ...

Page 39: ...ng through the power supply retaining wall and back to front through the fan mounting wall 3 Connect the fan module cabling to the connectors on the PCBA Tech Tip Before pushing the fan module cabling through the fan mounting wall bend the cable about 90 4 to 5 cm 1 5 to 2 inches above the fan module connectors and then align the connectors in the fan mounting wall opening Note There are six conne...

Page 40: ...sembly through the opening in the power supply compartment wall see figure 21 Figure 21 Tape Drive Power Cable Assembly from Power Supply Compartment b Gently lift the fan module upward just a little c While holding the fan module up pull the tape drive power cable assembly under the fan module and through the slot in the fan mounting wall see figure 22 Note Be sure to align the power cable connec...

Page 41: ...e 2U Rackmount Component Replacement Guide 29 Figure 22 Tape Drive Power Cable Assembly under Fan Module 5 Seat the fan module in the unit and then install the thumbscrew securing the fan module to the unit Figure 23 Fan Module Thumbscrew ...

Page 42: ...over on page 5 8 Slide the unit back into the equipment rack and secure it to the rack see Sliding the 2U Rackmount Into the Equipment Rack on page 4 9 Connect the unit power cable at the rear panel see Connecting Power on page 3 10 Turn on power to the unit by pressing and holding the power button on the front panel for one second 11 Turn on any peripheral devices you turned off earlier 12 Turn o...

Page 43: ... to perform these tasks Removing a Power Supply Installing a Power Supply Figure 24 shows the power supply location in the unit It also shows the location of other unit components mentioned in the procedure Warning Electric Shock Hazard Voltage or current sufficient to cause shock burn or death may be present on the power supply To reduce exposure to electric shock Disconnect power from the 2U Rac...

Page 44: ...wer to the 2U Rackmount see Disconnecting Power on page 2 3 Slide the 2U Rackmount out of the equipment rack and into the service position see Sliding the 2U Rackmount Out of the Equipment Rack on page 4 4 Remove the 2U Rackmount cover see Removing the Cover on page 5 5 Remove the thumbscrew securing the fan module to the unit Set the thumbscrew aside for re use Power supply Power Supply Compartme...

Page 45: ...nder the fan module see figure 25 Figure 25 Tape Drive Power Cable Assembly under Fan Module c Allow the fan module to return to its original position d Pull the tape drive power cable assembly through the opening in the power supply compartment wall the opening is near the fan mounting wall see figure 26 Note Be sure to align the power cable connector so that it passes through the slot easily Cau...

Page 46: ...r Supply Removing a Power Supply 2U Rackmount Component Replacement Guide 34 Figure 26 Tape Drive Power Cable Assembly to Power Supply Compartment e Lay the tape drive power cable assembly on top of the power supply ...

Page 47: ...om the two power supply retaining brackets and then remove the retaining brackets Lay the ground wire toward the rear of the unit see figure 27 Set the thumbscrews and retaining brackets aside for re use Figure 27 Power Supply Retaining Brackets and Ground Wire Ground wire Rear retaining bracket Front retaining bracket ...

Page 48: ...pply slightly forward and then lift it upward 10 Pull the PCBA power cable assembly through the fan mounting wall from the PCBA and then remove the power supply from the unit Caution Do not pull on the wires when removing the cable Note Be sure to align the power cable connector so that it passes through the slot easily Caution The fan mounting flange is sharp To avoid personal injury or damaging ...

Page 49: ...ower supply into its compartment and then push the power supply toward the rear of the unit until it clicks into place 3 Install the power supply retaining brackets securing each retaining bracket with a thumbscrew Be sure to attach the ground wire to the front retaining bracket see figure 27 4 Connect the PCBA power cable assembly to the PCBA 5 Thread the tape drive power cable assemblies under t...

Page 50: ...he 2U Rackmount back into the equipment rack and secure it to the rack see Sliding the 2U Rackmount Into the Equipment Rack on page 4 10 Connect the 2U Rackmount power cable at the rear panel see Connecting Power on page 3 11 Turn on power to the unit by pressing and holding the power button on the front panel for one second 12 Turn on any peripheral devices you turned off earlier 13 Turn on the h...

Page 51: ...on the power indicator LED and the fan failure LED This chapter describes how to replace the front bezel by performing the following tasks Removing the Front Bezel Installing the Front Bezel Figure 30 shows the bezel location Caution To avoid damaging the front bezel do not grasp the front bezel when moving the 2U Rackmount instead use the handles on either side of the unit to move it ...

Page 52: ...zel To remove the front bezel 1 Turn off and disconnect power to the 2U Rackmount see Disconnecting Power on page 2 2 Slide the 2U Rackmount out of the equipment rack and into the service position see Sliding the 2U Rackmount Out of the Equipment Rack on page 4 3 Remove the 2U Rackmount cover see Removing the Cover on page 5 Front Bezel ...

Page 53: ...m edges b With the other hand release the two top tabs that hold the bezel to the chassis by applying light pressure toward the center of the bezel see figure 31 Figure 31 Bezel Tabs Direction of Motion c While applying pressure to the tabs pull gently on the bezel top edge to move it away from the chassis 5 Release the bottom edge of the bezel by repeating step 4 for the bottom tabs and edge Beze...

Page 54: ...sh the bezel into the chassis until it clicks in place 3 Replace the 2U Rackmount cover see Replacing the Cover on page 5 4 Slide the 2U Rackmount back into the equipment rack and secure it to the rack see Sliding the 2U Rackmount Into the Equipment Rack on page 4 5 Connect the 2U Rackmount power cable at the rear panel see Connecting Power on page 3 6 Turn on power to the 2U Rackmount by pressing...

Page 55: ...board that resides in the compartment between the two tape drives This chapter describes how to perform the following tasks Removing the PCBA Installing a PCBA Figure 32 shows the location of the PCBA in the unit It also shows the location of other unit components mentioned in the procedure ...

Page 56: ...ckmount see Disconnecting Power on page 2 3 Slide the 2U Rackmount out of the equipment rack and into the service position see Sliding the 2U Rackmount Out of the Equipment Rack on page 4 4 Remove the 2U Rackmount cover see Removing the Cover on page 5 5 Depress the latch on the power supply connector and disconnect the power supply connector from the PCBA see figure 33 You may need to wiggle the ...

Page 57: ...D cable assembly Figure 33 PCBA with Cables Disconnected 8 Remove the two thumbscrews that secure the PCBA to the 2U Rackmount Set the thumbscrews aside for re use 9 Lift the PCBA out of the unit Caution Do not pull on the wires when removing the cables in steps 5 through 6 LED cable assembly PCBA Thumbscrews Power supply connector Fan module cable connectors ...

Page 58: ...ver see Replacing the Cover on page 5 5 Slide the 2U Rackmount back into the equipment rack and secure it to the rack see Sliding the 2U Rackmount Into the Equipment Rack on page 4 6 Connect the 2U Rackmount power cable at the rear panel see Connecting Power on page 3 7 Turn on power to the 2U Rackmount by pressing and holding the power button on the front panel for one second 8 Turn on any periph...

Page 59: ...the SCSI ID cable and connectors and the SCSI connector module at the rear of the unit This chapter describes how to perform the following tasks Removing a SCSI Cable Assembly Installing a SCSI Cable Assembly Figure 34 shows the location of the SCSI cable assembly in the unit It also shows other unit components affected by this procedure ...

Page 60: ...Rackmount 1 Turn off the host computer and all peripheral devices 2 Turn off and disconnect power to the 2U Rackmount see Disconnecting Power on page 2 3 Slide the 2U Rackmount out of the equipment rack and into the service position see Sliding the 2U Rackmount Out of the Equipment Rack on page 4 4 Remove the 2U Rackmount cover see Removing the Cover on page 5 SCSI Cables SCSI Connector Modules SC...

Page 61: ...Unit b Pull the tape drive forward slightly and then lift the tape drive out of the unit Lay the tape drive on the top of the unit c Disconnect the SCSI cable and the SCSI ID cable from the rear panel of the tape drive For specific pictures of cable locations see the following DLT S4 see figure 9 on page 13 SDLT 600 see figure 10 on page 14 SDLT 600A see figure 11 on page 15 LTO 3 see figure 12 on...

Page 62: ...ing wall opening Tech Tip The SCSI cable connector is too wide to fit directly through the opening in the fan mounting wall Fold the SCSI cable so that the connector is 90 to the cable see figure 37 Carefully slide the SCSI cable and connector so that the connector fits sideways through the opening Caution The fan mounting flange is sharp To avoid personal injury or damaging the power cable assemb...

Page 63: ...t Replacement Guide 51 Figure 37 Folded SCSI Cable 9 Remove the two thumbscrews that secure the SCSI connector module to the rear of the unit see figure 38 Set the thumbscrews aside for re use Figure 38 SCSI Connector Module 10 Remove the SCSI cable assembly from the unit Thumbscrews ...

Page 64: ...e figure 38 3 Gently lift the fan module upward just a little 4 Pull the SCSI cable through the fan mounting wall opening see figure 39 Tech Tip The SCSI cable connector is too wide to fit directly through the opening in the fan mounting wall Fold the SCSI cable so that the connector is 90 to the cable see figure 37 Carefully slide the SCSI cable and connector so that the connector fits sideways t...

Page 65: ...ide 53 Figure 39 SCSI Cable Under Fan Mounting Flange 5 Pull the SCSI ID cable through the fan mounting wall see figure 40 Figure 40 Tape Drive Power and SCSI ID Cables Under Fan Module 6 Seat the fan module in the unit and then install the thumbscrew securing the fan module to the unit see figure 41 ...

Page 66: ...eplacing the Cover on page 5 9 Slide the 2U Rackmount back into the equipment rack and secure it to the rack see Sliding the 2U Rackmount Into the Equipment Rack on page 4 10 Connect the 2U Rackmount power cable at the rear panel see Connecting Power on page 3 11 Turn on power to the 2U Rackmount by pressing and holding the power button on the front panel for one second 12 Turn on any peripheral d...

Page 67: ...ects to the Ethernet cable attached to the tape drive The GigE connector on the outside connects the tape drive to the host or router This chapter describes how to perform the following tasks Removing a CAT 6 Cable Connector Plate Installing a CAT 6 Cable Connector Plate This chapter assumes that you are replacing only the CAT 6 cable connector plate If you are also installing an Ethernet cable or...

Page 68: ...ll peripheral devices 2 Turn off and disconnect power to the 2U Rackmount see Disconnecting Power on page 2 3 Slide the 2U Rackmount out of the equipment rack and into the service position see Sliding the 2U Rackmount Out of the Equipment Rack on page 4 4 Remove the 2U Rackmount cover see Removing the Cover on page 5 5 Disconnect the Ethernet cable from the GigE connector of the CAT 6 cable connec...

Page 69: ... cable from the GigE connector of the CAT 6 cable connector plate on the outside of the 2U Rackmount see figure 44 7 Remove the two thumbscrews that secure the CAT 6 cable connector plate to the 2U Rackmount see figure 44 Set the thumbscrews aside for re use Figure 44 CAT 6 Cable Connector Plate With Thumbscrews on Outside of 2U Rackmount 8 Remove the CAT 6 cable connector plate from the unit GigE...

Page 70: ... Connector Plate To install a CAT 6 connector plate in the 2U Rackmount 1 Make sure the 2U Rackmount the host computer and all peripheral devices are turned off 2 Position the CAT 6 cable connector plate at the rear of the 2U Rackmount Install two thumbscrews to secure it in place see figure 45 Figure 45 CAT 6 Cable Connector Plate on Outside of 2U Rackmount ...

Page 71: ...onnected to the tape drive to the GigE connector on the CAT 6 cable connector plate see figure 46 Figure 46 Connecting the Ethernet cable to the CAT 6 Cable Connector Plate Inside the 2U Rackmount 4 Connect one end of an Ethernet cable to the CAT 6 cable connector plate on the outside of the 2U Rackmount see figure 47 Connect the other end of the Ethernet cable to the host computer or router GigE ...

Page 72: ...see Replacing the Cover on page 5 6 Slide the 2U Rackmount back into the equipment rack and secure it to the rack see Sliding the 2U Rackmount Into the Equipment Rack on page 4 7 Connect the 2U Rackmount power cable at the rear panel see Connecting Power on page 3 8 Turn on power to the 2U Rackmount by pressing and holding the power button on the front panel for one second 9 Turn on any peripheral...

Page 73: ...llowing tasks Removing an Ethernet Cable Installing an Ethernet Cable This chapter assumes that you are replacing only the Ethernet cable If you are also installing a CAT 6 cable connector plate or a tape drive see chapter 2 Tape Drive and chapter 8 Rear Panel CAT 6 Cable Connector Plate for further instructions Figure 48 shows the location of the Ethernet cable in the unit It also shows other uni...

Page 74: ... 1 Turn off the host computer and all peripheral devices 2 Turn off and disconnect power to the 2U Rackmount see Disconnecting Power on page 2 3 Slide the 2U Rackmount out of the equipment rack and into the service position see Sliding the 2U Rackmount Out of the Equipment Rack on page 4 4 Remove the 2U Rackmount cover see Removing the Cover on page 5 Ethernet cable CAT 6 cable connector plate Gig...

Page 75: ...hen you must first remove the tape drive as follows a Remove the two thumbscrews securing the tape drive to the tape drive retaining wall see figure 49 Set the thumbscrews aside for re use when installing a replacement tape drive Figure 49 Thumbscrews Securing Tape Drive to Unit b Pull the tape drive forward slightly and then lift the tape drive out of the unit Lay the tape drive on the top of the...

Page 76: ... lift the fan module upward just a little 8 Pull the Ethernet cable through the fan mounting wall opening 9 Disconnect the Ethernet cable from the CAT 6 cable connector plate on the inside of the 2U Rackmount see figure 52 and remove the Ethernet cable Caution The fan mounting flange is sharp To avoid personal injury or damaging the power cable assembly or connector apply only light pressure when ...

Page 77: ...rd just a little 3 Push the Ethernet cable through the fan mounting wall opening into the tape drive compartment see figure 53 4 Connect the Ethernet cable to the rear panel of the tape drive 5 If you removed the tape drive earlier re install the tape drive and thumbscrews into the 2U Rackmount 6 Seat the fan module and then reinstall the thumbscrew securing the fan module to the unit see figure 5...

Page 78: ...ount cover see Replacing the Cover on page 5 9 Slide the 2U Rackmount back into the equipment rack and secure it to the rack see Sliding the 2U Rackmount Into the Equipment Rack on page 4 10 Connect the 2U Rackmount power cable at the rear panel see Connecting Power on page 3 11 Turn on power to the 2U Rackmount by pressing and holding the power button on the front panel for one second 12 Turn on ...

Page 79: ... cable assembly connector connects to the PCBA Two LEDs Power switch Power switch cable This chapter describes how to replace the LED cable assembly in the 2U Rackmount unit by performing the following tasks Removing the LED Cable Assembly Installing an LED Cable Assembly Figure 54 shows the location of the LED cable assembly and PCBA in the unit ...

Page 80: ...ices 2 Turn off and disconnect power to the 2U Rackmount see Disconnecting Power on page 2 3 Slide the 2U Rackmount out of the equipment rack and into the service position see Sliding the 2U Rackmount Out of the Equipment Rack on page 4 4 Remove the 2U Rackmount cover see Removing the Cover on page 5 5 Disconnect the LED cable assembly from the PCBA see figure 55 6 Remove the power LED and the fan...

Page 81: ... collar and the sheet metal to help loosen it c Slide the released collar along the LED cable toward the PCBA connector to keep it from falling off the cable when you remove the LED from its mounting Save the collars for re use when installing a new cable d Pull gently on the LED wires to remove the LED from the mounting Figure 55 LED Cable Assembly Connections to Mounting Brackets LED cable assem...

Page 82: ...r switch out of the bracket c While continuing to pull gently on the power switch wire use a flat screwdriver blade to release the other tab d When you have released the second tab gently pull the switch out of the bracket 8 Flip open the top of the surface mounted cable clamp that secures the cable wires to the floor of the 2U Rackmount and remove the LED cable assembly from the unit Caution The ...

Page 83: ...sh the collar onto the bracket 4 Connect the LED cable assembly to the PCBA 5 Secure the LED cable assembly wires in the surface mounted cable clamp and snap the clamp shut 6 Replace the 2U Rackmount cover see Replacing the Cover on page 5 7 Slide the 2U Rackmount back into the equipment rack and secure it to the rack see Sliding the 2U Rackmount Into the Equipment Rack on page 4 8 Connect the 2U ...

Page 84: ...er For a unit with one tape drive installed the factory preset SCSI ID is 5 For a unit with two tape drives installed the factory preset SCSI ID for one tape drive is 5 and the SCSI ID for the other tape drive is 6 You can change the SCSI ID using the push button switch on the back of the unit see figure 57 Use the point of a pencil or pen to press the buttons above or below the number display to ...

Page 85: ...f the host computer and all peripheral devices 3 Turn off and disconnect power to the 2U Rackmount see Disconnecting Power on page 2 4 Slide the 2U Rackmount out of the equipment rack and into the service position see Sliding the 2U Rackmount Out of the Equipment Rack on page 4 5 Connect a terminator to the upper SCSI connector on the back of the unit see figure 58 Note You must terminate the SCSI...

Page 86: ...ton on the front panel for one second 9 Turn on any peripheral devices you turned off earlier 10 Turn on the host computer Making SCSI Connections in a Daisy Chain If you are using two tape drives in the unit you can connect each one separately or you can link the two SCSI connectors on the unit in a daisy chain If you use a daisy chain follow these steps 1 Ensure that all SCSI devices have unique...

Page 87: ...k into the equipment rack and secure it to the rack see Sliding the 2U Rackmount Into the Equipment Rack on page 4 7 Connect the 2U Rackmount power cable at the rear panel see Connecting Power on page 3 8 Turn on power to the 2U Rackmount by pressing and holding the power button on the front panel for one second 9 Turn on any peripheral devices you turned off earlier 10 Turn on the host computer N...

Page 88: ...this section do not fix the failure contact technical support The following table lists failure symptoms possible causes and possible actions you can take to determine the exact problem and fix it Symptom Possible Causes Action Tape drive does not turn on when unit is on Tape drive power cable assembly not connected to tape drive rear panel Reconnect the tape drive power cable assembly to the rear...

Page 89: ...Ensure that you have connected the unit power cable at the unit s rear panel Power LED burned out Check for signs that the unit has turned on Tape drive LEDs turn on Fans turn on listen for fan sounds If unit is on and Power LED is not on replace the LED cable assembly Power supply failure Check power supply operation by placing your hand immediately behind the power supply fans If you feel no air...

Reviews: