background image

23

2. GETTING STARTED

until your operating system is loaded. During booting, your notebook is performing a
standard boot sequence including a Power On Self Test (POST). When the boot
sequence is completed without a failure and without a request for the BIOS Setup
Utility, the system displays the operating system’s opening screen.
The boot sequence is executed when:

You turn on the power to your notebook.

You restart your notebook from the Windows Shut Down dialog box.

The software initiates a system restart. Example: When you install a new application.

2-3-3 BIOS SETUP UTILITY

The BIOS Setup Utility is a program that sets up the operating environment for your
notebook. Your BIOS is set at the factory for normal operating conditions, therefore
there is no need to set or change the BIOS environment to operate your notebook.
The BIOS Setup Utility configures:

Device control feature parameters, such as changing I/O addresses and boot
devices.

System Data Security feature parameters, such as passwords.

Entering the BIOS Setup Utility

To enter the BIOS Setup Utility, do the following:

1. Turn on or restart your notebook.
2. Press the [F2] key once the flash screen appears on the screen. This will open the

main menu of the BIOS Setup Utility with the current settings displayed.

3. Press the [RIGHT ARROW] or [LEFT ARROW] key to scroll through the other

setup menus to review or alter the current settings.

Summary of Contents for 802MI3BEG8

Page 1: ...EG8L EG8L ST G200 SERIES NOTEBOOK Computer USER S GUIDE October 2002 ...

Page 2: ...is equipment does cause harmful interference to radio or television reception which can be determined by turning the equipment off and on the user is encouraged to try to correct the interference by one or more of the following measures Reorient or relocate the receiving antenna Increase the separation between the equipment and receiver Connect the equipment into an outlet on a circuit different f...

Page 3: ...2 Thispageisintentionallyleftblank ...

Page 4: ... 17 2 1 Power Sources 17 2 2 Display Panel 20 2 3 Starting Your Notebook PC 22 2 4 Status Display Indicators 24 2 5 Using the Keyboard 27 2 6 Volume Control 29 2 7 Power Management 30 3 USING YOUR NOTEBOOK PC 33 3 1 Touchpad Pointing Device 33 3 2 Internal Floppy Disk Drive 35 3 3 Optical Drive 37 3 4 PC Cards 43 3 5 Memory Upgrade Module 45 3 6 Device Ports 49 4 TROUBLESHOOTING 55 4 1 Identifying...

Page 5: ...4 Thispageisintentionallyleftblank ...

Page 6: ...kesureyoudon t blocktheopen ingsprovidedforventilation DO NOT placeordropobjectsonthecomputer andDONOTapplyheavypressureonit DONOTsubjectthecomputertomagneticfields DO NOT placeonunevenorunstableworksur faces DONOTpressortouchthedisplaypanel DONOTuseyournotebookcomputerunderharsh conditions ...

Page 7: ...at DONOTtamperwiththebatteries Keepthemaway fromchildren DONOTexposetodirectsunlight DONOTuseorstoreinextremetemperatures Avoidsuddenchangesintemperatureorhumidity bykeepingitawayfromA Candheatingvents DONOTexposethecomputertorainormoisture ...

Page 8: ...i cals DONOTslamyournotebookshutandneverpick uporholdyournotebookbythedisplay DONOTspraywateroranyothercleaningfluids directlyonthedisplay Ifyouaretravelingwithyourcomputer remember to carry it as hand luggage Do not check it in as baggage ...

Page 9: ...8 Thispageisintentionallyleftblank ...

Page 10: ...pre installed AC adapter with AC power cord Phone Modem RJ 11 telephone cable DriverandApplicationsCD GettingStartedGuide UserGuide thisdocument Dependingupontheconfigurationofyournotebook youmayhavealsoreceivedthe followingitems DVDApplicationCD CD RWApplication CD DVD CD RW ComboApplication CD Once you have checked and confirmed that your notebook system is complete read throughthefollowingpages...

Page 11: ...t the display backwards being careful not to touch the screen until it is at a comfortableviewingangle 1 2 2 TOP AND FRONT COMPONENTS The following is a brief description of yournotebook s top and front components Suspend Resume Power On Button Scroll Button TouchPad Pointing Device Stereo Speaker Stereo Speaker Battery Indicator Power Indicator Status Display Indicator Application Panel Keyboard ...

Page 12: ...activitywithoutpoweringoff resumeyournotebookfrom suspend mode and power on your notebook when it has been shut down from Win dows See Suspend Resume Power On Button in 2 3 1 Power On for more information Stereo Speakers The built in dual speakers allow for stereo sound Keyboard Afull size keyboard with dedicated Windows keys See 2 5 Using the Keyboard for more information Touchpad Pointing Device...

Page 13: ...on PC Card Slot The PC Card Slot allows you to install one Type II or Type III PC Card See 3 4 PC Cards for more information Internal Floppy Disk Drive Astandard floppy disk drive to accommodate 3 5 floppy disks See 3 2 Internal Floppy Disk Drive for more information Headphone Jack The headphone jack allows you to connect headphones or external speakers with amplifier See 3 6 13 Headphone Jack for...

Page 14: ...ical drive allows you to play back a media disc See 3 3 Optical Drive for more information Optical Drive Eject Button The OpticalDrive Eject Button allows you to open the optical drive tray to remove or install a DVD CD R or CD ROM See 3 3 Optical Drive for more information Emergency Optical Drive Tray Release The Emergency OpticalDriveTray Release allows you to open the optical drive tray without...

Page 15: ...connect an external PS 2 keyboard mouse or numeric keypad See 3 6 8 PS 2 Port for more information IEEE 1394 Port The 1394 port is used to connect between your and a peripheral such as a digital video camera See 3 6 3 IEEE 1394 Port for more information USB Ports The two USB ports allow you to connect Universal Serial Bus devices See 3 6 4 Universal Serial Bus Ports for more information Serial Por...

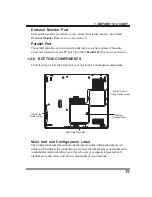
Page 16: ...rmation 1 2 6 BOTTOM COMPONENTS The following is a brief description of your notebook s bottom panel components Main Unit and Configuration Label Theconfigurationlabelshowsthemodelnumberandotherinformationaboutyour notebook In addition the configuration portion of the label has the serial number and manufacturerinformationthatyouwillneedtogiveyoursupportrepresentative It identifiestheexactversiono...

Page 17: ... of the battery when stored over a long period of time or for swapping a dis charged battery with a charged Lithium ion battery See 2 1 3 Replacing the Battery for more information Memory Compartment The memory compartment contains the system RAM The RAM can be expanded according to the information contained in 3 5 Memory Upgrade Module ...

Page 18: ...PTERS The AC adapter provides power for operating your notebook PC and charging the batteries Connecting the AC Adapter 1 Plug the DC output cable into the DC power jack of your notebook PC 2 Plug the AC adapter into an AC electrical outlet POINT TheLithiumionbatteryisnotchargeduponpurchase Initially you will need to connect the AC adapter to use your notebook PC ...

Page 19: ... mode There is no guarantee that your data will be saved once the notebook reaches thispoint CAUTION To protect your notebook PC from damage use only the power adapter that came with the notebook PC because each power adapter has its own power output rating Once your notebook PC goes into Dead Battery Suspend mode you will be unable to resume operation until you provide a source of power either fr...

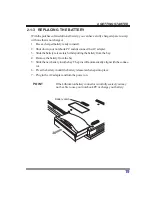
Page 20: ...nnect theAC adapter 3 Slidethebatteryreleaselatchwhilepullingthebatteryfromthebay 4 Remove the battery from the bay 5 Slidethenewbatteryintothebay Thepinswillautomaticallyalignwiththeconnec tor 6 Press the battery in until the battery release latch snaps into place 7 Plug in the AC adapter and turn the power on POINT IftheLithiumionbatteryconnectorisnotfullyseated youmay not be able to use your no...

Page 21: ...ainstopresolutionthroughtheuseofactive matrixtechnology 2 2 1 OPENING THE DISPLAY PANEL 1 Slide the latch located at the top of the display panel to the right This releases the lockingmechanismandraisesthedisplayslightly 2 Lift the display backwards being careful not to touch the screen until it is at a comfortableviewingangle Display Panel Latch ...

Page 22: ...owalevelas possible Keyboard Adjustingthebrightnessusingthekeyboardchangesthesettingonlytemporarily FN F6 Pressing repeatedly will lower the brightness of your display FN F7 Pressing repeatedly will increase the brightness of the display POINT IfusingACpower yourbrightnesssettingissettoitshighestlevel by default If using battery power your brightness settings is set to approximatelymid levelbydefa...

Page 23: ...k damaging your notebook When you power on your notebook it will perform a Power On Self Test POST to checktheinternalpartsandconfigurationforcorrectfunctionality Ifafaultisfound your notebook PC will emit an audio warning and or an error message will be dis played Depending on the nature of the problem you may be able to continue by startingtheoperatingsystemorbyenteringtheBIOSsetuputilityandrevi...

Page 24: ...is a program that sets up the operating environment for your notebook Your BIOS is set at the factory for normal operating conditions therefore there is no need to set or change the BIOS environment to operate your notebook TheBIOSSetupUtilityconfigures Device control feature parameters such as changing I O addresses and boot devices System Data Security feature parameters such as passwords Enteri...

Page 25: ...otebook s operating mode Steady On This means that there is power to your notebook and that it is ready for use Flashing ThismeansthatyournotebookisinSuspendmode SteadyOff notvisible ThismeansthatyoursystemiseitherinSave to Disk mode or that your notebook has been turned off with the power switch Ifyouarechargingyourbattery thePowerindicatorsymbolwillremainonevenifyour notebookisshutoff ThePowerin...

Page 26: ...nlyflashwhenyouaccesstheopticaldrive drive The default setting is theAuto InsertNotification function active See 3 3 8Auto Insert Notification Function for more information 2 4 4 HARD DRIVE ACCESS INDICATOR The HardDriveAccess indicator states whether yourinternal hard drive is being ac cessed 2 4 5 FLOPPY DRIVE ACCESS INDICATOR TheFloppyDriveAccessindicatorstateswhethertheinternalfloppydiskdrivei...

Page 27: ...TTING STARTED 2 4 7 CAPSLOCK INDICATOR The CapsLock indicator states that your keyboard is set to type in all capital letters 2 4 8 SCRLK INDICATOR The ScrLk indicator states that your scroll lock is active S ...

Page 28: ...ed by pressing the NumLk keys Turning off theNumLk feature is done the same way Once this feature is activated you can enter numerals 0 through 9 perform addition subtraction multiplication or division and enter decimal points using the keys designated as ten key function keys The keys in the numeric keypad are marked on the front edge of the key toindicatetheirsecondaryfunctions POINT Ifyouareusi...

Page 29: ...ys are used The FN key provides extended functions for the notebook and is always used in conjunctionwithanotherkey FN F3 Pressing F3 while holding FN will toggle theAudio Mute on and off FN F5 Pressing F5 while holding FN allows you to toggle between video compensation and no compensation Video compensation controls spacing on the display When it is enabled displays with less than 800 x 600 pixel...

Page 30: ...anbecontrolledinseveraldifferentways Volume can be set from within theVolume Control on theTaskbar Volume can be controlled with the F8 and F9 functions keys Pressing F8 repeatedlywhileholding Fn willdecreasethevolumeofyournotebook Pressing F9 repeatedlywhileholding Fn willincreasethevolumeofyournotebook Volumecanbecontrolledbymanyvolumecontrolsthataresetwithinindividual applications Certain exter...

Page 31: ...l See 2 4 Status Display Indicators for more information Iftheindicatorisvisibleandnotflashing yournotebookisfullyoperational Ifthe indicatoris bothvisibleandflashing yournotebookisinSuspendmode Iftheindicator is not visible at all the power is off or your notebook is in Hibernation Save to Disk mode See 2 7 3 Hibernation Feature 2 7 2 SUSPEND MODE Suspend or Standby mode saves the contents of you...

Page 32: ...t Control Panel 2 From the Control Panel select Power Options 3 Select the Hibernation tab Select the box to enable or disable this feature Using the Hibernation Feature 1 From the Start menu select Settings then select Control Panel 2 From the Control Panel select Power Options 3 Select the Advanced tab Select Hibernate from the pull down menu for Power buttons CAUTION The Suspend or Hibernation ...

Page 33: ...ER OFF Before turning off the power by choosing ShutDownfromWindows check that the Hard Drive optical drive drive PC Card and Floppy Disk Drive Access indicators are all Off If you turn off the power while accessing a disk or PC Card there is a risk of data loss To ensure that your notebook shuts down without error use theWindows shut down procedure CAUTION Turningoffyour notebookwithoutexitingWin...

Page 34: ... scrolling button The cursor control works the same way a mouse does and moves the cursor around the display It onlyrequireslightpressurewiththetipofyourfinger Theleftandrightbuttonsfunction thesameasmousebuttons Theactualfunctionalityofthebuttonsmayvarydepending ontheapplicationthatisbeingused Thescrollingbuttonallowsyoutonavigatequickly throughpages withouthavingtousethescrollbars 3 USING YOUR N...

Page 35: ...hpadonce 3 1 2 DOUBLE CLICKING Double clickingmeanspushingandreleasingtheleftbuttontwiceinrapidsuccession This procedure does not function with the right button To double click move the cursor to the item you wish to select press the left button twice and then immediately release it You also have the option to perform the double click operation by tapping lightlyontheTouchpadtwice POINTS Iftheinte...

Page 36: ...our notebook PC 3 1 3 DRAGGING Draggingmeanspressingandholdingtheleftbutton whilemovingthecursor Todrag move the cursor to the item you wish to move Press and hold the left button while movingtheitemtoitsnewlocationandthenreleaseit Draggingcanalsobedoneusing theTouchpad First tap the Touchpad twice over the item you wish to move making sure to leave your finger on the pad after the final tap Next ...

Page 37: ...a new disk it needs to be prepared so your notebook PC knows wheretostoreinformation Thispreparationiscalledformattingorinitializingadisk You will need to format new disks unless they are preformatted Please refer to your operating system manual for step by step instructions on formatting a disk To prevent accidental erasure of the data stored on a disk slide the write protect tab until a small ho...

Page 38: ...ies noted above with this optical drive drive you can read audio CDs and write data onto a recordable CD R or CD RW disc In addition to the OpticalDrive software you also receive software for burning CDs If you should need to install your Optical Drive software refer to the applicablereadmefileontheDriverApplicationsCD ROM CAUTIONS Do not operate your optical drive drive unless your notebook PC is...

Page 39: ...ort distance 2 Gently pull the tray out until a media disc can easily be placed in the tray 3 Place the media into the tray label side up with the hole in the center of the disc Snap the disc onto the raised circle in the center of the tray 4 Gently push the holder tray back in until you hear a click CAUTION There may be a protective sheet in the tray from when it was shipped please make sure it i...

Page 40: ...caldrivesoftwarepre installed Ifitisnotinstalled reference thedocumentationthataccompaniesthemediaapplication Starting a DVD Movie DVD Models only 1 Insert the DVD movie into the optical drive drive of your notebook PC If the CD AutoRun feature activates skip Step 2 2 From the Start menu selectPrograms then locate theDVD player software that you installed from the application CDthat accompanied yo...

Page 41: ...e box To change the type of surround sound select one of the radio buttons listed under RoomFilterSetting 5 ClickOK TheDolbyHeadphonefeaturewillnow beenableduntilyoudisableit byuncheckingEnableDolbyHeadphone 3 3 6 USING THE OPTICAL DRIVE ON BATTERY POWER Since optical drive drives consume a lot of power your overall battery life will be significantlyshorterwhenoperatingtheopticaldrivedrivecontinuo...

Page 42: ...esented to you before the system will reboot 4 Manually place your notebook PC into suspend mode by depressing the Suspend button and replace the discharged battery with an addi tional full charged battery Or if you do not have an additional battery you may attachAC power as soon as you see the low battery warning 5 Resume your notebook PC by pressing the Suspend button again This step is not requ...

Page 43: ... 4 Select the Device Manager tab to display the device lists for your notebook PC 5 Click on the to the left of the CD player drive icon The treeview will expand to show the optical drive drive manufacturer s name andmodelnumber 6 Double click on the optical drive drive manufacturer s nameandmodelnumber Thiswillopentheopticaldrivedrivemanufacturer s nameandmodelnumber dialogbox 7 Select the Settin...

Page 44: ...IA 2 1 or CardBus standards Forfurtherinformation refertotheinstructionssuppliedwithyourPCCard 3 4 1 INSTALLING PC CARDS PC Cards are installed in the PC Card slot To install a PC Card s follow these easy steps WARNING Installing or removing a PC Card s during your notebook PC s shutdown or bootup process may damage the card and or your notebook PC Do not insert a PC Card into a slot if there is w...

Page 45: ...re your notebook PC to be in Suspend Mode or Off while removingthem CAUTION Windows has a shutdown procedure for PC Cards that must be followed before removing a card Please review your operating system manual for the correct procedure POINT If the dialog box states that the device cannot be removed you must save all of your open files close any open applications and shut down your notebook Once y...

Page 46: ...k PC upside down on a clean work surface 3 Open the top cover all the way so that it is lying flat on the work surface 4 Removethescrewholdingthememorycompartmentcover CAUTION The memory upgrade module can be severely damaged by electrostatic discharge ESD Be sure you are properly grounded whenhandlingandinstallingthemodule 5 Align the connector edge of the memory upgrade module chip side up with ...

Page 47: ...pand pulling towards the back of your notebook PC 4 Store the memory upgrade module in a static guarded sleeve 5 Replace the memory compartment cover by following step 8 of 3 5 1 Installing a Memory Upgrade Module POINT Afterchangingyourmemorymoduleconfiguration youmust completetheResettingtheHibernation Save to Disk Parameters procedure in order for the Hibernation Save to Disk mode to operate pr...

Page 48: ...ch 2 Allow the system to start booting and press the F2 key once the flash screen appears on the screen This will open the main menu of the BIOS setup with the current settings displayed See 2 3 3 BIOS Setup Utility for more information Use the right arrow key to select Info in the BIOS Setup menu The System Memory and the Extended Memory capacity as detected by your note book PC during the Power ...

Page 49: ...48 3 Using Your Notebook PC Thispageisintentionallyleftblank ...

Page 50: ...one outlet WARNING TheinternalmodemisnotintendedforusewithDigitalPBX systems Do not connect the internal modem to a Digital PBX as it may cause serious damage to the internal modem or your entire notebook PC Consult your PBX manufacturer s documentation fordetails POINTS The internal modem is designed to the ITU TV 90 standard Its maximum speed of 53000bps is the highest allowed by FCC and its act...

Page 51: ...to a LAN outlet 3 6 3 IEEE 1394 PORT The 1394 port allows you to connect digital devices that are compliant with IEEE 1394 standard The IEEE 1394 standard is easy to use connect and disconnect This port can allow up to 400 Mbps transfer rate A third party application is required to operate your digital device with the 1394 port In order to connect a 1394 device follow these steps 1 Aligntheconnect...

Page 52: ... until it is seated 3 Tighten the two hold down screws located on each end of the connector 3 6 7 PS 2 PORT The PS 2 port allows you to connect an external keyboard and or numeric keypad and mouse In order to connect a PS 2 interface device follow these easy steps 1 Aligntheconnectorwiththeportopening 2 Push the connector into the port until it is seated POINT A mouse keyboard or keypad may be ins...

Page 53: ...ight orincandescentlightshinesdirectlyontheport CAUTION Donotmoveeitherdevicewhilecommunicationisactiveasit mayinterruptdatatransmission Be careful not to scratch the infrared port lens Dirt scratches or other surface marks can degrade operation POINT With Windows 98 Second Edition you can use the Infrared Recipientapplicationforinfraredfiletransfers LapLink2000 software can also be used for infra...

Page 54: ...until it is seated 3 Tighten the two hold down screws located on each end of the connector POINT Pressing the FN F10 keys allows you to change your selection of where to send your display video Each time you press the key combination you will step to the next choice startingwiththebuilt indisplaypanelonly movingtotheexternal monitoronly finallymovingtoboththebuilt indisplaypaneland anexternalmonit...

Page 55: ...54 3 Using Your Notebook PC Thispageisintentionallyleftblank ...

Page 56: ...tive AC power source 3 Make sure that any card installed in the PC Card slot is seated properly You can alsoremovethecardfromtheslot thuseliminatingitasapossiblecauseoffailure 4 Make sure that any devices connected to the external connectors are plugged in properly You can alsodisconnect such devices thus eliminating themas possible causesoffailure 5 Turn on your notebook PC Make sure it has been ...

Page 57: ...4 Troubleshooting Any error messages that have occurred Hardwareconfiguration Type of device connected if any See the Configuration Label on the bottom of your notebook for configuration and serial numbers ...

Reviews: