Quansys Q-View IMAGER LS Operator'S Manual Download Page 11

7

For Research Use Only

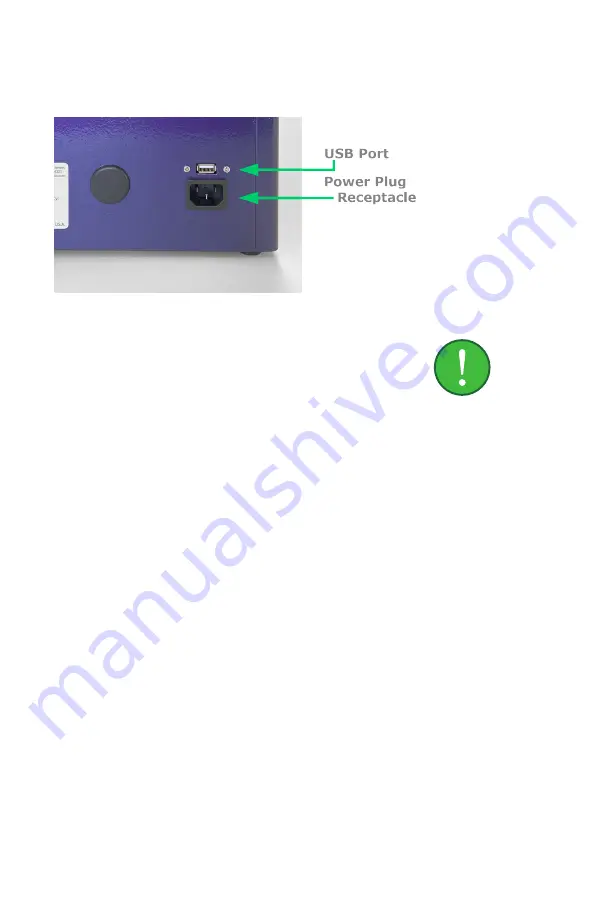
ELECTRONIC CONSIDERATIONS

Power Cord

The power cord is a 3-wire grounding-type plug. 

This cord will only fit into a grounded outlet, which 

is a requirement for the Q-View Imager LS. Do not 

remove the grounding leg of the plug. Doing so will 

void all warranties on the Q-View Imager LS.
The power cord provided with the Q-View Imager LS 

is specific to the power supplied in your region. If you 

have  a  different  voltage  supply  or  need  a  different 

power cord for any reason, please contact technical 

support. Do not use an extension cord for the Q-View 

Imager  LS.  Ensure  that  all  equipment  plugged  into 

the same circuit as the Q-View Imager LS does not 

exceed the amperes of service, or you may experience 

a tripped breaker or power failure that could result in 

the loss of your image.

Before unplugging the power cord, make sure Q-View 

Software is closed on the PC. Make sure the USB cord 

is unplugged. At this point, it is safe to remove the 

power cord.

USB Cord

The USB cord connects the Q-View Imager LS to the 

PC, which controls and operates the Q-View Imager 

LS. This cord should only be unplugged from the 

Q-View Imager LS once Q-View Software is closed.

Summary of Contents for Q-View IMAGER LS

Page 1: ...Version 2 03 For Research Use Only Not For Use in Diagnostic Procedures Operator s Manual...

Page 2: ...h the device instruction manual It is critical that the user read this manual in its entirety and train on the device frequently to ensure proper operation For laboratory use only Pollution Degree 2 o...

Page 3: ...ANSYS BIOSCIENCES BRANDED PRODUCTS ANY WARRANTY APPLICABLE TO NON QUANSYS BIOSCIENCES BRANDED SOFTWARE OR PRODUCTS IS PROVIDED BY THE ORIGINAL MANUFACTURER Printing History Version Number Date 1 0 Sep...

Page 4: ...nstallation and Safety Information 2 Safety Precautions 2 Lid and Glass Tray Insert 2 Electricity 2 Placement in the Laboratory 2 Temperature and Humidity 2 Ventilation and Dust 2 Space 3 Vibration 3...

Page 5: ...al Features 8 Back 8 Computer Connection 8 Q View Software Introduction 8 Chapter 3 Operation 9 Before you Begin 9 Cleaning the Tray Surface 9 Loading the Plate 9 Imaging the Plate 9 Using the Qualifi...

Page 6: ...ot cut cords that provide power or connect the device to the PC PLACEMENT IN THE LABORATORY Temperature and Humidity The Q View Imager LS has a high resolution camera which may be subject to performan...

Page 7: ...t cause vibrations such as vortex mixers shakers centrifuges etc are not co located on the bench with the Q View Imager LS Also consider where the Q View Imager LS is placed in the laboratory For exam...

Page 8: ...and a dark field acquired Focusing the Q View Imager LS Open the Q View Imager LS lid Place the 96 well focusing plate included on the plate tray From the Manage Imagers menu select Focus With the li...

Page 9: ...onnection on any computer running Q View Software goes through a proxy specify these settings under Administration Network Settings Your Q View Software and Q View Imager LS are now ready to use Disas...

Page 10: ...protective sleeve 9 Bundle and tie cables together 10 Insert the Q View Imager LS into the foam insert in the Q View Imager LS box 11 Place the glass tray insert and cords into the box CHEMICAL SAFET...

Page 11: ...reason please contact technical support Do not use an extension cord for the Q View Imager LS Ensure that all equipment plugged into the same circuit as the Q View Imager LS does not exceed the ampere...

Page 12: ...ray insert is free from dust and any chemicals To clean the device use 70 percent ethanol or warm water Do not use scouring cleaners or abrasive pads as this can scratch the glass Be careful not to sp...

Page 13: ...Management and see an entry in a table for the Q View Imager LS with one of the columns saying connected or disconnected Q VIEW SOFTWARE INTRODUCTION A copy of Q View Software will accompany the Q Vie...

Page 14: ...tray it will adversely affect the quality of the image and the overall quality of your data This can be cleaned with 70 percent ethanol using a lint free cloth Do not use scouring cleaners or abrasive...

Page 15: ...can be used to qualify the performance of the Q View Imager LS over time This plate has built in LEDs that create a constant signal that can be imaged over certain periods of time with Q View Imagers...

Page 16: ...Solution Q View Software is unable to recognize the Q View Imager LS Failure of communication between the Q View Imager LS and computer Ensure power is supplied to the Q View Imager LS Ensure the USB...

Page 17: ...nescent blots 7 6 cm x 12 1 cm Imaging Time 1 5 minutes Control Q View Software Connection to PC USB OPERATING SPECIFICATIONS Operating Conditions Temperature range of 15 35 C and dew point of no grea...

Page 18: ...Part Number 365 North 600 West Logan Utah 84321 Tel 1 888 782 6797 Fax 435 750 6869 www quansysbio com For technical support email support quansysbio com...

Reviews: