background image

November 28, 2017 


7082-151C 


                  27

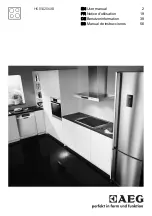
MT. VERNON E2 INSERT

-C

B. Exploded Drawings

Service Parts

R

MTVI-E2-C

Beginning Manufacturing Date: July 2017 

Ending Manufacturing Date: Active

Pellet Insert

MTVI-E2-CSB-C, MTVI-E2-MBK-C, MTVI-E2-PMH-C

Part number list on following pages.

11/17

39

38

37

36

35

34

33

32

31

30

29

28

27

8

26

25

24

23

22

21

20

19

18

17

16

15

14

13

12

11

10

9

8

7

6

5

4

3

2

1

Summary of Contents for MTVI-E2-MBK-C

Page 1: ...QuadraFire com 00Pour obtenir une traduction fran aise de ce manuel s il vous pla t contacter votre revendeur ou visitez www QuadraFire com CAUTION Check building codes prior to installation Installat...

Page 2: ...Room Heating Pellet Burning Type UM 84 HUD POUR USAGE AVEC LES BOULETTES DE BOIS N utiliser aucun autre genre de combustible Puissance de Rendement 55 00 Btu s hr Puissance lectrique 115 VAC 60 Hz D b...

Page 3: ...8 A Fire Safety 8 B Non Combustible Materials 8 C Combustible Materials 8 D Fuel Material and Fuel Storage 8 E Before Your First Fire 8 F Filling the Hopper 9 G User Dial Control 9 H Normal Startup S...

Page 4: ...home construction warranty coverage begins on the date of first occupancy of the dwelling or six months after the sale of the product by an independent authorized HHT dealer distributor whichever occ...

Page 5: ...y does not cover the following Changes in surface finishes as a result of normal use As a heating appliance some changes in color of interior and exterior surface finishes may occur This is not a flaw...

Page 6: ...eeded for rst re or starting re on empty hopper Note The prime function is only required during initial set up of the unit or after the unit has alarmed out due to an empty hopper Priming while under...

Page 7: ...d the warranty will be voided by the following actions B BTU Efficiency Specifications The Quadra Fire Mt Vernon E2 Pellet Insert Appliance meets the U S ENVIRONMENTAL PROTECTIONAGENCY Certified to co...

Page 8: ...Depending on the source material it may have a high or low ash content Higher Ash Content Material Hardwoods with a high mineral content Fuel that contains bark Standard grade pellets or high ash pell...

Page 9: ...tion happens the smoke should quickly disap pear During this stage as well as any part during the burn process the front door should not be opened This startup cycle continues until the appliance sens...

Page 10: ...tial operation Curing of high temperature paint Open windows for air circulation Odors may be irritating to sensitive individuals CAUTION WARNING HOT SURFACES Glass and other surfaces are hot during o...

Page 11: ...he exhaust temperature has cooled Green 1X Stage 1 Low heat BTU Range 14 620 19 694 Average 19 054 Green 2X Stage 2 Med Low heat BTU Range 22 102 23 506 Average 22 735 Green 3X Stage 3 Med heat BTU Ra...

Page 12: ...educed by means ap proved by the regulatory authority having jurisdiction Mantel Avoid placing candles and other heat sensitive ob jects on mantel or hearth Heat may damage these objects P Trim Adjust...

Page 13: ...the day To cancel the temporary setting at any time press RUN SCHEDULE Program Schedule Override permanent Press HOLD to permanently adjust the temperature This will override the temperature settings...

Page 14: ...n burn season see troubleshooting section Is there a place to lubricate the blowers to quiet them down No The most often cause of noisy blowers is from the impellers becoming dirty over time See maint...

Page 15: ...a dealer We recommend annual service by a qualified dealer A Proper Shutdown Procedure Turn dial control to OFF let appliance completely cool and exhaust blower must be off Now you can unplug appli an...

Page 16: ...s on the 2 side latches Clinkers filling the ash pan will have to be cleaned out more often than ash Ash Disposal Ashes should be placed in a steel container with a tight fitting lid The container of...

Page 17: ...ove the majority of the ash Be sure to vacuum the back of the baffle also Inspect the drop tube and remove any residue build up in the drop tube Figure 17 3 c Assemble the crevice tool from the micro...

Page 18: ...e the appliance is allowed to cool b Open the front cast door and cycle the ash removal handle these should be inspected for functionality c Inspect for any degradation or deformation As the springs h...

Page 19: ...e glass and firebox should be inspected periodically to make sure there is a good seal If the gasket is frayed or damaged replace with a new one 9 Cleaning Exhaust System Requires No Lubrication Frequ...

Page 20: ...nformation on how to handle a chimney fire In the event of a soot or creosote fire close the firebox door exit the building immediately and contact the proper fire authorities DO NOT under any circums...

Page 21: ...21 2 5 Rock the top of the blower slightly and lift up The blower will pass out the left side of the appliance Note You may need to loosen the surround to move it out of the way 6 Install replacement...

Page 22: ...ch wires for integrity Safety snap disc is tripped 3 Check to make sure convection blower wires are connected and reset snap disc located on RH side of appliance Clean inspect convection blower and co...

Page 23: ...er Exhaust probe not sensing correct temperature Secure the exhaust probe to exhaust blower housing keeping its wire away from hot surfaces Control board is defective Replace control board Convection...

Page 24: ...l spilling over the fire pot and or excessive flame Dirty Appliance Clean appliance including the fire pot exhaust path and venting system Feed Motor locked on Follow corrective action for feed motor...

Page 25: ...Connect terminal end to control board Failed component Replace exhaust probe securing it to exhaust blower housing keeping wire away from hot surfaces 4 Red Flashes Missed Ignition Hopper empty Fill t...

Page 26: ...vection Blower The convection blower is mounted at the bottom left of the appliance The convection blower pushes heated air through the heat exchange system into the room 4 Feed System The feed system...

Page 27: ...TVI E2 C Beginning Manufacturing Date July 2017 Ending Manufacturing Date Active Pellet Insert MTVI E2 CSB C MTVI E2 MBK C MTVI E2 PMH C Part number list on following pages 11 17 39 38 37 36 35 34 33...

Page 28: ...BK Porcelain Mahogany 7036 101PMH Sienna Bronze 7036 101CSB 4 Catch Clip 7036 146 5 Elbow Catch 7000 393 6 Bracket Catch 7036 145 7 Backer Side Window 414 0280 8 Side Matte Black 7036 103MBK Porcelain...

Page 29: ...Y 19 3 Hinge Female SRV450 2910 19 4 Door Latch Assembly 413 5200 Gasket Channel 3 Mm X 32 Field Cut to Size 10 Ft 7000 377 10 Y 20 Ash Pan Door 7034 133 21 Ash Pan Assembly SRV7034 069 Twin Ball cat...

Page 30: ...SRV7080 106 Y Gasket Blower Combustion Between Housing Stove SRV7080 117 Y Gasket Motor Blower Combustion Between Housing Motor SRV7080 107 Y 31 Snap Disc L250 Manual Reset 3 SRV230 1290 Y Gasket Exh...

Page 31: ...60 AE B Y Outside Air Kit OAK 3 Top Vent Adapter TPVNT 4 Surround Std Panel For Cast Trim SP MTVS CST Component Pack 7036 041 Surround Std Panel w Gold Trim SP MTVS GD Component Pack 7036 042 Trim Pa...

Page 32: ...e purchased installed _________________________________________________________________________ Serial Number ____________________________________ Location on appliance ___________________________ Dea...

Reviews: