


2
7014-259B
November 30, 2017
CB1200 FREESTANDING
9.00
2017 2018 2019
Jan
Feb
Mar
Apr
May
Jun
Jul
Aug
Sep
Oct
Nov
Dec
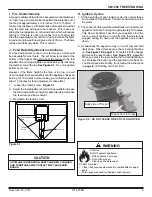
Floor protector must be noncombustible material, extending beneath heater and to the
front/sides/rear as indicated. Measure front distance (I) from the surface of the glass door.
FLOOR PROTECTION / PROTECTION DU SOL
*Non-combustible floor protection must extend beneath the flue pipe when installed with
horizontal venting or under the Top Vent Adapter with vertical installation.
RECOMMENDED IN USA; REQUIRED IN CANADA
Le poêle doit être placé sur une assise non combustible s’étendant tout autour de lui, comme les
schémas l’indiquent. Mesurez la distance du devant (I) de la surface de la porte vitrée.
*Un protecteur incombustible de plancher doit s'étendre sous le conduit de cheminée pour une
installation de ventilation horizontale ou sous un adapteur de ventilation de dessus pour une installation
verticale.
ÉTATS-UNIS - RECOMMANDÉ; CANADA - REQUIRENT
352 Mountain House Road
Halifax, PA 17032
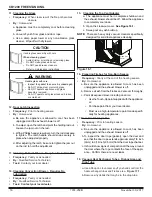
Tested to: ASTM E1509-95, ULC S627-M93, ULC/ORD-C-1482-M1990 Room Heating Pellet Burning Type,
(UM) 84-HUD FOR USE ONLY WITH PELLETIZED WOOD OR SHELLED FIELD CORN FUEL.
Input Rating: 50,700 Btu's/hr
Electrical Rating: 115 VAC, 60 Hz, Start 4.6 Amps, Run 1.6 AMPS.
Route power cord away from unit. Do not route cord under or in front of appliance.
DANGER: Risk of electrical shock
. Disconnect power supply before servicing. Replace glass only with
5mm ceramic available from your dealer. To start, set thermostat above room temperature, the stove will light
automatically. To shutdown, set thermostat to below room temperature. For further instruction refer to owner's
manual. Keep viewing and ash removal doors tightly closed during operation.
PREVENT HOUSE FIRES
Install and use only in accordance with manufacturer's installation and operating instructions. Contact local
building or fire officials about restrictions and inspection in your area.
WARNING - FOR MOBILE HOMES:
Do not install appliance in a sleeping room. An outside combustion air
inlet must be provided. The structural integrity of the mobile home floor, ceiling and walls must be
maintained.
Refer to manufacturer's instructions and local codes for precautions required for passing chimney through a
combustible wall or ceiling. Inspect and clean vent system frequently in accordance with manufacturer's
instructions.
DO NOT CONNECT THIS UNIT TO A CHIMNEY SERVING ANOTHER APPLIANCE.
Use a 3" or 4" diameter type "L" or "PL" venting system.
Testé à: ASTM #1509-95, ULC S627-M93, ULC/ORD-C 1482-M1990 Room Heating. Pellet Burning Type, (UM) 84-HUD POUR
USAGE AVEC LES BOULETTES DE BOIS OU DE COMBUSTIBLE DE MAIS ÉCOSSÉ DES CHAMPS.
Puissance de Rendement: 50,700 Btu's/hr
Puissance Électrique: 115 VAC, 60 Hz, Début 4.6 Amps, Courir 1.6 Amps,
Éloignez le fil électrique de l'appareil. Ne pas faire passer le fil électrique au dessus ou en dessous de l'appareil.
DANGER: Il y a risque de décharge électrique.
Déconnectez le fil électrique de la prise de contact avant le service.
Remplacez la vitre seulement avec une vitre céramique de 5 mm disponible chez votre fournisseur.
Pour allumer, monter la température du thermostat au dessus de la température de la pièce, le poêle s'allumera automatiquement. Pour
éteindre, descendre la température du thermostat en dessous de la température de la pièce. Pour des instructions supplémentaires, référez
vous au manuel du propriétaire. Gardez la porte d'ouverture et la porte des cendres fermées hermétiquement durant l'opération.
PRÉVENTION DES FEUX DE MAISON
I
nstallez et utilisez en accord avec les instructions d'installation et d'opération du fabricant. Contactez le bureau de la construction ou le
bureau des incendies au sujet des restrictions et des inspections d'installation dans votre voisinage. Ne pas obstruez l'espace en
dessous de l'appareil.
AVIS - Pour Les Maisons Mobiles:
Ne pas installer dans une chambre à coucher. Un tuyau extérieur de combustion d'air doit être
installé et ne doit pas être obstrué lorsque l'appareil est en usage. La structure intégrale du plancher, du plafond et des murs de la
maison mobile doit être maintenue intacte.
Référez vous aux instructions du fabricant et des codes locaux pour les précautions requises pour passer une cheminée à travers un mur
ou un plafond combustibles, et les compensations maximums.
Inspectez et nettoyez la cheminée fréquemment. Ne pas connecter cet appareil à une cheminée servant un autre appareil.
Utilisez systèm de ventilation "L" ou "P" diamètre 76mm ou 102mm.
C
C
D
B
E
E
A
B
C
C
Listed Solid Fuel Room Heater/Pellet Type Insert. Also suitable for Mobile Home Installation. This appliance has
been tested and listed for use in Manufactured Homes in accordance with OAR 814-23-900 through 814-23-909.
Appareil de chauffage inséré de combustible solide/de type de boulettes. Accepté dans l'installation dans les maisons mobiles. Cet appareil a été
testé et enregistré pour l'usage dans les Maisons Mobiles en accord avec OAR 814-23-900 jusqu'à 814-23-909.
U.S. ENVIRONMENTAL PROTECTION AGENCY
Certified to comply with 2015 particulate emission standards at 1.1 g/hr EPA Method 28
and 5G. Not approved for sale after May 15, 2020
7014-079J
DO NOT REMOVE THIS LABEL / NE PAS ENLEVER L'ÉTIQUETTE
MADE IN CHINA / FAIT AUX CHINE
R
Report / Rapport
061-S-21-4
CB 1200 Pellet Stove
SERIAL NO. / NUMÉRO DE SÉRIE
G = 2"/51mm
H* = 2"/51mm
I = 6"/152mm
HOT WHILE IN OPERATION DO NOT TOUCH. KEEP CHILDREN, CLOTHING AND FURNITURE AWAY. CONTACT MAY CAUSE SKIN
CAUTION:
BURNS. SEE NAMEPLATE AND INSTRUCTIONS. Operate this unit with fuel hopper lid closed. Failure to do so may result in emissions
products' combustion from the hopper under certain conditions. Maintain hopper seal in good condition. Do not over fill the hopper.
CHAUD LORS DE L'OPÉRATION. NE PAS TOUCHER. GARDEZ LES ENFANTS ET LES VÊTEMENTS LOIN DE L'ESPACE DÉSIGNÉ DE L'INSTALLATION. LE CONTACT
ATTENTION:
PEUT CAUSER DES BRÛLURES À LA PEAU. VOIR L'ÉTIQUETTE ET LES INSTRUCTIONS. Opérez cet appareil avec le couvercle de la trémie fermé. Le défaut de ne pas
suivre les instructions peut résulter, sous certaines conditions, en une combustion des émissions des produits venant de la trémie. Ne pas remplir la trémie trop pleine.
H*
G
G
I
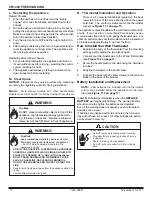
MINIMUM CLEARANCES TO COMBUSTIBLE MATERIALS / ESPACES LIBRES MINIMUM DES MATÉRIAUX COMBUSTIBLES:
A Back Wall to stove / Mur Arrière du poêle
2"/51mm
B Side Wall to Cast Top / Mur De Côté du haut
6"/152mm
CORNER INSTALLATION / INSTALLATION DU COIN :
C
Side Wall / Mur De Côté
2"/51mm
VERTICAL ADAPTER KIT INSTALLATION:
UN ASSEMBLAGE POUR ADAPTEUR POUR INSTALLATION VERTICALE:
D
Back Wall to Flue Pipe
/ Mur Arrière tuyau rigide
3"/76
mm
B Side Wall to Cast Top / Mur De Côté du haut
6"/152mm
CORNER INSTALLATION WITH VERTICAL ADAPTER KIT:
INSTALLATION DU COIN AVEC UN ASSEMBLAGE D'ADAPTEUR VERTICAL:
E
Side Wall / Mur De Côté
2"/51mm
ALCOVE INSTALLATION /
INSTALLATION DE L' ALCÔVE:
Max. Alcove Depth: / La profondeur maximum de l'alcôve 36"/914mm
A
Back Wall to stove / Mur Arrière du poêle
2"/51mm
B Side Wall to Cast Top / Mur De Côté du haut
6"/152mm
C
Unit corner to diagonal wall / Du Poêle du coin du mur diagonal
2" (51mm)
F
Top of Unit to Combustibles / Du Poêle du haut combustibles
12.5"/318mm
Alcove vertical installation / Installation verticale de l'alcôve
D
Back Wall to Flue Pipe
/ Mur Arrière tuyau rigide
3"/76
mm
Note 1:
In residential installations, when using Parts 811-0580, (3" - 3" Top Vent Adapter) and 811-3570
(3" - 6" Top Vent Adapter Collar) 24 gauge 6" single wall flue connector may be used.
Note 1:
Dans les installations résidentielles, lorsque les pièces 811-0580, (dessus de l'adapteur de
ventilation 3" - 3") et 811-3570 (collier de l'adapteur de ventilation 3" - 6"), un tuyau connecteur de 6"
pour mur simple de calibre 24 peut être utilisé.
Note 2:
In manufactured home installation, when using Part 811-0580, (3" - 3" Top Vent Adapter) and
811-3570 (3" - 6" Top Vent Adapter Collar), use listed double wall flue connector. An Outside Air Kit
(Part 811-0872 rear or 811-0570 floor), must be used with manufactured home installation.
Note 2:
Pour l'installation dans les maisons préfabriquées, lorsque les pièces 811-0580 (dessus de
l'adapteur de ventilation 3" - 3") et 811-3570 (collier de l'adapteur de ventilation 3" - 6"), utilisez un
tuyau connecteur enregistré pour mur double. Un assemblage d'air extérieur (pièce 811-0872 arrière
au 811-0570 la plancer), doit être utilisé pour l'installation dans les maisons préfabriquées.
A
B
F
A
D
US070
O-T L
Tested and
Listed by
Portland
Oregon USA
OMNI-Test Laboratories, Inc.
C
US
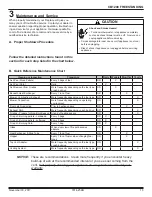
This wood heater needs periodic inspection and repair for proper operation. Consult the owner’s manual for further information. It is against federal regulations to operate this
wood heater in a manner inconsistent with the operating instructions in the owner’s manual.
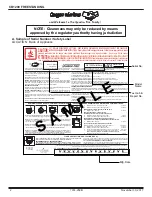
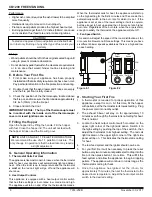
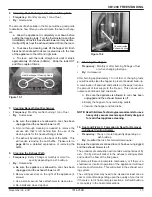
A. Sample of Serial Number / Safety Label
LOCATION: Back of Appliance
Serial No.
S A
M P
L E
Test Lab &
Report No.
Model
Name
Mfg. Date
NOTE: Clearances may only be reduced by means
approved by the regulatory authority having jurisdiction
and Welcome to the Quadra-Fire Family
!


