Quadra-Fire 3100 Series Operating & Maintenance Instructions Download Page 21

Page 21


250-6103C   December 6, 2004

3100 ACT Wood Stove Series

R

OPACITY

This is the measure of how cleanly your stove is burning.  Opacity is measured in percent; 100% opacity is when an object 

is totally obscured by the smoke column from a chimney, and 0% opacity means that no smoke column can be seen.  As you 

become familiar with your stove, you should periodically check the opacity.  This will allow you to know how to burn your stove 

as nearly smoke-free as possible (goal of 0% opacity).  

BURN RATES

STARTING FIRE:  

Open (push in) both controls fully.  After a wood load has been burning for 5 to 15 minutes (longer for very 

large pieces) close the Start-Up Air Control by pulling it out (to the right of the stove).  

HIGH: 

 Leave the Primary Air Control fully open (center of stove under the ashcatcher).  It is important to do this when reloading 

the stove.  Failure to do this could result in excessive emissions (opacity).

After a wood load has been burning for 5 to 15 minutes on High to achieve the following burn rates 

set the controls as listed below:

MEDIUM HIGH:

  Close the Primary Air Control to 1-1/4” to 2-1/2” (32-64mm) open,  Start-Up Air is closed.

MEDIUM LOW

: Close the Primary Control  to 1” - 1-1/4” (25-32mm) open.  Start-Up Air is closed.

LOW:

  Gradually close down the Primary Control, making sure to maintain flames in the stove. (Star-Up Air is closed.)  It is very 

important to maintain flames in your stove during the first few hours of a low burn to avoid excessive air pollution.

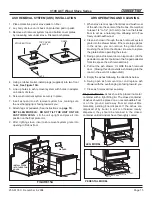
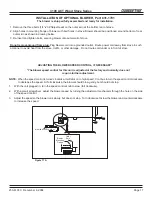
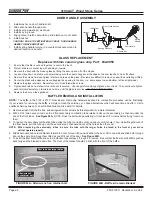
BLOWER OPERATING INSTRUCTIONS

(

see blower installation instructions on page 17)

If your Quadra-Fire wood stove is equipped with an optional blower, you should follow these guidelines:

1. 

Initial (cold) start-up:

  Leave blower off until your stove is hot and a good coalbed is established.  The blower may be 

turned on approximately 15 minutes after loading the stove with fuel.

2. 

High burn setting: 

 The blower may be left on throughout the burn.

3. 

Medium-Low or Medium-High burn setting:

  The blower should be left off until a good burn is established, then turned 

on at a medium or high rate.

4. 

Low burn setting

:  The blower tends to cool off the stove.  If you are using wet wood or a very low burn setting, leave 

blower off until the burn is well established.  Then, if you wish, turn the blower on at a lower rate.  Too high a blower setting 

with a low burn rate may adversely affect emissions.

5.  The blower is equipped with a speed control.  The highest blower speed is obtained by turning the speed control to“ON” and 

then adjusting counterclockwise towards “OFF” as far as possible without turning the blower off.  For a low blower speed, 

turn the control knob clockwise as far as possible.

OPERATING INSTRUCTIONS (Cont’d)

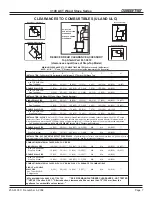
CAUTION:  DO NOT STORE WOOD CLOSER THAN THE REQUIRED CLEARANCES TO COMBUSTIBLE OF THE STOVE OR 

WITHIN THE SPACE REQUIRED FOR LOADING WOOD AND ASH REMOVAL

.

WOOD SELECTION AND STORAGE

Burn only dry seasoned wood.  Store wood under cover, out of the rain and snow.    Dry and well-seasoned wood will not only 

minimize the chance of creosote formation, but will give you the most efficient fire.  Even dry wood contains at least 15% moisture 

by weight, and should be burned hot enough to keep the chimney hot for as long as it takes to dry the wood out - about one hour.  

It is a waste of energy to burn unseasoned wood of any kind.
Dead  wood  lying  on  the  forest  floor  should  be  considered  wet,  and  requires  full  seasoning  time.    Standing  dead  wood  can 

be  considered  to  be  about  two-thirds  seasoned.   To  tell  if  wood  is  dry  enough  to  burn,  check  the  ends  of  the  logs.    If  there 

are  cracks  radiating  in  all  directions  from  the  center,  it  is  dry.    If  your  wood  sizzles  in  the  fire,  even  though  the  surface  is 

dry, it may not be fully cured.  
Splitting wood before it is stored reduces drying time.  Wood should be stacked so that both ends of each piece are exposed to 

air, since more drying occurs through the cut ends than the sides.  This is true even with wood that has been split.  Store wood 

under cover, such as in a shed, or covered with a tarp, plastic, tar paper, sheets of scrap plywood, etc., as uncovered wood can 

absorb water from rain or snow, delaying the seasoning process.

Summary of Contents for 3100 Series

Page 1: ...red condition Close the air controls completely by pulling them out until the glowing has stopped OVERFIRING VOIDS YOUR WARRANTY 4 Cool ashes should be disposed of carefully using a metal container 5...

Page 2: ...are old fashioned when it comes to craftsmanship Each unit is meticulously fabricated and gold and nickel surfaces are hand finished for lasting beauty and enjoyment Our pledge to quality is completed...

Page 3: ...ing Instructions 20 21 Building a Fire 20 Opacity 21 Burn Rates 21 Wood Selection 21 Blower Operation 21 MAINTENANCE Creosote Removal 22 Chimney Cleaning 22 Ash Disposal 22 Over ring 22 Firebrick 22 G...

Page 4: ...6 152mm listed high temperature UL 103 HT or ULC S629M chimney Components required by manufacturers for installation such as the chimney support base firestop as appropriate attic insulation shield i...

Page 5: ...UNI BODY LEG MODEL C L 24 5 8 625mm 9 1 4 235mm 12 5 16 313mm 15 1 16 383mm 14 15 16 379mm 10 15 16 278mm 19 1 16 484mm 18 1 4 464mm 21 0 533mm 34 1 16 357mm Back of stove to glass 10 1 2 267mm 20 1 4...

Page 6: ...und the chimney This space around a chimney is necessary to allow natural heat removal from the area Insulation in this space will cause a heat buildup which may ignite wood framing NOTE Clearances ma...

Page 7: ...le Wall air insulated connector pipe with UL103 HT listed factory built Class A chimney or a masonry chimney Mobile Home must be equipped with a spark arrestor Maximum depth of Alcove shall be no more...

Page 8: ...Top CANADA 203mm 8 203mm 8 203mm 8 457mm 18 Millennium 1232mm 48 1 2 minimum 1032mm 40 5 8 minimum Millennium 978mm 38 1 2 minimum Step Top Uni body Step Top 1245mm 49 minimum Must extend 2 51mm beyo...

Page 9: ...ture that is within 10 305cm of the chimney measured horizontally See 2 10 3 Rule below These are safety requirements and are not meant to assure proper ue draft We recommend using a minimum total sys...

Page 10: ...iner 5 8 16mm Minimum or Equivalent Sill support Header Wood Stud 2 51mm Clearance from chimney wall Fireclay liner 5 8 16mm Minimum or Equivalent The ue should be checked to determine that it is not...

Page 11: ...speci ed by its manufacturer It may be necessary to cut the wall studs and install a header and a sill frame to maintain the wall support The hole in the chimney must have at least an 8 203mm diameter...

Page 12: ...st the chimney Install the trim collar on the outside of the opening Check to make sure there is a 1 25mm air space between the connector and the chimney section During installation be certain that a...

Page 13: ...up which may ignite the ceiling joists The other method is to install an exterior chimney that runs up the outside of the residence Figure 13B This method of installation requires at a minimum a wall...

Page 14: ...n Canada this appliance must be connected to a 6 152mm factory built chimney conforming to CAN ULC 629M STANDARD FOR FACTORY BUILT CHIMNEYS Floor protection referenced on page 8 must be followed 8 Use...

Page 15: ...open ash removal door and replace ash drawer with the overhanging lip facing toward you 7 Close ash removal door securely ARS OPERATING AND CLEANING FIGURE 15A 4 Using a rubber mallet install plugs su...

Page 16: ...Head socket or wrench from the adapter and save 5 Secure mounting brackets to the bottom of the stove with 1 4 20 Phillips screws These screws are located on the outer skin at the bottom rear of the s...

Page 17: ...trol 3 Adjust the speed so the blower runs slowly but does not stop Turn clockwise to slow the blower and counterclockwise to increase the speed The blower speed control for this unit is adjusted at t...

Page 18: ...m metal ex or rigid piping to directly connect outside air to the unit or into vented crawl space Do not put ex into a non vented crawl space Use the supplied termination cap with a rodent screen Seal...

Page 19: ...e wood gives off ammable gases which burn above the fuel with bright ames During this stage of burning it is very important that the ames be maintained and not allowed to go out This will ensure the c...

Page 20: ...some vapor rise from the stove surface this is normal We recommend that you open a window until the odor dissipates and paint is cured NOTE Stove should be run full open for 15 minutes a day to keep a...

Page 21: ...uld be left off until a good burn is established then turned on at a medium or high rate 4 Low burn setting The blower tends to cool off the stove If you are using wet wood or a very low burn setting...

Page 22: ...he door glass This air ow washes the glass helping to keep smoke from adhering to its surface When operated at a low burn rate less air will be owing over the glass and the smokey relatively cool cond...

Page 23: ...e top of the bottom bricks Slide top of bricks under clip on back of rebox wall and push bottom of brick back 5 Install side bricks Slide top of brick under clips on side of rebox and push the bottom...

Page 24: ...bustion processes can be frustrating If your reason for removing the baf e is simply to clean the chimney you have alternatives which will save time and effort Call a quali ed chimney sweep or an auth...

Page 25: ...see page 21 832 3401 Ceramic Blanket 1 thick eld cut to t size 14 1 4 x 19 1 2 832 2670 Component Pack includes paint pedestal oak trim gold spring handles and manual 832 0540 Door Handle Assembly 83...

Page 26: ...ifold Tubes 4 13 Oak Trim for Pedestal 2 14 Pedestal Base 1 11 2 3 4 5 6 7 8 9 10 12 13 14 EXPLODED VIEWS Item Part Name 1 Door Cast 2 Door Handle 3 Glass Replacement 4 Glass Frame Assembly 5 Glass Fr...

Page 27: ...years for optional accessories Adjustments regular maintenance cleaning and temporary repairs do not qualify for a service call fee and will not be covered The replacement of consumer replaceable ite...

Page 28: ...5076254 5113843 5191877 5218953 5263471 5328356 5341794 5347983 5429495 5452708 5542407 5601073 5613487 5647340 5688568 5762062 5775408 5890485 5931661 5941237 5947112 5996575 6006743 6019099 6048195...

Reviews: