8
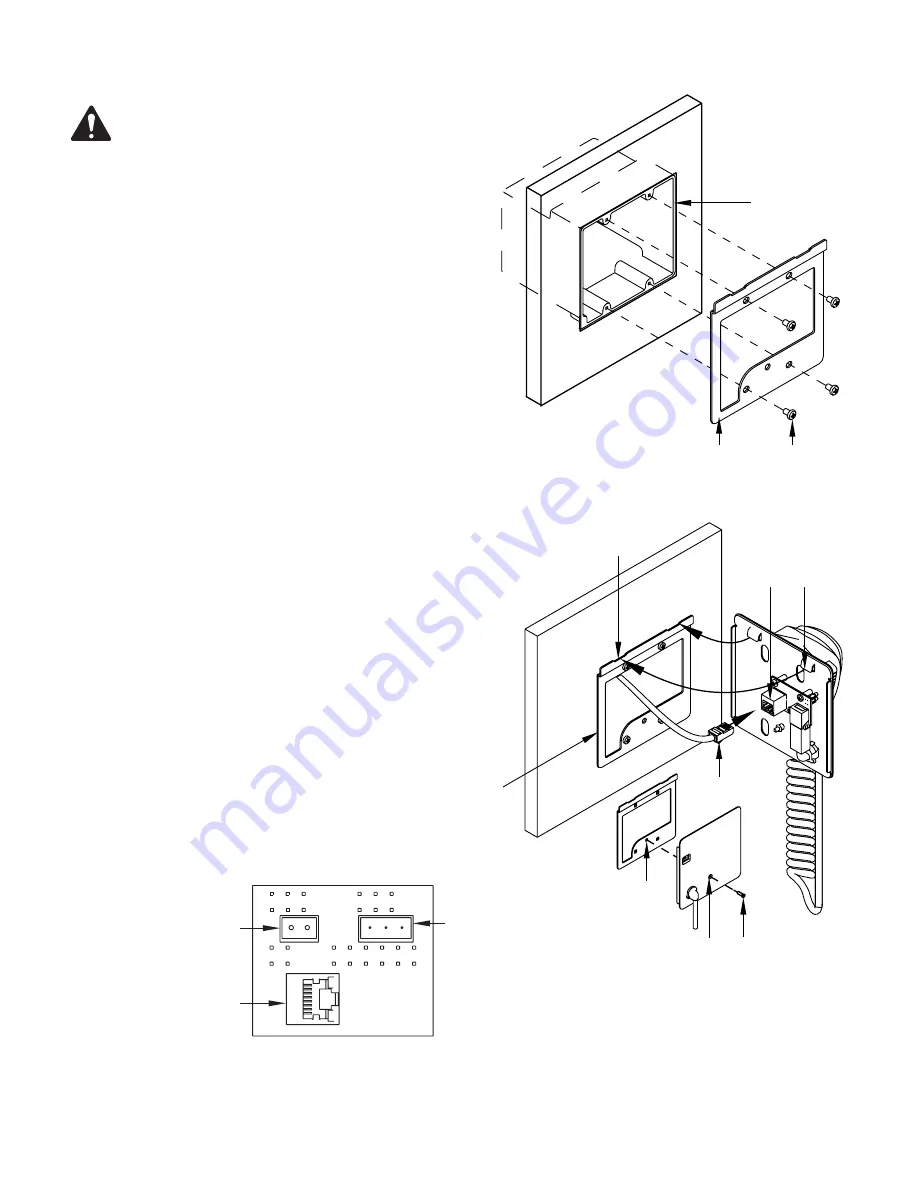
Mounting the Mounting Bracket to a 2-Gang Electrical Box - New Construction
ROTE!:
The mounting procedure for an old-construction
2-gang box is the same, however not all old-construction boxes
will work with the PS-X. Be sure you verify the fit before installing
the old-construction box in the wall.
The 2-gang electrical box must be UL listed, and should be installed in the wall,
during construction, with the Cat 5e cable pre-wired.
Refer to
Figure 4
.
1. Place the Mounting Bracket on the wall aligning the holes in the Mounting
Bracket
(2)
with the holes in the 2-gang box
(1)
.
2. Use four Mounting Bracket Screws (3) and an appropriate screwdriver to
secure the Mounting Bracket to the 2-gang box.
Mounting the PS-X to the Mounting Bracket
Refer to
Figure 5
.
1. Feed the Cat 5e cable
(1)
with a Class 2 RJ45 connector, through the
Mounting Bracket
(2)
, and plug it into the RJ45 socket
(3)
on the back of
the PS-X.
2. Carefully angle the top of the PS-X forward (towards the wall), and slide the
PS-X onto the Mounting Bracket
(1)
inserting the two mounting tabs
(4)
into the mounting tab receptacles
(5)
. Make sure the cable is fed carefully
into the box or wall and is not binding anywhere.
3. After engaging the tabs, straighten the PS-X, pull slightly down, and push in
on the bottom.
4. Secure the PS-X to the Mounting Bracket with one counter sunk Phillips
screw
(5)
inserted in the hole
(6)
in the PS-X microphone docking plate.
Page Station Connector Adaptor Labeling
Refer to
Figure 6
When you connect the adapter to the Page Station, it makes use of the GPIO
and Mic/Line connectors on the Page Station and the labels on the back of the
Page Station are no longer relevant. Refer to the Page Station User Manual for
details. The following Page Station connectors are available for use.
1. RJ-45 connector to the PS-X (J5)
2. Aux Power (J4)
3. Line Out (J5)
— Figure 4 —
1
2
3
— Figure 5 —
1
2
3
4
5
6
5
8
— Figure 6 —
2
1
3
J3
J4
J5


