background image


35


c.


Direct attachment 


3.8.


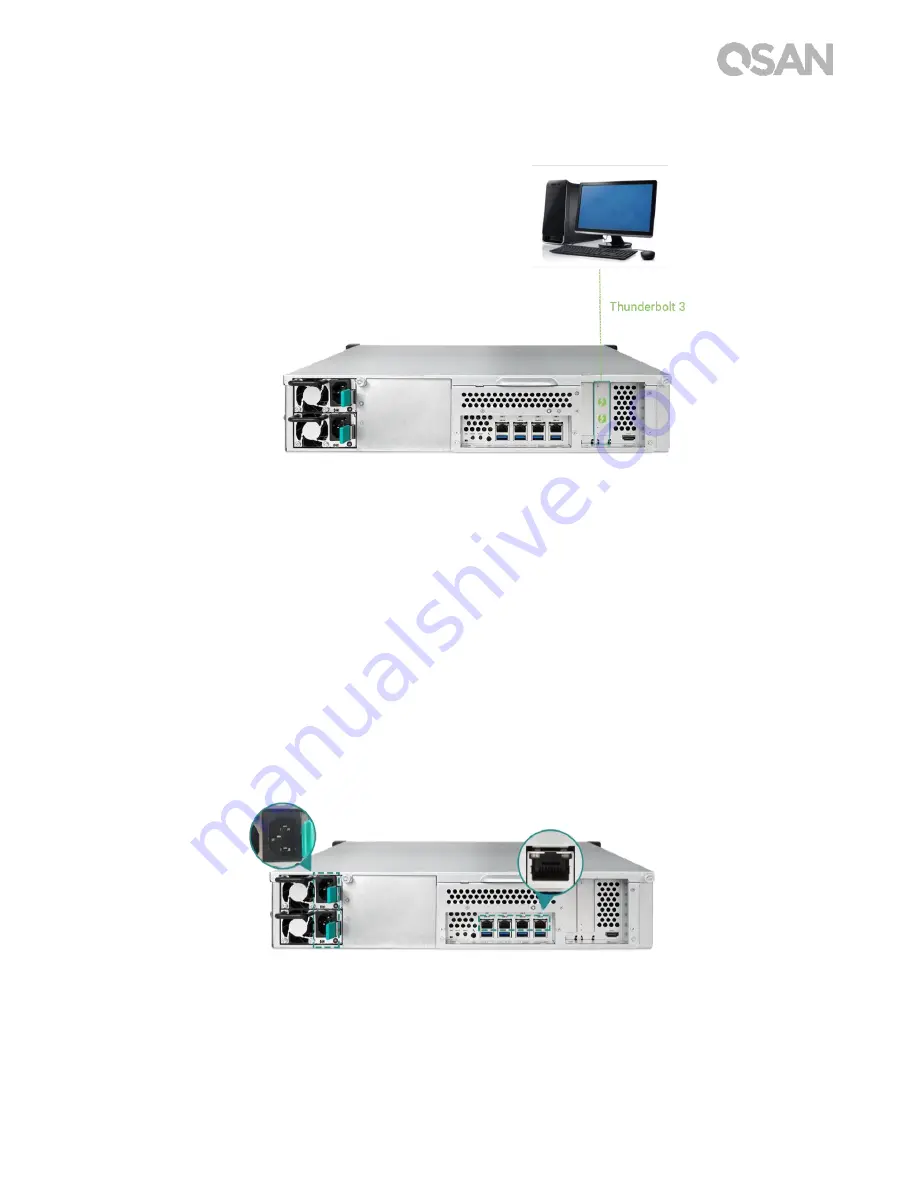
Start Up Your System 

Before you power on your XCubeNAS for the first time, please make sure the following tasks 
are done: 

1.


Connect one end of each power cord to the power ports located on the back of the 
XCubeNAS and the other end to a power outlet. 

2.


Connect at least one LAN cable to one of the LAN ports and the other end to your 
switch, router, or hub. 


Summary of Contents for XN8012RE

Page 1: ...are Owner s Manual QSAN Technology Inc www qsan com Copyright 2019 QSAN Technology Inc All rights reserved No part of this document may be reproduced or transmitted without written permission from QSAN Technology Inc ...

Page 2: ...tice Trademarks QSAN the QSAN logo XCubeNAS and QSAN com are trademarks or registered trademarks of QSAN Technology Inc Intel Xeon Pentium Core Celeron and Intel Inside logo are trademarks of Intel Corporation in the United States and other countries Other trademarks and trade names used in this document to refer to either the entities claiming the marks and names or their products are the propert...

Page 3: ...nts will be the same on generally available systems Furthermore some measurements may have been estimated through extrapolation Actual results may vary Users of this document should verify the applicable data for their specific environment This information contains examples of data and reports used in daily business operations To illustrate them as completely as possible the examples include the n...

Page 4: ... is operated in a commercial environment This equipment generates uses and can radiate radio frequency energy and if not installed and uses in accordance with the instruction manual may cause harmful interference to radio communications Operation of this equipment in a residential area is likely to cause harmful interference in which case the user will be required to correct the interference at hi...

Page 5: ...ration 8 Do not place the XCubeNAS near any liquid 9 Do not place the XCubeNAS on any uneven surface to avoid falling off and damage 10 Do no place the XCubeNAS on the ground and do not step on the system to prevent any potential damages 11 Make sure the voltage is correct in the location where the XCubeNAS is installed Contact the distributor or the local power supply company for the information ...

Page 6: ... equivalent type battery use and dispose of used batteries according to the instructions INFORMATION QSAN provides a limited warranty for QSAN branded hardware products System hardware and peripheral product s 3 years limited warranty from date of original purchase For more detail warranty policy please refer to QSAN official website https www qsan com en warranty php ...

Page 7: ...ve Numbering 15 2 3 Disk Drive Form Factors 15 3 Install the System Hardware 16 3 1 Install the Disk Drive in the Tray 16 3 2 Upgrade Memory 20 3 3 Install the Optional Adapter Card 24 3 4 Replace System Fan 27 3 5 Replace Malfunctioning PSU 29 3 6 Install the Rail Kits 31 3 7 Connect the System to the Host 34 3 8 Start Up Your System 35 4 Discover and Install QSM 37 5 Restart Shutdown Logout QSM ...

Page 8: ...the System 50 10 Quick Maintenance 53 10 1 Replace Fan Module 54 10 2 Replace Power Supply Unit 55 11 Support and Other Resources 57 11 1 Getting Technical Support 57 11 2 Documentation Feedback 58 Appendix 59 End User License Agreement EULA 59 Expansion Enclosure List 62 ...

Page 9: ...nge disassemble or upgrade the equipment s components by yourself Doing so may violate your warranty and expose you to electric shock Refer all servicing to authorized service personnel Please always follow the instructions in this owner s manual Related Documents There are related documents which can be downloaded from the website XCubeNAS QIG Quick Installation Guide https www qsan com en downlo...

Page 10: ...day UTC 8 Via Skype Chat Skype ID qsan support Service hours 09 30 02 00 Monday Friday UTC 8 Summertime 09 30 01 00 Via Email support qsan com Information Tip and Caution This manual uses the following symbols to draw attention to important safety and operational information INFORMATION INFORMATION provides useful knowledge definition or terminology for reference TIP TIP provides helpful suggestio...

Page 11: ...e which is a placeholder for actual text provided by the user or system Example copy source file target file square brackets Indicates optional values Example a b indicates that you can choose a b or nothing braces Indicates required or expected values Example a b indicates that you must choose either a or b vertical bar Indicates that you have a choice between two or more options or arguments Sla...

Page 12: ...hich is designed for composite SMB and enterprise applications for enterprise and SMB users Before setting up your new XN8012RE please check the package contents to verify those items below Besides make sure to read the safety instructions carefully 1 1 Package Contents Main Unit 1 AC Power cord 2 RJ45 Cable 2 Screws for 3 5 drives 6 32 48 Screws for 2 5 drives M3 48 ...

Page 13: ... ECC U DIMM RAM Max 16GB x 4 64GB Built in 1GbE Network Interface 4 Additional PCIe slot for 10 GbE Thunderbolt 3 SAS adapter card that can demand high bandwidth and capacity expansion Tool less design for chassis opening fan module replacing and installing rail kit Following tables are hardware specifications of XN8012RE Model Name XN8012RE Form Factor Rackmount 2U 12bay CPU Intel Xeon 3 3GHz Qua...

Page 14: ...orts 1 GbE LAN RJ45 x4 PSU 250W 1 1 redundant 100 240V 5A 2 5A 50 60Hz Dimension H x W x D mm 19 Rack mount 88 5 x 438 x 510 Agency Certifications FCC Class A CE Class A BSMI Class A VCCI Class A RCM Class A Note Model specifications are subject to change without notice Please refer to http www qsan com for the latest information 1 LFF Large Form Factor 3 5 disk drive ...

Page 15: ... XN8012RE hardware component and give you the ability to be able to successfully configure and operate your XN8012RE system Following is the key components of XN8012RE Front and Rear Panel System Disk Drive Numbering Disk Drive Form Factors 2 1 Front and Rear Panel The figure below contains the information about buttons and indicators modules Front Panel Rear Panel ...

Page 16: ...dicator for Power Status 2 Unique Identifier UID Button LED Indicator 3 System Access LED Indicator 4 System Status LED Indicator 5 USB 2 0 Port 6 Disk Drive Power LED Indicator 7 Disk Drive Status LED Indicator 8 Back Power Supply Unit Power Port 9 Power Supply Unit PSU Indicator and Beep Off Button 10 Unique Identifier UID LED Indicator 11 Mute Button 12 Reset Button 13 Console Port 14 Gigabit L...

Page 17: ...t performance SATA HDDs or SSDs from the market it will significantly reduce your IT infrastructure investment cost Please refer to the following website for the compatibility of HDD and SSD https www qsan com en download php Table 2 2 Supported Disk Drive Types Form Factor Number of Tray Supported Drive Type Type1 3 5 LFF Tray 12 3 5 2 5 SATA HDD 2 5 SATA SSD TIP 1 2 5 SATA drives can also be ins...

Page 18: ...y 3 1 1 Tools and Parts for Drive Installation A screwdriver Phillips 1 At least one 3 5 or 2 5 SATA drive please visit www qsan com for compatible drive models CAUTION Please ensure that there is no data on the disk to prevent important data being formatted 3 1 2 LFF Disk Drive Description Table 3 1 Front Side Components of LFF SFF Disk Drive Trays Item Number Description 1 Release Button 2 Disk ...

Page 19: ...e Disk Drive LFF 1 Open the drive tray Push the release button from right to left to open the carrier handle Hold the carrier handle and pull out the disk drive tray repeat the steps above to remove other disk drive trays ...

Page 20: ... Secure the drive from the four spots indicate below with four 6 32 screws provided in the accessory box 3 Install a 2 5 SSD into an LFF tray Place the drive in the blue area shown below of the tray Turn the tray upside down and secure the drive from the bottom of the tray with four M3 screws provided in the accessory box ...

Page 21: ...ive bay all the way to the back until the carrier handle can be closed Push the disk drive lock from right to left to lock the drive tray TIP Make sure the tray is pushed in all the way otherwise the drive might not function properly 5 Repeat the steps above to install all prepared drives ...

Page 22: ...move a memory module on your XCubeNAS please follow the steps as illustrated below 1 Shutdown your XCubeNAS and disconnect power adapter network cable s or any other device cable that is attached to your system to prevent any possible damages 2 Remove the rear top cover Loosen the screw on the back of the XCubeNAS Pull the rear top cover and put it aside CAUTION When you remove the rear top cover ...

Page 23: ...21 Push down on the memory module with firm and even pressure The retaining clips will snap into position as the module is correctly inserted ...

Page 24: ...ove to shut down your XCubeNAS and disconnect the cables and then remove the rear top cover Disengage the memory retaining clips by pushing them outwards and the module will pop out of the slot Follow step 4 above to put back the top cover The following table is the suggested installation combination for memory Table 3 2 The Suggested Installation Combination for Memory Pair 1 Pair 2 Total Memory ...

Page 25: ...serted into any slot as single channel memory configuration 2 RAMs Supports two modules inserted into slot 1 and slot 3 or slot 2 and slot 4 as one pair of dual channel memory configuration 4 RAMs Supports four modules inserted into all the slots as two pairs of dual channel memory configuration INFORMATION 1 If you want to purchase the optional memory please contact your nearest local reseller or...

Page 26: ... low profile bracket before installing the card on your XCubeNAS To install the adapter card please follow the steps as illustrated below 1 Shutdown your XCubeNAS and disconnect power adapter network cable s or any other device cable that is attached to your system to prevent any possible damages 2 Remove the rear top cover Loosen the screw on the back of the XCubeNAS Pull the rear top cover and p...

Page 27: ... s cover Align the card s connector with the expansion slot and insert the card into the slot CAUTION Make sure the connector is fully inserted Otherwise the network expansion card might not be able to function properly Put back and fasten the screw that you removed in step 3 1 to secure the newly inserted card ...

Page 28: ...card to the mainboard Align the connectors Please make sure that the position is the same as the figure shown below Push to connect the cable and the connectors 6 Put back the rear top cover you lifted in step 2 Align the pin at the side of the rear top cover with the slots on the chassis edge and push the rear top cover back in position Put back and fasten the screw on the back of the XCubeNAS ...

Page 29: ...want to purchase the optional adapter card please contact your nearest local reseller or visit QSAN official website https qsan com location 2 See the recommended adapter cards from the QSAN website https www qsan com en download php 3 4 Replace System Fan If a system fan failed to function please see the instructions below to open the XCubeNAS and replace the malfunctioning fan 1 Shutdown your XC...

Page 30: ...dule and lift it upwards 4 Prepare a new fan module and replace the system with the new fan module Align the connectors on and fan module to the connector on the mainboard Slide the fan module into the fan holder rail Make sure both sides are aligned properly as illustrated below then push the module all the way down ...

Page 31: ... with two redundant Power Supply Units PSU that can be hot swapped when the PSU is not functioning If a PSU or its fan failed to function please see the instructions below to replace the malfunctioning PSU CAUTION The power supply unit is heavy and fragile please use both hands while installing removing or carrying them Recommended place for removing the power supply unit the system is in a well s...

Page 32: ...PSU to silence the beeping sound 2 Remove the PSU from XCubeNAS Push the lever of the PSU at the back panel in the indicated direction Pull out the PSU from the XCubeNAS 3 Prepare a new PSU and push it back to the slot until you hear a click Please make sure that the direction of the PSU is correctly installed to prevent any potential damage by improper installation ...

Page 33: ...d rail kit full extension and thin slide with tool less bracket AA612508 series please contact QSAN authorized reseller CAUTION The populated XCubeNAS system can be very heavy to avoid any potential injury or harm to installers or damage to the system we strongly recommend at least two certified operators or engineers perform the system installation 1 Pull the inner rail out and slide the intermed...

Page 34: ...32 Copyright 2019 QSAN Technology Inc All Rights Reserved 2 Install the inner member onto the chassis 3 Install the outer rail bracket assembly to the frame Repeat this step for the other side ...

Page 35: ...ull the middle member fully extended in locked position Ensure ball bearing retainer is located at the front of the middle member Insert chassis into the middle outer member When hitting the stop pull push release tab to unlock and retract chassis into rack Pull the chassis into position and ensure the chassis ear is located on the chassis The chassis ear allows you to drag out the chassis from it...

Page 36: ...s Reserved 3 7 Connect the System to the Host XN8012RE has four onboard 1Gbps LAN ports for host connections You can learn more about the path configuration in cabling for XN8012RE by following images a One LAN connection b Multiple LAN connections ...

Page 37: ...e first time please make sure the following tasks are done 1 Connect one end of each power cord to the power ports located on the back of the XCubeNAS and the other end to a power outlet 2 Connect at least one LAN cable to one of the LAN ports and the other end to your switch router or hub ...

Page 38: ... the minimum requirement The rating of the power cord that you purchase must equal to or be higher than the minimum requirement to ensure the system safety and reliability INFORMATION The Following are the operational conditions for XN8012RE Temperature Operating temperature 0 to 40 C Shipping temperature 10 C to 50 C Operating Relative Humidity 20 to 80 non condensing Non Operating Relative Humid...

Page 39: ...CubeNAS 2 Open a web browser on your computer connected to the same local area network as XCubeNAS and use either of the following methods on the browser a Use Web Finder find qsan com Please make sure the XCubeNAS has internet access ability before using the Web Finder b If your XCubeNAS cannot be connected to the internet please try downloading and installing XFinder application from the QSAN we...

Page 40: ...ts Reserved 3 Click Connect on the Web Finder or double click on your XCubeNAS on the XFinder the welcome page will be launched on your web browser 4 Click Quick Setup or Custom Setup to start the setup process and follow the onscreen instructions ...

Page 41: ... PC must be on the same local network 3 If you cannot find your XCubeNAS the default IP address for LAN 1 is 169 254 1 234 4 If you expanded your memory or add a network expansion card earlier on you can now check to make sure the system recognizes the new module You can check the status by following steps a Login to QSM as admin or a user belongs to the administrator s group b Find the memory sta...

Page 42: ...hutdown Logout QSM If you want to restart shutdown or log out QSM please follow the steps below 1 To restart or shutdown QSM please click on the QSAN logo on the top left corner then choose the option which you would like to proceed Click Yes button on the confirm window ...

Page 43: ...41 2 To log out QSM please click User Profile on the top right corner then choose Logout Click Yes button on the confirm window ...

Page 44: ...rear panel for 3 seconds a short beep sound for 1 second will be heard The administrator password and all the network settings will be reset the system configuration will result in Reset Admin password to the default value 1234 All networking set to DHCP All data service ports set to default setting All data service enable and set to default port VLAN will be terminated Vswitch will be deleted Por...

Page 45: ... set to default AntiVirus setting are deleted SQL settings are set to default Media Library index will be deleted After configs are deleted restart the XCubeNAS Log out QSAN Cloud Reset to default through QSM You can also reset network setting or all the setting through QSM 1 Please click Control Panel System Maintenance System Recovery Choose the option which you would like to proceed a Reset net...

Page 46: ...44 Copyright 2019 QSAN Technology Inc All Rights Reserved 2 Click the Reset Device button to proceed ...

Page 47: ...dicators LEDs Number Description Definition 1 Enclosure Power Button LED Power Button Press the button one time to turn ON or OFF the system power Keep pressing for 4 seconds to force turn OFF the system power Power LED White power is ON at least one power supply unit is supplying power to the system White flashes every 0 5 sec the system is at the stage of starting up or shutting down or the NAS ...

Page 48: ... 100 2 The storage folder pool is going to be full 95 3 The system fan is out of function 4 A bad sector is detected on the hard disk drive 5 One of the pool is in degraded read only mode 6 Hardware self test error e g PSU failed abnormal voltage the temperature is at critical high low any cooling fan module failed or removed any pool failed Amber flashes every 0 5 sec firmware is upgrading or RAI...

Page 49: ...ternet Light flashes when data is being accessed Speed Light OFF Speed less than 10Mbps Light ON Connected to the internet 8 Unit Identification UID LED rear panel Blue the system has been identified Off the system has not been identified 9 PSU LED OFF No AC power to power supplies AC present only 5VSB on PS off Green PSU is on and OK Amber Power supply failure for main output ...

Page 50: ...em pool is going to be full 95 3 The system fan is out of function 4 A bad sector is detected on the hard disk drive or hard disk failed 5 One of the pool is in degraded mode 6 Hardware self test error e g PSU failed abnormal voltage the temperature is at critical high low any cooling fan module failed or removed any pool failed 7 Remove hard disk or solid state drive Note If one event has trigger...

Page 51: ...se refer to the table below for a maximum number of expansion enclosures and disk drives prior to performing system deployment Table 9 1 XCubeNAS System and Expansion Enclosure Configuration Rules NAS Model Expansion Enclosures Max No of Expansion Units Max No of Disk Drives Max Raw Capacity HDD 14 TB SATA SSD 2 TB XN8012RE with SAS 12G Adapter Card XD5312 2U 12Bay 8 12 12 x 8 118 1 512 TB XD5316 ...

Page 52: ...rage space 1 Please follow the steps in chapter 3 3 to install the SAS adapter card Chapter 3 3 Install the Optional Adapter Card 2 Connect your XCubeNAS to one or more expansion unit s via the SAS adapter card and SAS cable s The following images illustrate some examples of expansion types for your system a Single Path Expansion ...

Page 53: ...51 b Dual Path Expansion 3 After connected to the expansion units you can check the deployment topology on QSM Control Panel Storage app Overview Enclosure Map ...

Page 54: ...52 Copyright 2019 QSAN Technology Inc All Rights Reserved 4 The status of each expansion unit will be shown on QSM Monitor app Hardware ...

Page 55: ... that all maintenance is carried out by a certified technician Do not attempt to carry out any maintenance outside of those outlined in the following section of this guide System damage due to incorrect maintenance or FRU replacement can affect your product warranty If you are unsure of the problem related to your XCubeNAS system we strongly recommend you to contact or get help from QSAN support t...

Page 56: ...ed when the fan failed If a fan failed to function you can check the fan status on QSM Please go to Monitor app Hardware The System Health and Fan Speed will show Error if failed You can also check the status by clicking Dashboard on the top right corner on the desktop The System Status will also display Error and its message Fan No is not functioning ...

Page 57: ...2 Replace Power Supply Unit XCubeNAS comes with two redundant Power Supply Units PSU that can be hot swapped it when the PSU is not functioning If a PSU or its fan failed to function you can check the PSU status in two ways 1 On PSU the PSU LED will turn to color amber 2 In QSM Please go to Monitor app Hardware The PSU status will show Error if failed You can also check the status by clicking Dash...

Page 58: ... which means your PSU has encountered an issue and need to be replaced immediately To replace the malfunction PSU please refer to chapter 3 5 Replace Malfunctioning PSU After the new PSU is successfully installed the PSU status LED will be green and you can see the PSU status displaying Good on QSM ...

Page 59: ...t Skype ID qsan support Service hours 09 30 02 00 Monday Friday UTC 8 Summertime 09 30 01 00 4 Via Email support qsan com Information to collect 1 Product name model or version and serial number 2 Firmware version 3 Error messages or screenshot images 4 Product specific reports and logs 5 Add on products or components installed 6 Third party products or components installed Information for Technic...

Page 60: ...roviding documentation that meets and exceeds your expectations To help us improve the documentation email any errors suggestions or comments to docsfeedback qsan com When submitting your feedback including the document title part number revision and publication date located on the front cover of the document ...

Page 61: ...ELLER S APPLICABLE RETURN POLICY General QSAN Technology Inc QSAN is willing to grant you User a license of software firmware and or other product sold manufactured or offered by QSAN the Product pursuant to this EULA License Grant QSAN grants to User a personal non exclusive non transferable non distributable non assignable non sub licensable license to install and use the Product pursuant to the...

Page 62: ...ING BUT NOT LIMITED TO ANY MERCHANTABILITY FITNESS FOR A PARTICULAR PURPOSE WORKMANLIKE EFFORT TITLE AND NON INFRINGEMENT ALL PRODUCTS ARE PROVIDE AS IS WITHOUT WARRANTY OF ANY KIND QSAN MAKES NO WARRANTY THAT THE PRODUCT WILL BE FREE OF BUGS ERRORS VIRUSES OR OTHER DEFECTS IN NO EVENT WILL QSAN BE LIABLE FOR THE COST OF COVER OR FOR ANY DIRECT INDIRECT SPECIAL PUNITIVE INCIDENTAL CONSEQUENTIAL OR...

Page 63: ...the software or firmware anytime QSAN may assign its rights and obligations under this EULA to any third party without condition This EULA will be binding upon and will inure to User s successors and permitted assigns This EULA shall be governed by and constructed according to the laws of R O C Any disputes arising from or in connection with this EULA User agree to submit to the jurisdiction of Ta...

Page 64: ... 8643 internal connectors Enclosures LFF 2U12 LFF 3U16 LFF 4U24 SFF 2U26 No of Hard Drives 12 16 24 26 Hard Drive Interfaces 12Gb s 6Gb s 3 5 2 5 SAS NL SAS HDD 2 5 SAS SSD 3 5 SATA HDD 2 5 SATA SSD 2 5 SAS NL SAS HDD 2 5 SAS SATA SSD Dimension H x W x D mm 88 x 438 x 515 130 4 x 438 x 515 170 3 x 438 x 515 88 x 438 x 491 Power Supply 80 PLUS Platinum two redundant 770W 1 1 AC Input 100 127V 10A 5...

Reviews: