®
5
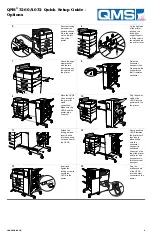
Pass the locking
bar under the
printer and hook
it into the center
slot on the left
side of the
printer.
6
On the right side
of the printer,
push up the
locking bar
supporting unit
to fit the tabs in
the slots behind
the printer cover.
7
Attach the align-
ment bracket
with the two
thumbscrews on
the right side of
the printer.
8
Raise the
horizontal
transport, then
flip down the two
supporters so
that it remains
horizontal.
9
Move the HCOS
close enough to
the printer for
cable
connection.
Make sure the
HCOS and the
printer align
correctly.
10
Plug the power
cable of the
HCOS into the
power outlet on
the printer.
11
Extend the
locking bar and
insert the end
into the opening
on the bottom of
the HCOS.
12
Gently push the
HCOS towards
the printer until
they lock in
place. Make
sure the
horizontal
transport is
positioned
correctly on the
top of the printer
and its far end
goes securely
into the vertical
transport.
13
Insert and
tighten the
locking screw to
secure the
HCOS to the
printer.
14
Plug the
interface cable
of the HCOS
into the output
connector on the
printer.
Summary of Contents for 3260
Page 4: ......


