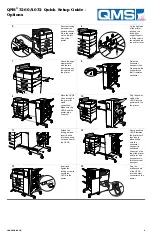
QMS 3260 Quick Setup Manual Download Page 6


®

5

Insert the cutter/
supporter into 
the slots at the 
front end of the 
duplexer. It is 
used to support 
the face-up tray.

6

Insert the two 
thumbscrews 
into the face-up 
tray holder.

7

Attach the face-
up tray holder to 
the printer and 
tighten the two 
thumbscrews.

8

Attach the face-
up tray onto the 
holder.

*&!#"*!"

1

Make sure the 
printer is 
unplugged from 
the power outlet 
and the 
communication 
cables.

Unpack the 
HCIF and its 
parts, and 
remove any 
packing material 
or tape. 

2

Lock the front 
roller on the 
HCIF.

Make sure the 
connecting 
cable is fed 
through the 
cable notch on 
the rear of the 
HCIF.

3

With another 
person, lift the 
printer and lower 
it onto the HCIF, 
while noting the 
alignment of the 
covers of the 
printer and 
HCIF.

4

Pull the lower 
tray of the 
printer all the 
way out until it 
stops, then lift it 
up slightly to 
remove it.

Remove the top 
tray of the HCIF, 
using the same 
technique.

WARNING!

 The printer weighs approximately 91 lbs (41 kg) without consumables. Do not attempt to lift the printer by yourself.

ACHTUNG! 

Der Drucker hat ein Gewicht von ungefähr 41 kg. Bitte versuchen Sie niemals, den Drucker alleine anzuheben oder zu transportieren.

5

Attach one 
mounting 
bracket to the 
left side of the 
printer/HCIF 
frame and 
secure it with a 
thumbscrew.

6

Attach the other 
mounting 
bracket to the 
right side of the 
printer/HCIF 
frame and 
secure it with a 
thumbscrew.

Summary of Contents for 3260

Page 1: ...he front and back Set the printer down on a sturdy flat surface 3 Remove all packing tape and lower the multi purpose tray 1 Open the side and front doors of the printer 2 Unpack the toner cartridge a...

Page 2: ...the rear side fuser plug 6 Peel off the label on the front side of the fuser 7 Use a coin to unscrew the front side fuser plug 8 Remove the front side fuser plug 1 Open the paper tray by grasping the...

Page 3: ...ont panel menus Operate the printer within a temperature range of 50 90 5 F 10 32 5 C and a relative humidity range of 20 80 Install the printer on a hard level surface capable of supporting the 91 lb...

Page 4: ......

Page 5: ...ure the duplexer by hooking the safety wire of to the printer 4 Plug the duplexer cable into the printer Close the duplexer 1 Unpack the face up tray and its parts Face up tray Face up tray holder Thu...

Page 6: ...HCIF 3 With another person lift the printer and lower it onto the HCIF while noting the alignment of the covers of the printer and HCIF 4 Pull the lower tray of the printer all the way out until it st...

Page 7: ...the feeder go securely into the slots on the printer 4 Lift the envelope stopper and insert an envelope stack with the flap up and the long edge first Slide the side guide in so it lightly touches the...

Page 8: ...HCOS close enough to the printer for cable connection Make sure the HCOS and the printer align correctly 10 Plug the power cable of the HCOS into the power outlet on the printer 11 Extend the locking...

Reviews: