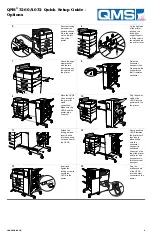
QMS 3260 Quick Setup Manual Download Page 2


®

"

1

Open the Upper-
Left door of the 
printer.

2

Locate the peel-
off labels on 
each side of the 
fuser. 

3

Peel off the label 
on the rear side 
of the fuser.

4

Use a coin to 
unscrew the rear 
side fuser plug.

5

Remove the rear 
side fuser plug.

6

Peel off the label 
on the front side 
of the fuser.

7

Use a coin to 
unscrew the 
front side fuser 
plug.

8

Remove the 
front side fuser 
plug.

 #

1

Open the paper 
tray by grasping 
the handle and 
pulling the tray 
toward you.

2

Gently lift the 
length guide and 
slide it to the 
right to the 
correct paper 
size.

Press down the 
gray handle of 
the width guide 
and adjust to the 
correct paper 
size.

Summary of Contents for 3260

Page 1: ...he front and back Set the printer down on a sturdy flat surface 3 Remove all packing tape and lower the multi purpose tray 1 Open the side and front doors of the printer 2 Unpack the toner cartridge a...

Page 2: ...the rear side fuser plug 6 Peel off the label on the front side of the fuser 7 Use a coin to unscrew the front side fuser plug 8 Remove the front side fuser plug 1 Open the paper tray by grasping the...

Page 3: ...ont panel menus Operate the printer within a temperature range of 50 90 5 F 10 32 5 C and a relative humidity range of 20 80 Install the printer on a hard level surface capable of supporting the 91 lb...

Page 4: ......

Page 5: ...ure the duplexer by hooking the safety wire of to the printer 4 Plug the duplexer cable into the printer Close the duplexer 1 Unpack the face up tray and its parts Face up tray Face up tray holder Thu...

Page 6: ...HCIF 3 With another person lift the printer and lower it onto the HCIF while noting the alignment of the covers of the printer and HCIF 4 Pull the lower tray of the printer all the way out until it st...

Page 7: ...the feeder go securely into the slots on the printer 4 Lift the envelope stopper and insert an envelope stack with the flap up and the long edge first Slide the side guide in so it lightly touches the...

Page 8: ...HCOS close enough to the printer for cable connection Make sure the HCOS and the printer align correctly 10 Plug the power cable of the HCOS into the power outlet on the printer 11 Extend the locking...

Reviews: