


Part number, Rev 2.x
Page 9
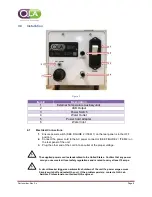
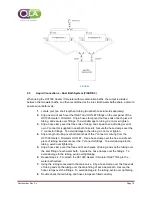
FIGURE 3
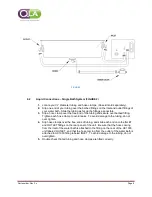
4.2
Liquid Connections
– Single Bath System (FIGURE 2)
1.
Locate your ½” diameter tubing and hose clamps. (Hose kit sold separately).
2.
Slip one end of your tubing over the barbed fittings on the inlet and outlet fittings of
your water bath. Slide the tubing as far up the fittings as possible.
3.
Slip a hose clamp over the free end of the tubing and secure over barbed fitting.
Tighten each hose clamp to avoid leaks. To avoid damage to the tubing, do not
over tighten.
4.
Slip hose clamps over the free ends of tubing, and slide each end onto the INLET
and OUTLET fittings on the rear panel of the unit. Be sure that the hose coming
from the inlet of the water bath is attached to the fitting on the rear of the HC1000
unit labeled OUTLET, and that the hose coming from the outlet of the water bath is
attached to HC1000 fitting labeled INLET. To avoid damage to the tubing, do not
overtighten.
5.
Double check that all tubing and hose clamps are fitted correctly.


